• Which the release of FS2020 we see an explosition of activity on the forun and of course we are very happy to see this. But having all questions about FS2020 in one forum becomes a bit messy. So therefore we would like to ask you all to use the following guidelines when posting your questions:

    • Tag FS2020 specific questions with the MSFS2020 tag.
    • Questions about making 3D assets can be posted in the 3D asset design forum. Either post them in the subforum of the modelling tool you use or in the general forum if they are general.
    • Questions about aircraft design can be posted in the Aircraft design forum
    • Questions about airport design can be posted in the FS2020 airport design forum. Once airport development tools have been updated for FS2020 you can post tool speciifc questions in the subforums of those tools as well of course.
    • Questions about terrain design can be posted in the FS2020 terrain design forum.
    • Questions about SimConnect can be posted in the SimConnect forum.

    Any other question that is not specific to an aspect of development or tool can be posted in the General chat forum.

    By following these guidelines we make sure that the forums remain easy to read for everybody and also that the right people can find your post to answer it.

MSFS Help with Blender Textures

Messages
503
Country
australia
Hi All,
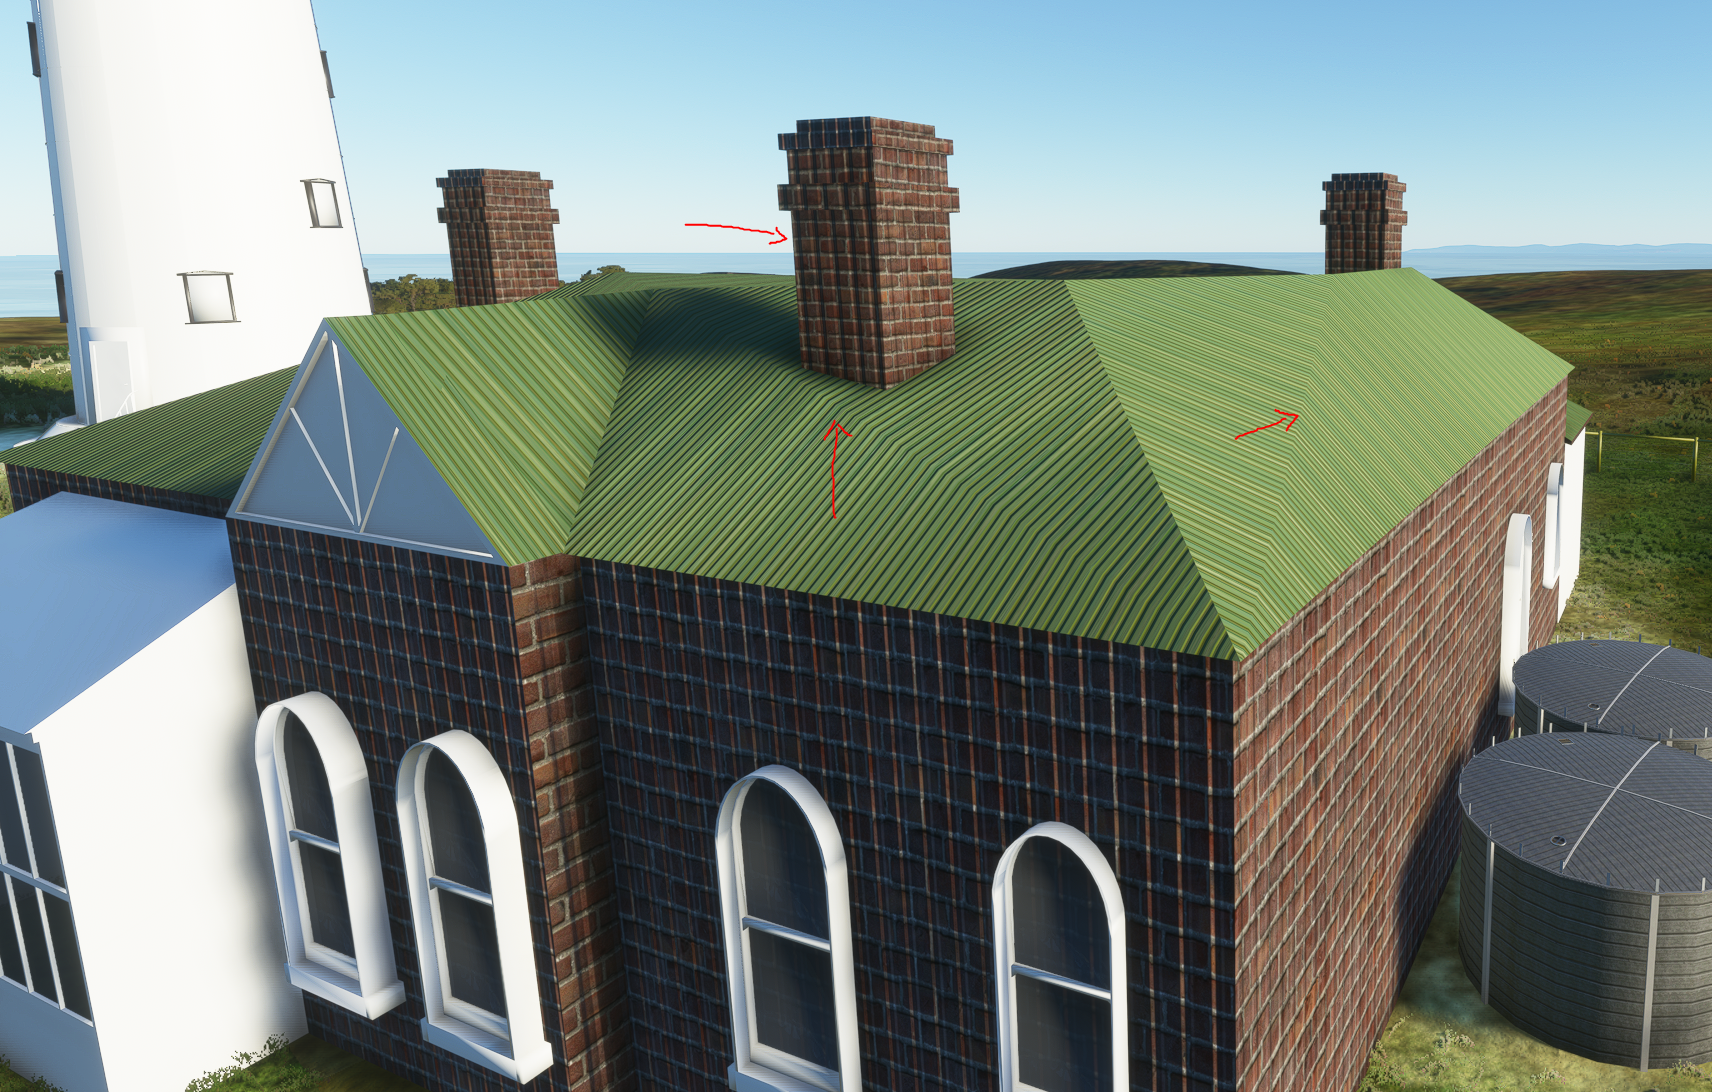
Pretty new to this and I have been working on modelling a Lighthouse Keepers cottage and have imported to MSFS 2020 - yes there are some obvious things wrong but the main things I'm seeing and need help with are:
  1. The brick texture on the front faces of the walls and chimney(s) appear to have a "crinkle" or shadow perhaps? In Blender they are flat and scaled OK EDIT - OK resolved this one - I used the Roof Metallic and Normal images instead of the Brick ones!
  2. The roof up the left side and facing the front should be flat but seem to have gained an extra 'ridge' in each face after texturing. There's nothing in x-ray view
  3. I'm using a "standard" texture for the metal roof but cannot for the life of me make it greyish with some rust. Anyone know of where I could get such a texture for use with MSFS?
Am willing to share my Blender file if it will help.

Thanks.

1622526098393.png
 
Last edited:
Messages
105
Country
ukraine
Send the belnder file with textures please if you can and I'll take a look. It's hard to tell with just a picture.
 
Messages
503
Country
australia
Hi. Here's my project. I don't see anything obvious in the Blender file with the roof crease but it's there when you export to GLTF and import to MSFS 2020. Also, to change the colour of the roof or do I need to start with an altogether different texture?
As the texture files are too big to upload, they can be found here - I selected the 2K jpg (Diffuse/Normal/Roughness)

Thanks.
 

Attachments

  • TasmanLight.zip
    474.1 KB · Views: 94
Last edited:
Messages
149
To make the roof grey and rusty, adjust the colors of the Diffuse texture in GIMP, Photoshop, etc. By the way, the Normal files from Texture Haven look to be in OpenGL format. You should invert the Green channel of the Normal texture to put in in DirectX format before using it in MSFS. See this discussion for more detail on the formatting of Normal files.
 
Messages
503
Country
australia
Thanks for the link. Makes it as clear as mud lol! :laughing:
I think I’m gathering from it that I need to check the rotation. I did do each roof face separately and turned them all over the place . In addition, I had to unpack each one to see the uv map for it, scaled it (much larger than the grid map) and basically that was it. I’m actually surprised it worked at all... :stirthepo
trouble with learning is that unless there’s a tutorial on EXACTLY what I need to do then it’s probably guess work for me!
The other thing it says is regarding inverting the format for DirectX in Blender. Thanks for the tip regarding the colour change.

So I’ll try these things and see how I go.
 
Messages
149
I downloaded your model, and there are a number of issues to address. First, you have a lot of faces in the model that are polygons other than triangles or quadrangles. The two roof faces that have issues in your picture above have 5 and 7 sides, respectively. Before texturing, you really should subdivide the faces of your model until you have nothing but triangles and/or quads. Second, when UV unwrapping your model, you need to preserve the proportions and scale of each of the faces if you want the textures to look right. Typically, to achieve this you will need to pick the edges where you want to place a seam when unwrapping. To do this, go into Edit Mode, select an edge and in the Edge menu select Make Seam. Keep creating seams until the model unwraps neatly without distortion. Then move the resulting islands around in the UV editor until the textures line up the way you want them to.
 
Messages
503
Country
australia
The two roof faces that have issues in your picture above have 5 and 7 sides, respectively. Before texturing, you really should subdivide the faces of your model until you have nothing but triangles and/or quads.
Hi and again thanks for the advice. I assume you mean from above that I need to use the knife tool to make the subdivisions? Does this also explain why in some instances I cannot use the loop cut through certain surfaces after I’ve “fiddled” a bit with the face?
 
Messages
149
Go into Edit Mode, select the face that has more than four sides, then select Triangulate Faces from the Face menu (or just hit Ctrl-T).

Actually, I just did this and it immediately made it clear that the two faces that I was talking about aren't flat at all. Which explains why they look the way they do in your picture above.
 
Messages
503
Country
australia
@trfsd So I decided to go back to the start and redo the building really to see where I’m going wrong. I’ve started with a Plane and cut away all the parts to end up with a “floor plan” that dimensionally is to scale. Where I think I’ll have trouble is raising the roof in that shape whilst keeping those ridges you noticed “flat”.
The other issue is that with a cutaway shape, should I have scaled out to create the eaves before doing the Boolean cuts (ie as a squarish shape) or is it ok after? I seem to have trouble where an X comes back on a Y
 
Messages
503
Country
australia
Thanks for the above link. I remodeled the house starting from plane, to walls, roof etc.
Where Blender appears to have an issue (could be me) is where I resize out to make an overhang: if two edges (x and y) meet at an INWARDS 90 degrees then neither edge resizes. These two have to be extruded separately after. Must be because neither will take priority and would overlap? All other edges with normal outward 90 angles work fine.
I got texturing working by following FlyingTheeson’s tutorial and using Blender and Affinity Designer (which like Fireworks) handles vectors.
The roof still gives me issues whereby the face with the issue is (in real life) an odd shape and is raised as displayed. I can find no way of triangulating it without seeing that ridge when it should not exist. Is this Blender or me? I have not yet tried re-texturing following FT’s method yet.
 
Top