• Which the release of FS2020 we see an explosition of activity on the forun and of course we are very happy to see this. But having all questions about FS2020 in one forum becomes a bit messy. So therefore we would like to ask you all to use the following guidelines when posting your questions:

    • Tag FS2020 specific questions with the MSFS2020 tag.
    • Questions about making 3D assets can be posted in the 3D asset design forum. Either post them in the subforum of the modelling tool you use or in the general forum if they are general.
    • Questions about aircraft design can be posted in the Aircraft design forum
    • Questions about airport design can be posted in the FS2020 airport design forum. Once airport development tools have been updated for FS2020 you can post tool speciifc questions in the subforums of those tools as well of course.
    • Questions about terrain design can be posted in the FS2020 terrain design forum.
    • Questions about SimConnect can be posted in the SimConnect forum.

    Any other question that is not specific to an aspect of development or tool can be posted in the General chat forum.

    By following these guidelines we make sure that the forums remain easy to read for everybody and also that the right people can find your post to answer it.

Ground Horizontal signage with GP

Pyscen

Resource contributor
Messages
2,994
Country
us-texas
BMP files can have an alpha channel within GIMP. If the BMP file in question needs an alpha channel pure black do this:

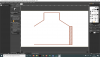
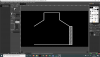
Load up the BMP file in GIMP - does it have an Alpha Channel - yes or no?

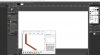
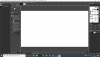
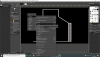
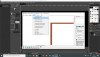
If it doesn't, add alpha channel - then to make it black, do this: From the layer stack, right-click and click on Add Layer Mask... a window will pop up:

Export_as_BMPw Alpha-2.png


Click on "Add"

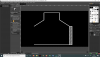
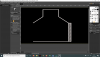
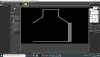
After all of this is done: right-click again within the layer stack and click on "Apply Layer Mask"
Your alpha channel is fully black.

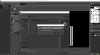
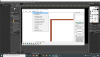
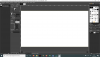
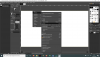
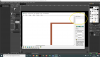
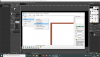
To save you will need to Export as. Make sure extension is ".bmp". This window appears:

Export_as_BMPw Alpha.png


Make sure to click on the Advanced Options and that the 32bits A8 R8 G8 B8 is selected. Export!

Done
 

tgibson

Resource contributor
Messages
11,343
Country
us-california
Your image does NOT have to have an alpha channel - that's what DXTBmp is for. When you save the Trans.BMP file and choose Alpha/Refresh Alpha, you are CREATING the alpha channel at that point. Please follow my steps exactly and you should be fine.
 
Messages
27
Country
italy
I tried both the systems but unfortunately no one is ok.

I have a problem that save the file in bmp format it's impossibile because if made so the transparency will lost.
When i hav to save the imagine before refresh alpha channel, wich is the format file? BMP? or other?
 

tgibson

Resource contributor
Messages
11,343
Country
us-california
It starts out as an 8 bit (256 color) image, so I would save it as that. But 24 bit BMP is probably OK too.
 
Messages
27
Country
italy
It starts out as an 8 bit (256 color) image, so I would save it as that. But 24 bit BMP is probably OK too.
I'm sorry, I keep going wrong and I still can't.
1. I load the image (png or bmp) in DXTBmp
2. send the image to the editor
3. I change the colors (black background and white stripes) so the image is in black and white.
4 send alpha to GIMP (see image 001) and create a trans.bmp
5. I copy the black and white image on the trans.bmp image (image 002).
6. I try to save (export) a bmp format. But the error message says: (see image 003)
"Cannot export transparently indexed images to a .bmp file"
if I export the image in bmp I lose transparency
if I export the image in other formats the job doesn't work.
How can I do it? Thanks so much
 

Attachments

  • 001.png
    001.png
    165.2 KB · Views: 82
  • 002.png
    002.png
    225.5 KB · Views: 96
  • 003.png
    003.png
    207.9 KB · Views: 87

tgibson

Resource contributor
Messages
11,343
Country
us-california
It doesn't matter if you lose transparency. DXTBmp will create it later when you create the extended BMP. Once again, you do NOT need to retain transparency when you save the Trans.BMP file.

1. Set DXTBmp to use GIMP as your editor (Prefs/Select Editor). Browse to the GIMP exe file. My GIMP exe file is in Program Files/Gimp 2/bin/gimp-2.10.exe.
2. Load the extendedbitmap.bmp into DXTBmp. Your image of red lines on a white background should appear. The alpha channel in the upper right is solid white.
3. Image/Send to Editor. GIMP opens with your image displayed.
4. Alter the image to the black and white alpha channel image.
5. Back in DXTBmp, Alpha/Send Alpha to Editor. GIMP reappears with the solid white alpha channel image.
6. In GIMP, click on the little image of your black and white image at the top of the screen.
7. Edit/Copy
8. Click on the little image of your solid white alpha channel image at the top of the screen.
9. Edit/Paste in Place
10. File/Export
11. Click on Trans.bmp in the main part of the window. Click Export button.
12. "A file named "trans.bmp" already exists. Do you want to replace it?" Click Replace button.
13. "Cannot export indexed image with transparency in BMP file format." Click the OK button. This will save the image anyway.
14. A box appears with 3 choices, be sure that numbers 2 and 3 are checked, number 1 is not. Click Export.
15. Back in DXTBmp, Alpha/Refresh Alpha. Your black and white image should appear in the upper right box.
16. File/Save As/Extended Bitmap, be sure it is in DXT1 format (not DXT1 (no alpha)), and save the image. Yes to overwrite it.

Hope this helps,
 
Messages
27
Country
italy
Hi dear, i'm so sorry but no good result.
I maked some pics to descccribe mu work, so you can see wher i'm wrong.

1. i created with GIMP a imagine in bmp extende format 32 bit (see 003) -closed GIMP.
2. i chargd the pic in the DXTBMP prtogram (see 004).
3. sended image to editor (see 005).
4. maked in black background (see 006)
5. maked stripes in white (see 007)
6 back to SXTbmp sended alpha to editor. (008 -009)
7. back to imagine and copied it (see 010)
8 pasted on to trans appha cannel pic (011 -014)

(CONT...)
 

Attachments

  • 003.png
    003.png
    293.6 KB · Views: 100
  • 004.png
    004.png
    2 MB · Views: 70
  • 005.png
    005.png
    219.9 KB · Views: 87
  • 006.png
    006.png
    208 KB · Views: 88
  • 007.png
    007.png
    220.7 KB · Views: 80
  • 008.png
    008.png
    281.8 KB · Views: 87
  • 009.png
    009.png
    189.3 KB · Views: 74
  • 010.png
    010.png
    232.2 KB · Views: 77
  • 011.png
    011.png
    222.9 KB · Views: 71
  • 012.png
    012.png
    185.6 KB · Views: 84
Messages
27
Country
italy
It doesn't matter if you lose transparency. DXTBmp will create it later when you create the extended BMP. Once again, you do NOT need to retain transparency when you save the Trans.BMP file.

1. Set DXTBmp to use GIMP as your editor (Prefs/Select Editor). Browse to the GIMP exe file. My GIMP exe file is in Program Files/Gimp 2/bin/gimp-2.10.exe.
2. Load the extendedbitmap.bmp into DXTBmp. Your image of red lines on a white background should appear. The alpha channel in the upper right is solid white.
3. Image/Send to Editor. GIMP opens with your image displayed.
4. Alter the image to the black and white alpha channel image.
5. Back in DXTBmp, Alpha/Send Alpha to Editor. GIMP reappears with the solid white alpha channel image.
6. In GIMP, click on the little image of your black and white image at the top of the screen.
7. Edit/Copy
8. Click on the little image of your solid white alpha channel image at the top of the screen.
9. Edit/Paste in Place
10. File/Export
11. Click on Trans.bmp in the main part of the window. Click Export button.
12. "A file named "trans.bmp" already exists. Do you want to replace it?" Click Replace button.
13. "Cannot export indexed image with transparency in BMP file format." Click the OK button. This will save the image anyway.
14. A box appears with 3 choices, be sure that numbers 2 and 3 are checked, number 1 is not. Click Export.
15. Back in DXTBmp, Alpha/Refresh Alpha. Your black and white image should appear in the upper right box.
16. File/Save As/Extended Bitmap, be sure it is in DXT1 format (not DXT1 (no alpha)), and save the image. Yes to overwrite it.

Hope this helps,
......CONT.....
 
Messages
27
Country
italy
......CONT.....

9. exported TRANS.BMP in bmp format (see 014-017)

10. back to DXTBmp and refresh alpha (018)

11: problem the square remain iun qhite (019)


12, saved images in two format from DXTbmp (i don't know if is right) (see (020-022)

or have i to import the trans.bmb in DXTBMP for exporting two images respectly in extended format and 24 bit format?

IN any case nothing is right i'm so sorry.


Thank you so much for the patient
 

Attachments

  • 013.png
    013.png
    217.8 KB · Views: 83
  • 014.png
    014.png
    220.7 KB · Views: 69
  • 017.png
    017.png
    221.8 KB · Views: 75
  • 016.png
    016.png
    245.7 KB · Views: 89
  • 015.png
    015.png
    249.1 KB · Views: 99
  • 018.png
    018.png
    284 KB · Views: 77
  • 019.png
    019.png
    249.6 KB · Views: 82
  • 020.png
    020.png
    273.9 KB · Views: 83
  • 021.png
    021.png
    274 KB · Views: 76
  • 022.png
    022.png
    1.3 MB · Views: 73

tgibson

Resource contributor
Messages
11,343
Country
us-california
Sorry, this process works for me. If you can save the trans.bmp image in GIMP as a separate file onto your hard drive (File/Save As, etc.), then back in DXTBmp use Alpha/Import Alpha Channel, click OK at the warning box, browse to your new alpha channel image (i.e. trans.bmp) on your hard drive, and click Open at the next box.

Hope this helps,
 
Messages
27
Country
italy
Finally i solved.

it was all much simpler and few and clear indications were enough.

This is the procedure:

1. Upload imagine (*.png) in DXBBmp

in DXTBmp:
2. Apply alpha from color (background)
3. Apply alpha to image
4. Export to Bmp extended and 24 bit.(selecting DXT1 - NOT no alpha!!)
5. nally use the same image as the base of the two textures (Bitmap extended and 24 bit bmp - obviously using DXTBmp)

Thanks to all
 
Top