• Which the release of FS2020 we see an explosition of activity on the forun and of course we are very happy to see this. But having all questions about FS2020 in one forum becomes a bit messy. So therefore we would like to ask you all to use the following guidelines when posting your questions:

    • Tag FS2020 specific questions with the MSFS2020 tag.
    • Questions about making 3D assets can be posted in the 3D asset design forum. Either post them in the subforum of the modelling tool you use or in the general forum if they are general.
    • Questions about aircraft design can be posted in the Aircraft design forum
    • Questions about airport design can be posted in the FS2020 airport design forum. Once airport development tools have been updated for FS2020 you can post tool speciifc questions in the subforums of those tools as well of course.
    • Questions about terrain design can be posted in the FS2020 terrain design forum.
    • Questions about SimConnect can be posted in the SimConnect forum.

    Any other question that is not specific to an aspect of development or tool can be posted in the General chat forum.

    By following these guidelines we make sure that the forums remain easy to read for everybody and also that the right people can find your post to answer it.

LOFTS Ground Poly Edges.

Messages
1,959
Country
unitedkingdom
I don't know why it has taken me so long to work this out but, why on earth re-draw the outside of ground polys, loft texture, and then spend ages lining it up, like it tells you in the tutorial. When you can clone the closed spline which you drew the apron/taxiway with, and then loft that. It ends up being perfectly in place!
:p
 
Messages
75
Country
unitedstates
LOL. Yep, I think that is one of the things many of us do, but it never got 'written down'. :) The 'create shape' button is worth its weight in gold.
 

jtanabodee

Resource contributor
Messages
3,921
Country
thailand
That's true. You don't need to draw things twice. What I usually do.
1. Draw the line of the taxiway and runway. Do the boolean to merge all the closed splines together. This will let the runways and taxiways join together seamlessly.
2. Convert those into polygon.
3. Apply texture to the polygon of the taxiways and runways polygon.
4. Select the edges of the runways and taxiway and use Create Shape command. Then I'll get the line for lofting.
5. Switch to the front view and draw the Template of the edge. The same way you do for Template of Line. But the different is you need to move the center of the spline to the either end of the template. You might need two templates since the line that you get from step 4 is not on the center of the loft but will be on the edge of the loft. Lofting will be controlled by the center of template. If you have the center of the template at the middle of the spline, you loft will be made from the center. But if you move the center of the template to the edge of the spline, Loft will be generate using your line in step 4 as the edge.
6. Apply texture to the lofting edge.

I have attached the Line Template and Edge Template example.
 

Attachments

  • LineLofting.jpg
    LineLofting.jpg
    15.7 KB · Views: 1,020
  • EdgeLofting.jpg
    EdgeLofting.jpg
    16.4 KB · Views: 991
Messages
374
Country
italy
I use the same way to create the fence, but sometimes I've to rotate 90° CCW my texture. In the Material Editor I set the rotation to 90 in order to align correctly the texture but when I export into FS the texture itself is not rotated. Any hints?
 
Messages
1,959
Country
unitedkingdom
Strange... It's probably to do with dds needing to be flipped upside down?


jtanabodee I don't understand, you say you create the taxiways, turn to a polygon, create the line again and re-draw over it?

With the way my side texture is (It's the same size as my asphalt texture but with 50% missing), Before converting to a polygon I clone the line, even a closed spline, and loft this, then convert the original to the polygon. Then it's all finished.

What's "create shape"?
 

jtanabodee

Resource contributor
Messages
3,921
Country
thailand
jtanabodee I don't understand, you say you create the taxiways, turn to a polygon, create the line again and re-draw over it?

What's "create shape"?
If I turn the spline to poly, I'll lost the spline. I turn it in to polygon and select the edge just where I want and make spline again by "create shape".
It time for mini tutorial here.
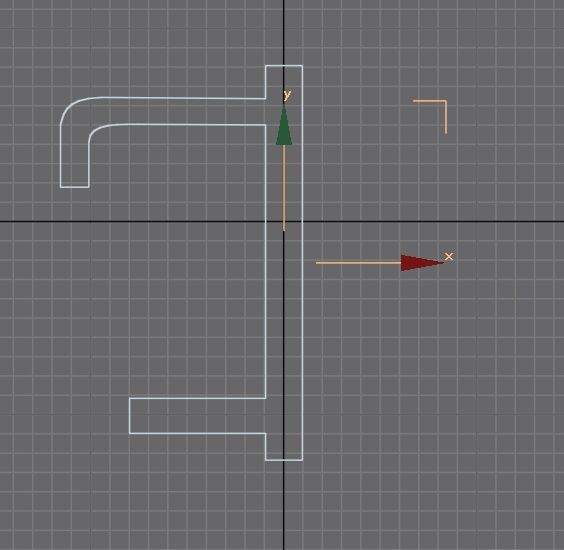
1. I draw a rectangle to be runway here and another spline to represent taxiway.

01_zps5251bdc7.jpg

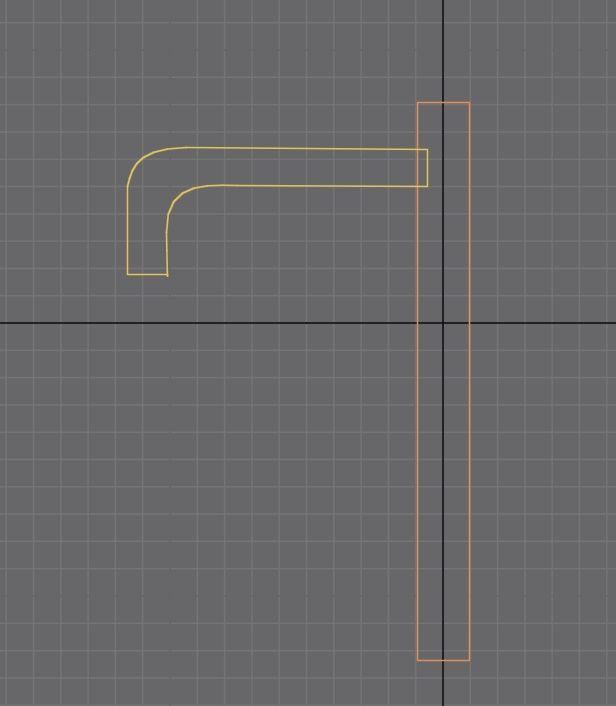
2.Then I turn it to be editable spline and attache them together. In the picture I have added the taxiway on the south of this runway too. I do the boolean on the runway and taxiway to joint them together. In this pic, I combined the south taxiway already. But the north one is still another spline.

02_zps799cb1a6.jpg


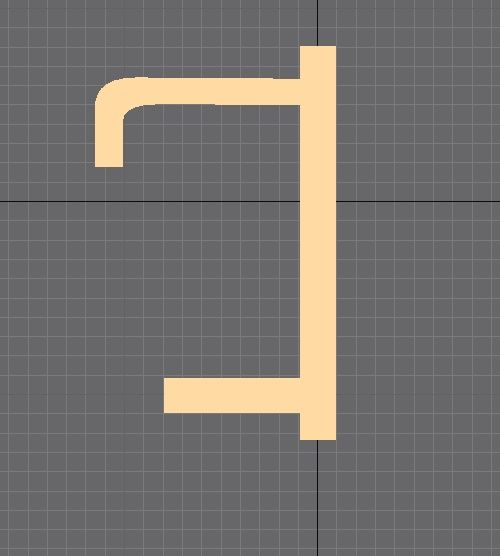
3. Now I got the runway and taxiway seamlessly together.
03_zps748b71ca.jpg


4. I turn this into polygon. I can apply asphalt texture (if they are the same material, or else you need to separate them.)
04_zps6aad4786.jpg


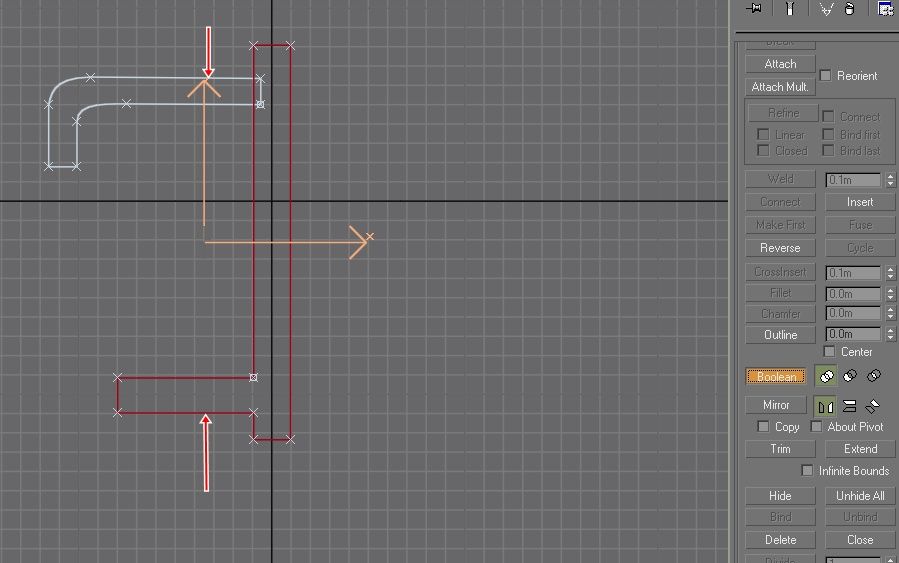
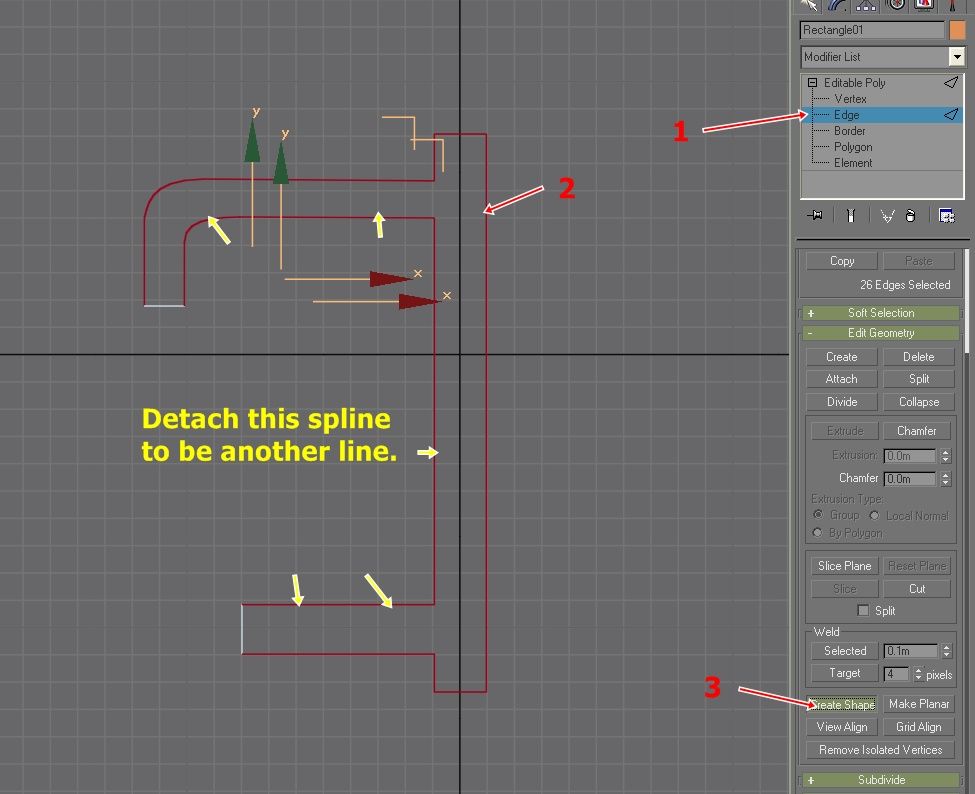
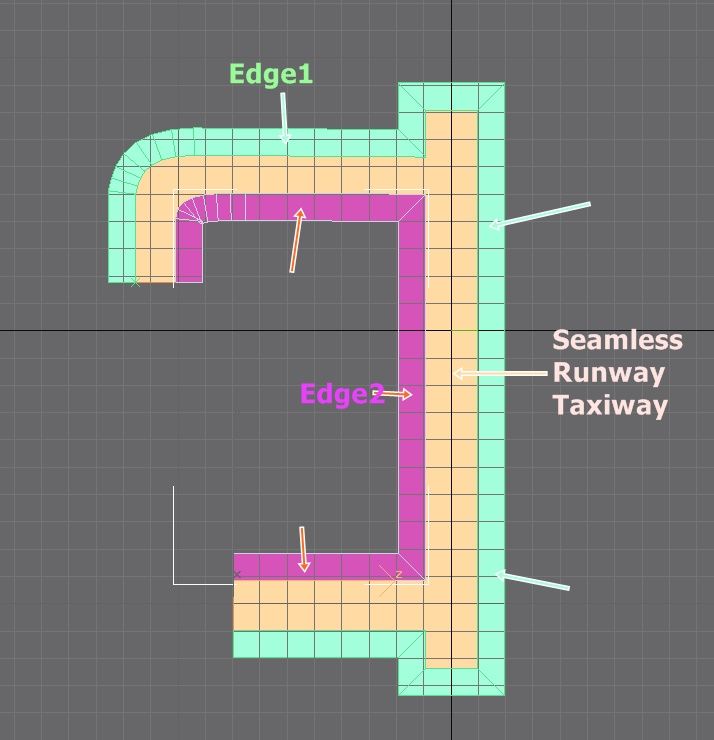
5.Now it's time for making edge. You can select the edge of the polygon (1) here where you need the edge of the runway taxiway(2). Note that I don't select the end of the runway. Then click on Create Shape button (3). The dialog box will show up let you choose between smooth and linear. Please choose linear. Now you got the line for lofting to be the edge of taxiway. If there are two splines you need to detach them to be single line (yellow arrow).
05_zps19138a31.jpg


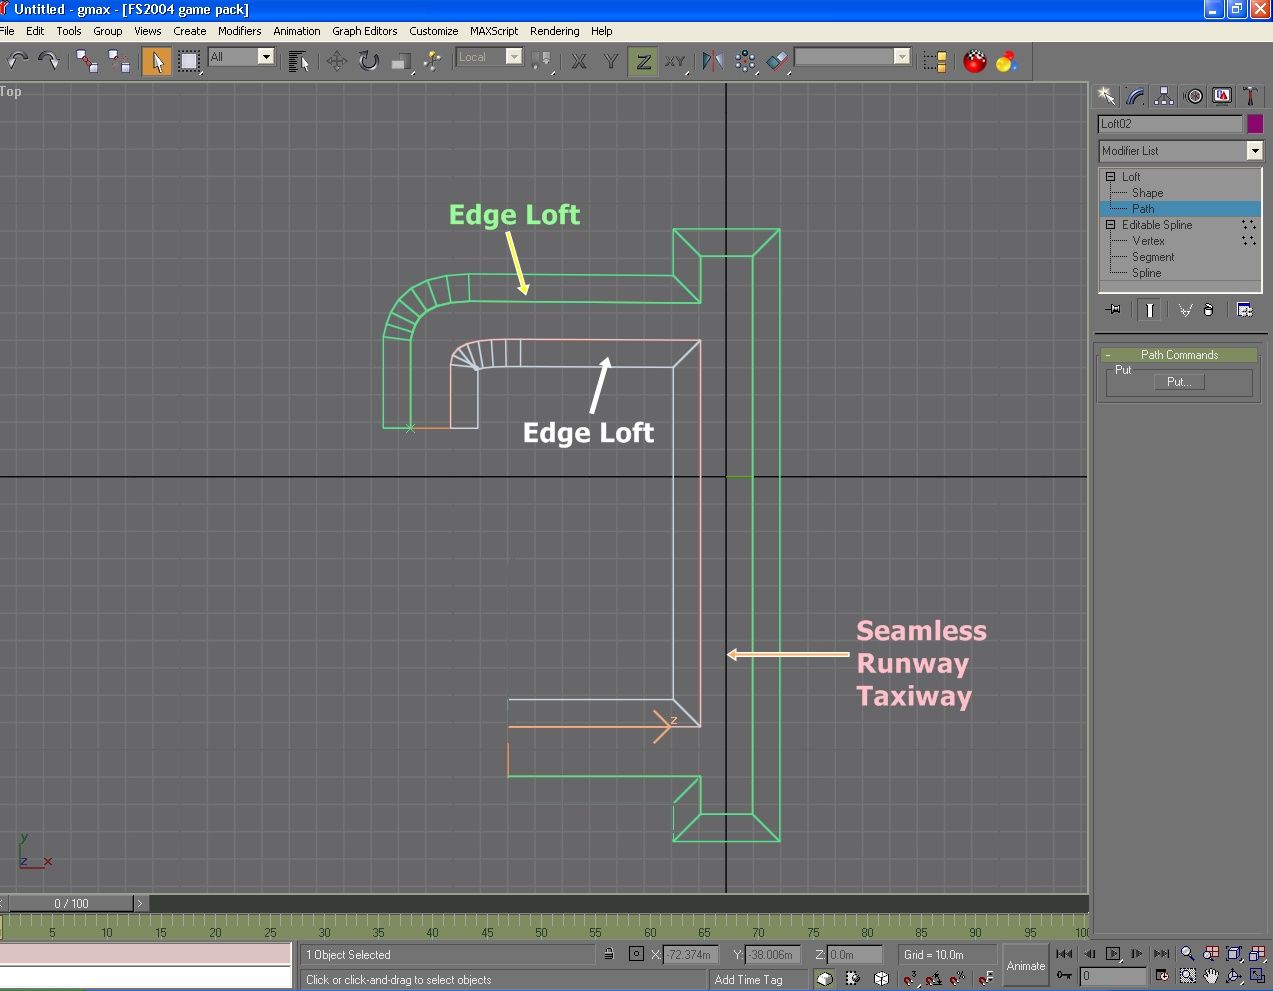
6. Now do the lofting as usual. The template of the lofting is the same as making lines but you need to move the center to the either end of the spline that you draw.
Sometime the edge seem to be inward (protrude into taxiway). To correct this you just assign the last vertex to be the first one by clicking on selected vertex and use "Make First" button. You will get the right oriented edge loft.
06_zps2c797192.jpg


7. You can apply all the textures now.
06_zps57e50de1.jpg


Easy, don't you think. You don't need to draw line twice. You got the edge and taxiway runway at the same time. Moreover they will be seamlessly and fit together, no doubt about it.

I have been thinking about making this quite a long time and I feel confident enough to share this method to the others.

For big airport, it is not easy to make. But I think I got two birds in one shot by this method.

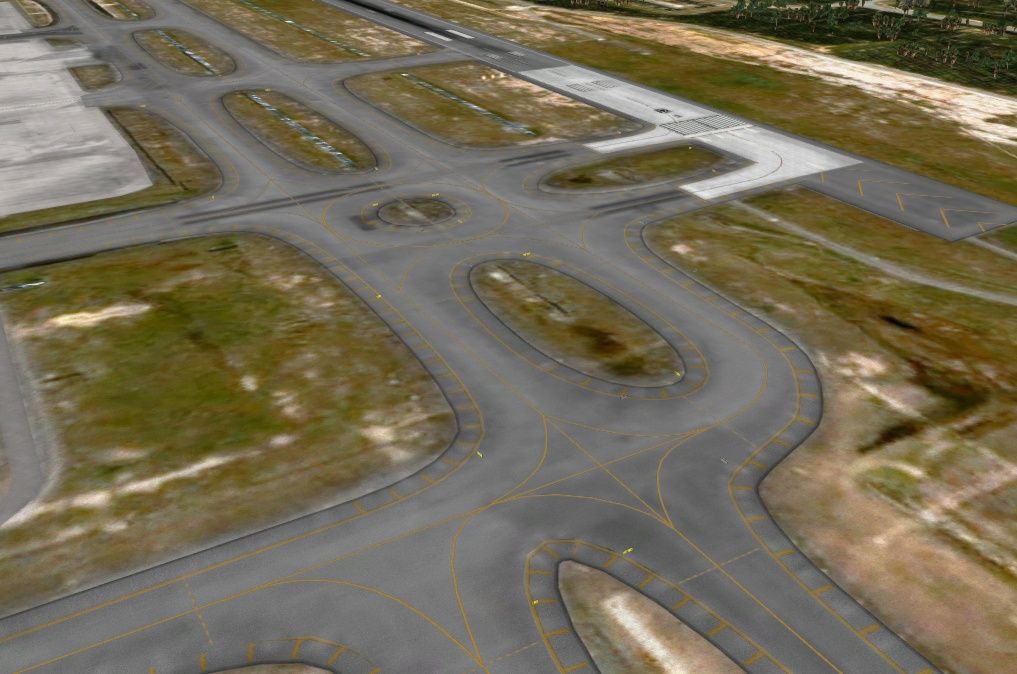
The taxiways and runways in my WMKK project are seamless by this way.

WMKK08.jpg


I took me an hour to make this mini tutorial. Hope you get what I tried to say.
 
Last edited:
Messages
374
Country
italy
This tutorial is very nice and I'm currently using this technique to create edges of my runway/taxiways. The new point for me is the boolean trick to merge multiple polys :D
 

jtanabodee

Resource contributor
Messages
3,921
Country
thailand
This tutorial is very nice and I'm currently using this technique to create edges of my runway/taxiways. The new point for me is the boolean trick to merge multiple polys :D
Boolean does not work correctly if you turn it into poly. You need to boolean while it is spline. It works better.
 
Messages
1,959
Country
unitedkingdom
Thanks jtanabodee! I didn't expect you to spend so much time explaining it, but it's really nice of you to do so. I will use this method in the future!:)
 
Messages
1,693
Country
unitedstates
Now I dont want to be picky, but the edge resembles a shoulder :D

Seriously, that is a nice tutorial. Very helpful. I dont use Gmax but if I did this would definitely help me out.
 
Messages
75
Country
unitedstates
Ha ha. Well, jtanabodee's edge is much wider than mine, probably because he is including the yellow side markings.

You can control the width of the edge by changing the size of the spline segment you use for the 'get shape' in the loft dialogue. :)
 

jtanabodee

Resource contributor
Messages
3,921
Country
thailand
This is gmax file that I did just for tutorial not a real project. So it is not in good proportion to the real thing. You can change the width of the edge to any size or you can use options in lofting to make it wider or taper along the way. Sorry I don't have gmax now. It might be Displacement or some thing.
 
Messages
35
Country
israel
Hi,
thans alot for this tutorial and it's will solve me alot of hand-work.
but from this tutorial i cant understand what is the taplate of the lines?
i make shape from the edges, but what is the template in need to loft from?

Raz.
 
Messages
35
Country
israel
Tejal- thanks for your replay.
my mistake way about the kind of the template. iv just change the teplate from rectangle (which give me 3d loftig) to only 1 spline- and its done!

just want to share my feeling (I think not only mine...)- those ground polys are suck and take from you so much energy.....the modeling and texturing of the 3d's buildings and objects are the simple part of the scenery, not matter how complicate are them.

Raz.
 
Messages
3,278
Country
spain
Yes, take a look to the ground poly wizard tool of Modelconvertex too. if the lofts give problem of flickering, can be a headache too, but the lofts once you get the hang are very easy to make but yes a very detailed work.
 

jtanabodee

Resource contributor
Messages
3,921
Country
thailand
just want to share my feeling (I think not only mine...)- those ground polys are suck and take from you so much energy.....the modeling and texturing of the 3d's buildings and objects are the simple part of the scenery, not matter how complicate are them.

Raz.

I don't think so, Raz. It will take some but not so much.
If you do it right focusing on drawcall.
You have to make all the lines texture and edge that you use to the same sheet of texture. So it will take only one drawcall.

DO NOT use ground poly technique for satellite photos. Each photo take one draw call. If you have 24 or 30 plan of satellite photos, it is already 24 drawcalls. For FSX use photoscenery instead.
 
A

Aviasim

Guest
Most difficult thing with lofting ground poly edges is acute angle and 90 degree angles...distorts the texture big time and for acute angles it gets very messy
 
Top