-
Which the release of FS2020 we see an explosition of activity on the forun and of course we are very happy to see this. But having all questions about FS2020 in one forum becomes a bit messy. So therefore we would like to ask you all to use the following guidelines when posting your questions:
- Tag FS2020 specific questions with the MSFS2020 tag.
- Questions about making 3D assets can be posted in the 3D asset design forum. Either post them in the subforum of the modelling tool you use or in the general forum if they are general.
- Questions about aircraft design can be posted in the Aircraft design forum
- Questions about airport design can be posted in the FS2020 airport design forum. Once airport development tools have been updated for FS2020 you can post tool speciifc questions in the subforums of those tools as well of course.
- Questions about terrain design can be posted in the FS2020 terrain design forum.
- Questions about SimConnect can be posted in the SimConnect forum.
Any other question that is not specific to an aspect of development or tool can be posted in the General chat forum.
By following these guidelines we make sure that the forums remain easy to read for everybody and also that the right people can find your post to answer it.
You are using an out of date browser. It may not display this or other websites correctly.
You should upgrade or use an alternative browser.
You should upgrade or use an alternative browser.
Surface Painted Taxiway Direction Signs
- Thread starter mathurpc
- Start date

That's not how the User Manual directs how textures are to be created. 24-bit textures are not displayed by FlightSim. They should go into the ADE Textures_Dpy folder. You must create DXT (or 32-bit) textures for Flightsim and to go into ADE's Textures folder.I created my own textures and saved it in 24-bit bmp format in ADE's default Textures folder
Don
Don,
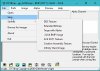
OK, help me on this please - so I am using the DXTbmp tool to convert the file to the correct format and when I click Save As I get the list of file types as shown in the attached file. I tried to use DDS Textures and Extended Bitmap but these two formats don't work. So, which format should I use. Is there any tool other than DXTbmp.exe?
Pramod
Attachments
tgibson
Resource contributor
- Messages
- 11,338
- Country
-

After you choose Extended Bitmap, you need to select DXT1 With Alpha or DXT3 using the drop down box. And as Don says, you won't get a transparent background without an alpha channel (so if your texture includes the correct background color you won't need it). And those formats and DXTBmp do work, I've created several ground polys using them.
To get the textures to show up in the Editor, you need to read the GP manual carefully in the section where it talks about Adding New Textures.
To get the textures to show up in the Editor, you need to read the GP manual carefully in the section where it talks about Adding New Textures.

If you are placing signs on taxiways' - aprons , an alley etc then unless they are already in the custom poly section then its completely correct what Don says, you have to create your own. Then you will need to place one version in the TEXTURES folder in ADE this will be DXT version so that flight sim can see it and then in Textures_Dpy you place a BMP version - These will be the same graphic just one converted using DTXBMP.
By creating your own (A) you learn a great set of skills (B) you can make changes at will (C) you can add in the little bits of candy that are frequently missing.
here's some of Heathrow (EGLL) Im knocking together after becoming frustrated with online ATC bending my exhaust pipe for wrong taxi routes and not stopping in accordance with NATS charts (Not of course realising that old fsx scenery is nowhere near it and newer versions often don't get the taxi signs correct for hold points , closed taxiways etc.
These are the first rushes of the ground markers and some of the taxi signs being set up. If you don't want to go down the road of creating ground making you can utilise taxi signage as some APs actually have taxi signs that are full of information for pilot use; not just pointers to taxiways and gates

Here Im adding both HOLD POSITION lights because of the issue of washout when some aircraft lighting is used and a stronger ground paint to for the same reason. These can be tweaked according to test results now by simply making small edits to the graphic, overwriting it in the texture folders and then making sure that the Ground poly Texture is corrected again.
Yet to add are the gate numbers which I have created 3 sheets, 001 to 999) so that I'm not messing about with single digits and getting them located and the ground arrows which are more frequently used now than ever and can aid pilot navigation when on the ground -
By taking some time to learn the creation and editing of ground markers this will pay dividends later - Using the Custom Poly tool in ADE takes a little trial and error . Don't start learning it with the intention of "Ill get it perfect immediately" That won't work. Try a simple double yellow line near a gate or near a runway so you can get to it and look at it. Use a notepad if necessary to write down your steps of creation and placement - amend if required - look on you tube and read the manual as well.
By creating your own (A) you learn a great set of skills (B) you can make changes at will (C) you can add in the little bits of candy that are frequently missing.
here's some of Heathrow (EGLL) Im knocking together after becoming frustrated with online ATC bending my exhaust pipe for wrong taxi routes and not stopping in accordance with NATS charts (Not of course realising that old fsx scenery is nowhere near it and newer versions often don't get the taxi signs correct for hold points , closed taxiways etc.
These are the first rushes of the ground markers and some of the taxi signs being set up. If you don't want to go down the road of creating ground making you can utilise taxi signage as some APs actually have taxi signs that are full of information for pilot use; not just pointers to taxiways and gates
Here Im adding both HOLD POSITION lights because of the issue of washout when some aircraft lighting is used and a stronger ground paint to for the same reason. These can be tweaked according to test results now by simply making small edits to the graphic, overwriting it in the texture folders and then making sure that the Ground poly Texture is corrected again.
Yet to add are the gate numbers which I have created 3 sheets, 001 to 999) so that I'm not messing about with single digits and getting them located and the ground arrows which are more frequently used now than ever and can aid pilot navigation when on the ground -
By taking some time to learn the creation and editing of ground markers this will pay dividends later - Using the Custom Poly tool in ADE takes a little trial and error . Don't start learning it with the intention of "Ill get it perfect immediately" That won't work. Try a simple double yellow line near a gate or near a runway so you can get to it and look at it. Use a notepad if necessary to write down your steps of creation and placement - amend if required - look on you tube and read the manual as well.
Attachments
- Messages
- 149
- Country
-

Good morning.
Okay, I can successfully use the above method to create apron signs -,but only if I use what is already in ADE. When I try to add my own custom signs, they don’t show in FSX. I think I have followed the directions correctly.
I’ve made a sign with photoshop. Saved it as a 24 bit BMP and placed that in the texture.dpy folder. It shows up in ADE and I have declared it using the GP texture editor tool. I have saved another 32 bit BMP copy of my texture and converted it to DTX3 extended bmp (with DXTBmp) and placed this in the ADE texture folder. The texture is now showing: DXT3 256x256 16bit. If I stop here and reload the scenery, I get a black box in the sim where the poly should be. If I copy the same texture and place it in the scenery’s texture folder, the black box goes away and I just see the apron. Comparing my custom texture to what is already in ADE, it looks like my alpha channel is wrong. Using DXTBmp, my custom gp’s alpha channel is white. When I check the others, like gp_red_20F, it’s alpha channel looks grey.
In photoshop, I checked under the channels tab and I just saw these four: RGB, Red, Green, and Blue. When I add an alpha channel, it looks black. I have tried opacities of both 0 and 100%, but I see no difference.
When I save the photoshop file to bmp, alpha channels is checked. Am I correct in assuming this is an alpha channel issue?
As it was mentioned in another post, I do not have a flatten or an exclude directly under my ground poly.
Thanks.
Last edited:
You haven't told us what version of Flightsim/P3D you are using. If a recent version of P3D, try making DXT5 textures rather than DXT3. Since using stock textures works, the issue definitely is your new texture.
While it's good practice to add a flatten at ARP elevation, that would not seem to be the cause of your current issue.
Don
While it's good practice to add a flatten at ARP elevation, that would not seem to be the cause of your current issue.
Don
- Messages
- 149
- Country
-
Don,
I'm using FSX.
I didn't think the flatten was an issue, I just read it in another post and figured it wouldn't hurt to check.
Yes, I think it is something I'm doing to the texture. If I take one of the stock texture - gp_red_20f - and convert it to a photoshop file using DXTBmp and then save it as a BMP again, something goes wrong along the way. I go through all the steps in creating a custom texture and I get the same result - nothing show up in FSX.
My DXTBmp doesn't have a .psd file save option.If I take one of the stock texture - gp_red_20f - and convert it to a photoshop file using DXTBmp and then save it as a BMP again,
Unless you are creating a Targa + alpha file which you then manipulate with some external image editor to change the color before loading the modified file back into DXTBmp and saving as DXT5, it's not clear you are generating a "good" file. I use Photoshop to create 24-bit .bmps of both the image and the alpha. Then, I load both into ImageTool (DXTBmp will also work_) and save as DXT1, DXT3 (.bmp so FS9 can read) or DXT5 (.dds).
Don
- Messages
- 149
- Country
-
I use 'send to editor ' under Image which goes straight to photoshop as a BMP, but then I can save it as a psd to edit it later. Probably creating work for myself, but that's just what I've always done.
Just before I read your post, I found 'import alpha' in DXTBmp. Was able to open the alpha in photoshop, save it as its own BMP and then import it to my texture file.
All looks good.
Thanks Don.
Just before I read your post, I found 'import alpha' in DXTBmp. Was able to open the alpha in photoshop, save it as its own BMP and then import it to my texture file.
All looks good.
Thanks Don.
I used ps to create. However, i always use dxtbmp for any fsx work toconvert. I save as a bmp for the texture_dpy , 24 byte i then open that with dxtbmp and save it as dtx3 24byte its save to the desktop and i cut and paste it in the ade, Textures folder. I dont use photoshop addons or anything else to convert, save the dxt files that way i have a moe stable process. Your saving as 32 byte from reading here and this might be the spanner in the works
Sorry about typos, im using my kindle as im creating textures for egll on the main comp next to me. Multi tasking huh!
Sorry about typos, im using my kindle as im creating textures for egll on the main comp next to me. Multi tasking huh!
")
- Messages
- 216
- Country
-

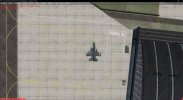
As you can see on the previous replay, I have added a text 'PARKING' and everything works perfectly. I have adapted it a bit and added a second text 'PARKING' (photo 1). While compiling I now get an error message (photo2). What went wrong?
Of course I am going to try this again, but I would like to know what I did wrong.
Of course I am going to try this again, but I would like to know what I did wrong.

