Difference between revisions of "Exporting a GMax object into FSX"
(→Show your Gmax model in FsX) |
(→Export the model to a mdl file) |
||
| Line 23: | Line 23: | ||
* Select from the upper menu "File > Export..." | * Select from the upper menu "File > Export..." | ||
* Select "Flightsim Model (*.MDL)" as file type | * Select "Flightsim Model (*.MDL)" as file type | ||
| − | * Give the file a name. In my example I called it Box. <br><br>[[Image:exportToMdl.jpg]]<br><br> | + | * Give the file a name. In my example I called it Box. <br><br>[[Image:exportToMdl.jpg|border|500px]]<br><br> |
* Browse to a directory where this mdl needs to be stored | * Browse to a directory where this mdl needs to be stored | ||
| − | * Click Save. The following window will/might appear: <br><br>[[Image:mixedMaterials.jpg]]<br><br> | + | * Click Save. The following window will/might appear: <br><br>[[Image:mixedMaterials.jpg|border|500px]]<br><br> |
* Click Yes to export the model to FsX format. The following window appears: <br><br>[[Image:modelExportOptions.jpg]]<br><br> | * Click Yes to export the model to FsX format. The following window appears: <br><br>[[Image:modelExportOptions.jpg]]<br><br> | ||
* Notice the options but leave all values on their default settings for now. Click OK. | * Notice the options but leave all values on their default settings for now. Click OK. | ||
| + | <br> | ||
== Create an FsX library bgl == | == Create an FsX library bgl == | ||
Revision as of 11:38, 1 November 2007
Contents
Show your Gmax model in FsX
The SDK explains how to get a model from 3ds Max into FsX, but doing the same for a Gmax model is hardly described. This document does. To keep it simple and just practice how to get your model into FsX, create a simple model in Gmax. I've created a box which is an object you will probably use the most.

Now it's time to show this model in FsX. That's what it is all about.
Prepare your Gmax model for exporting
Add a GUID and Friendly name to your model:
- Select from the upper menu "FS Tools > LODNameTool". The "LOD and GUID tools" window appears:

- Click the button "Create new GUID for this file" which results in a small new window asking for a friendly name.
- Fill in a friendly name. In my example I called it Box.
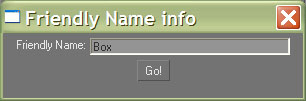
- Click the Go! button.
- Close the "LOD and GUID tools" window
- Just to have a look where this GUID is stored choose "File > Properties > tab Custom".


Export the model to a mdl file
- Select from the upper menu "File > Export..."
- Select "Flightsim Model (*.MDL)" as file type
- Give the file a name. In my example I called it Box.

- Browse to a directory where this mdl needs to be stored
- Click Save. The following window will/might appear:

- Click Yes to export the model to FsX format. The following window appears:
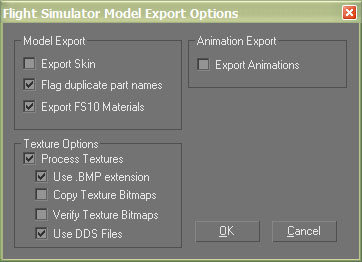
- Notice the options but leave all values on their default settings for now. Click OK.


Create an FsX library bgl
Create an FsX library bgl by installing, configuring and using a simple tool called Library Creator XML. A FsX library is a bgl file which contains you exported mdl files.
Create a placement bgl
Now you're one step away before viewing your model in FsX. The FsX library contains de models, but at this moment nothing is mentioned how to place this model on the right position (coordinates) in FsX. If you're up to creating an airport or other area of the same size, it is best to use tools like FSX Planner or Airport Design Editor (ADE). If you're planning to make models which are scattered around a wider area it is probably best to read the coordinates from FsX in top down view and edit a xml file via a teksteditor.
The following xml example can be used as a blueprint:
<FSData version="9.0"
        xmlns:xsi="http://www.w3.org/2001/XMLSchema-instance"
        xsi:noNamespaceSchemaLocation="bglcomp.xsd">

    <SceneryObject lat="52 27.52" lon="5 31.30"
                   alt="0M" pitch="0.0" bank="0.0"
                   heading="317.6" altitudeIsAgl="TRUE"
                   imageComplexity="SPARSE">
        <LibraryObject name="{879C35D2-5698-4CA9-9EBA-8D7CAA717495}"
                       scale="1.0"/>
    </SceneryObject>

</FSData>
- Store this xml in a directory and open it with a teksteditor like Notepad, Ultraedit, vi :-), vim, etc. In my example I called it my_sample_placement.xml
- First get the coordinates by slewing in FsX in top down view to the right location. The coordinate in this sample are at Lelystad Airport in the Netherlands (EHLE). By pressing <shift>-z (capital Z) several times you will see the coordinates in the left upper corner. Put those coordinates in the xml file as lat and lon values.
- Deside on the heading value.
- Get the GUID (including curly brackets) from the mdl file. You can see this in the Gmax file via file > Properties > tab Custom or get it by using Library Creator XML. Use copy/paste to avoid typo's.
- Let all other values at their default.
- Repeat the <SceneryObject ...></SceneryObject> part for each model (mdl file).
- Compile this xml file by dropping it on BglComp.exe which can be found in the SDK. In a default installation this will be "C:\Program Files\Microsoft Games\Microsoft Flight Simulator X SDK\SDK\Environment Kit\BGL Compiler SDK".
- The bgl will be found next to the xml file
View the results in FsX
Now you have both needed bgl's: one library and one placement bgl. Now they need to be put in a directory so that FsX will load them.
- Put the bgls in for example the "Addon Scenery\scenery" directory which can be found in the main FsX directory. Be sure this Addon Scenery is enable in the scenery library of FsX (start FsX > Settings > Scenery Settings). Feel free to create your own scenery directory.
- Start FsX and fly or slew to the position of your new model.
Have fun!