Difference between revisions of "Exporting from 3DSMax using Pandasoft plugin"
(→In 3D Studio) |
(→Export Options) |
||
| Line 41: | Line 41: | ||
There are many options here to choose from. Some of them do not apply to FS models and so can be ignored. At the moment I have found that the following options work, however, I have not tested animation. If you are going to use XAttach make sure that you choose the Text format in the X File Settings tab. | There are many options here to choose from. Some of them do not apply to FS models and so can be ignored. At the moment I have found that the following options work, however, I have not tested animation. If you are going to use XAttach make sure that you choose the Text format in the X File Settings tab. | ||
| − | [[Image:export1.jpg]] | + | [[Image:export1.jpg]]<br> |
Objects options | Objects options | ||
| − | [[Image:export2.jpg]] | + | [[Image:export2.jpg]]<br> |
Animation options | Animation options | ||
| − | [[Image:export3.jpg]] | + | [[Image:export3.jpg]]<br> |
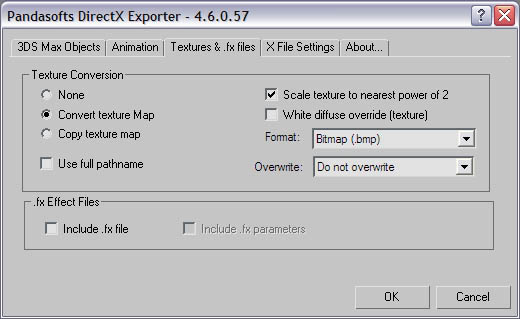
Textures and fx options | Textures and fx options | ||
| − | [[Image:export4.jpg]] | + | [[Image:export4.jpg]]<br> |
DirectX file settings | DirectX file settings | ||
Revision as of 10:21, 1 October 2006
Using the MakeMDL tool from Microsoft it is possible to export models from any 3D modelling program that supports the DirectX (*.X) format. This tutorial will step you through what you need to export from GMax’s bigger brother, 3D Studio Max. This general method could also be used to export from other programs (such as blender).
Edit: Though it is mentioned above that Blender can be used, there are issues to be overcome. Current work on trying to get blender to work seamlessly with makeMDL is going slowly. Only an hour ago, I downloaded the June 2006 version of the DX SDK and Blender 2.42 was just recently released. I will be upgrading to it momentarily and then undertake an in-depth study of the differences between the X files produced by Blender's DX9 exporter and Gmax/middleman. I will also grab Pandasoft's exporter to see what other differences, if any, there are in it's X file vs. the one captured by middleman.
Contents
What you need
- 3D Studio Max (any version greater than 3 should work)
- Pandasoft X file plugin or Microsoft DirectX Extensions for Max 7.0 (from new directx 9c) as alternative
- MakeMDL
- XAttach (for platforms, no crash etc)
Installing the Pandasoft Plugin
Because 3dsMax does not export to the X file format ‘out of the box’ then we have to use this great plugin by Pandasoft. If you haven’t got it you can download it from their website. There are different downloads for different versions of 3dsMax so make sure you grab the right one for you – if you don’t 3dsMax will produce an error on start up.
Once you have downloaded the plugin simply extract it from the zip file into the plugins subfolder of 3dsMax, for me the complete path was F:\3dsmax6\plugins. It’s a good idea to start up 3dsMax and see if it’s working. Select File > Export and then at the base of the file dialog you should be able to select Pandasoft DirectX as the file type.
In 3D Studio
For the purposes of this tutorial I’m going to use a simple scene I quickly put together that consists of some power poles and a helipad. I’ve also applied a wood texture to the power poles to show you that texturing works.
With the scenery modelled and plugin installed we can now export. There are two ways to export your model:
- export part of the model or
- export everything
I have added a few other objects such as a ground plane and a light for rendering purposes and I don’t want those to be exported, so I’m going to choose what I export. Using this method is handy if you want only want to view a small part of the overall model.
It is important to note here that if you wish to use XAttach later you will need to ensure that there are no duplicate part names. This is due to a limitation of XAttach, but I suppose it is good practise to give them unique names.
Using the select by name window, I select the objects I want to export. Close the window by clicking the select button. Keeping the objects selected, go to the menu and click File > Export Selected. To export the complete model, you do not have to select what you want to export just use the Export method in the File menu rather than Export Selected. Browse to a suitable folder, give the file a name and, most importantly, select Panda DirectX as the file format. Click save and the exported options window will appear.

Selecting the objects to export
Export Options
There are many options here to choose from. Some of them do not apply to FS models and so can be ignored. At the moment I have found that the following options work, however, I have not tested animation. If you are going to use XAttach make sure that you choose the Text format in the X File Settings tab.
Creating the MDL
The final step is to create the MDL file using MakeMDL. All you need to do is open MakeMDL and select your X file as the input. Select the output file and thats it. If you want to use any of Arno's tools then ensure you have the Keep Files option in MakeMDL checked.


