ModelConverterX
| | This manual is for the latest stable version of ModelConverterX. There is also a development release available, which contains more features. But it might be less stable and have some bugs. If your model is not read correctly in the stable release, please try the development release. |
ModelConverterX is a tool which primary function is, as the name already implies, to convert models. The tool allows you to import models from different formats and can then export them to other formats. For example you can import your old SCASM macros or COLLADA files made with SketchUp and export them in the FSX MDL format. But also exporting to the 3DS or OpenFlight format is possible.
A second functionality that you can use ModelConverterX for is as a model viewer. You can view a 3D presentation of your object. A third functionality is to make minor changes to your object, like changing a material parameter or an attachpoint.
The rest of this manual will discuss how to install and use ModelConverterX. It also contains a detailed description of the features supported by the readers and writers of the different model format. This manual matches the 1.3 stable release version of ModelConverterX.
Contents
Getting ModelConverterX
Prerequisites
Microsoft .NET Framework version 2.0
Installation
The information on how and where to download the version of ModelConverterX you are looking for can be found in this thread on the support forum.
Once you have downloaded the ZIP file containing the program, you need to unzip it to a folder of your choice. If you have used a previous version before, you can replace those files with the new version.
How to ...
Further down in this manual you will find a detailed explanation of the user interface and the features of the different object readers and writers. But in this section some quick howtos will be shown that explain how to perform common tasks. This should be enough to get you going quickly.
When using ModelConverterX for the first time, make sure that you have set the options correctly. Especially the paths to compilers like XtoMDL or MakeMDL should correspond with the location of those compilers on your machine.
Convert a SCASM macro into a FSX MDL object
This howto explains how to convert a SCASM macro object into a FSX MDL object. So to complete this howto you need to have a SCASM macro that you want to convert. Start ModelConverterX and we are ready to go. You can find the images illustrating the steps at the bottom of this section.
- Import to SCASM macro into ModelConverterX. To do so press the Import button and browse to the file you want to load. After you press the Open button ModelConverterX will start loading the object. Once this is done a preview of the object will appear.
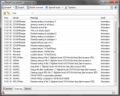
- Check if there were any problems during the import. To do so click on the Event log tab at the bottom of the screen. You should always see some entries in the log, look for events that are of the type Warning or Error to see if there were any serious trouble. It could for example be that there was a not supported command in your SCASM macro.
- Now that your object is loaded and you have verified that there are no big problems with it, it is time to export the object. To do so press the Export button and enter the name and location of the MDL file you want to export. Once you have done that press Save. ModelConverterX will start exporting now.
- Once the export process has finished, check the Event log again, the messages from the exporter will have been added to it. Especially look for the output XtoMDL added while compiling your MDL file. Normally there should not be any errors in this process.
Now you have the MDL file that you can use in your scenery, like you would do with any MDL object. So put it in an library BGL and start placing it with your favourite placement tool.

Selecting SCASM macro for import

Preview of the imported object

Event log after importing

Select MDL file for export
Event log after exporting


Convert a SketchUp object into a FSX MDL object
This howto explains how to convert an object made in SketchUp to a FSX MDL object. So you need an object made with SketchUp to complete this howto. You can find the images illustrating the steps at the bottom of this section.
- From SketchUp you need to export your object as a COLLADA DAE file. Using the default export options should work fine.
- Next load this DAE file into ModelConverterX. See the previous howto about converting an API macro for more details about importing files.
- If your model has a lot of small texture, you might want to use the Drawcall Minimizer function to combine them. See the information further down in this manual for more details on this function.
- Use the Mass Texture Editor to convert the JPG and PNG textures used by SketchUp to a format that FS can read. After opening the Mass Texture Editor make sure to set the folder where you want the textures to be saved. Check if the file format and sizes suggested for the textures are correct and then press Convert to make the new textures.
- Now export your object as a FSX MDL file. See the previous howto about converting an API macro for more details on this.
Now you have the MDL file that you can use in your scenery, like you would do with any MDL object. So put it in an library BGL and start placing it with your favourite placement tool.

Export COLLADA DAE from SketchUp

Import COLLADA DAE into ModelConverterX

Mass texture editor


Convert a SCASM macro into a 3DS object and import it into GMax
This howto explains how to import a SCASM macro object into GMax, so that you can manipulate the object. In this process the 3DS format will be used as an intermediate step. So let's get started.
- The first steps are similar to the howto about converting from a SCASM macro to a MDL file. So you need to load the macro into ModelConverterX and check for any errors during that process.
- Now press the Export button and instead of saving to a MDL file, we will save to a 3DS file this time. So select where you want to save it and press Save.
- Next start up GMax and from the File menu select the import option. Browse to your 3DS file and select it. In the next dialog I usually leave the default settings. Once the importing is done you should be able to see your geometry.
- But there is more, the materials and textures have also been exported. They are just not showing. So open the material navigator and open all the materials used in your object in the material editor. For each of them you will have to select the white/blue checkerboard icon to display the textures.
- Also note that the 3DS format has a limitation in storing the texture names, it only allows the old style short DOS names. So if you used names with more than 8 characters they might not always be exported correctly. So check if the right textures are showing up in your material and else select them again from your disk.
Now you have your object in GMax, so you can manipulate it further. From GMax you can export to MDL like usual.
Import 3DS in GMax
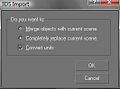
Import 3DS dialog

Material editor display textures

Material with DOS style texture name


Batch convert objects
When you want to convert a lot of objects it can take quite some time to import and export them one by one in ModelConverterX. For this kind of situations the batch convert option has been included. It allows you to convert multiple objects at once, with the same settings. Just follow these steps and you should be done in no time. The images to illustrate the steps are at the bottom of this section.
- Click the Batch convert button to open the batch converter form.
- Select the exporter you want to use and the folder in which you want the converted objects to be placed. Once you have set these two opens press Select objects.
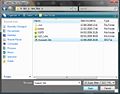
- This will bring up a screen where you can select all the objects you want to convert. You can use the Shift and Control key to select multiple files like normally in Windows. After selecting all files you want to convert press the Open button.
- Now ModelConverterX will start importing and exporting all the objects you selected. You can see the progress in the status bar and the preview will also shortly show the loaded objects.
- Once the conversion is completed, check the event log by clicking on that tab to see if anything went wrong during the conversion.
That's all, now you will find the objects in the required format in the output folder you selected.
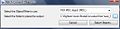
Setting output folder

Selecting objects

Event log after conversion


User interface
All your activities in ModelConverterX are done from the main screen. At the top of this screen you can find a toolbar with buttons to access the frequent actions you will be taking. The rest of the form can display any of the three tabs, that allow you to see either a preview, a log of events or the options. Each of these tabs can have a toolbar to access functions specific to that tab. Below you will find three sections describing the details of each tab and those of the main toolbar.
Preview tab
Event log tab

Options tab

Main toolbar
![]()
The main toolbar is the toolbar of ModelConverterX that is always visible, no matter which of the tabs you are viewing at the moment. It gives you access to the most important functions like importing or exporting objects. In this section all of the functions accessible are explained.
![]() Import Shows an open file dialog that allows you to select an object to import in ModelConverterX. If you click on the arrow next to the button you will get a list of the 8 most recently opened files, so that you can reload them more quickly.
Import Shows an open file dialog that allows you to select an object to import in ModelConverterX. If you click on the arrow next to the button you will get a list of the 8 most recently opened files, so that you can reload them more quickly.
![]() Export Shows an save file dialog that allows you to export the current object in the format you want.
Export Shows an save file dialog that allows you to export the current object in the format you want.
![]() Batch convert Shows the batch convert dialog that allows you to quickly convert multiple objects between two formats. See the howto about batch converting for more information.
Batch convert Shows the batch convert dialog that allows you to quickly convert multiple objects between two formats. See the howto about batch converting for more information.
![]() Special tools This menu gives you access to some special tools that can be used for certain specific tasks. Currently the following tools are available:
Special tools This menu gives you access to some special tools that can be used for certain specific tasks. Currently the following tools are available:
- SCASM Macro to XML placement converter brings up a new dialog that allows you to convert a SCASM file into a XML placement file. For every Macro command in the SCASM file a XML SceneryObject command will be written.
- XML placement to SHP converter brings up a new dialog that allows you to convert a BGLComp XML object placement file into a SHP file. For every SceneryObject command in the XML file a point feature is written in the SHP file.
- XML Apron to SurfaceType converter brings up a new dialog that allows you to convert the aprons of a BGLComp XML airport file into a SCASM file containing SurfaceType commands for these aprons. This can be useful if you want to delete your aprons from the XML to see an aerial image below, but still want aprons that are smooth. Without such code the aircraft will bump around and show dust behind the wheels.
- Texture converter brings up a new dialog that allows you to convert textures. So can load and save to the different formats that ModelConverterX supports. This tool can for example be used to convert old R8 textures to DDS files.
- Missing texture finder brings up a new dialog that allows you to find missing textures. You need to enter the library BGL you want to find the textures for and the texture folders to search. After that a report is generated of the missing textures.
- Flip all triangles this flips all triangles of the currently loaded object.
- Flip triangles with inverse normals this flips all triangles of the currently loaded object for which the normal of the triangle does not match the normal of the vertices.
![]() Options This shows the options tab where you can set all the settings of the tool. See further down in the manual for details.
Options This shows the options tab where you can set all the settings of the tool. See further down in the manual for details.
![]() Manual Brings up a dialog that shows this Wiki manual. For this function to work it is required that you are online at the moment of using it.
Manual Brings up a dialog that shows this Wiki manual. For this function to work it is required that you are online at the moment of using it.
![]() About Shows the about dialog that show for example version information about the ModelConverterX version you are using.
About Shows the about dialog that show for example version information about the ModelConverterX version you are using.
Statusbar
The statusbar gives you feedback about the the activities currently taking place. During the import or export you will for example see a progress bar to indicate how far that process is at the moment.
Besides that in the left corner of the statusbar an icon can be displayed to indicate the event log status. If there is no icon the event log is empty, but if there are entries in the log the following icons can be displayed:
![]() Indicates that there is at least one information message in the event log.
Indicates that there is at least one information message in the event log.
![]() Indicates that there is at least one warning message in the event log, there can also be information messages present.
Indicates that there is at least one warning message in the event log, there can also be information messages present.
![]() Indicates that there is at least one error message in the event log, there can also be information or warning messages present.
Indicates that there is at least one error message in the event log, there can also be information or warning messages present.
Preview tab
On the preview tab you will see a 3D preview of your object. This allows you to see if your object has been imported correctly or that some parts might not be right. Also it can be used as a simple way to visualize your objects.
You can move and rotate the preview with your mouse. If you keep the left mouse button pressed you can rotate around the object and if you keep the right mouse button pressed you can move the object. With the mouse wheel or the + and - keys you can zoom in or out.

At the top of the tab, just below the main toolbar, you will find a toolbar with actions specific for the preview tab. These are described below.
![]() If multiple objects are loaded, this allows you to go to the previous object in the list.
If multiple objects are loaded, this allows you to go to the previous object in the list.
![]() If multiple objects are loaded, this allows you to go to the next object in the list.
If multiple objects are loaded, this allows you to go to the next object in the list.
![]() If multiple objects are loaded, this allows you to show a list of all objects.
If multiple objects are loaded, this allows you to show a list of all objects.
![]() Shows information and statistics about the loaded object.
Shows information and statistics about the loaded object.
![]() Shows the hierarchy of the loaded object (function currently disabled).
Shows the hierarchy of the loaded object (function currently disabled).
![]() Shows the Material Editor that allows you to view and modify the materials used in the object.
Shows the Material Editor that allows you to view and modify the materials used in the object.
![]() Shows the Mass Texture Editor that allows you to convert, rename or resize multiple textures at once.
Shows the Mass Texture Editor that allows you to convert, rename or resize multiple textures at once.
![]() Shows the Drawcall Minimizer that allows you to combine different textures on a single sheet and thereby reduce the amount of drawcalls and improve the performance.
Shows the Drawcall Minimizer that allows you to combine different textures on a single sheet and thereby reduce the amount of drawcalls and improve the performance.
![]() Shows the Attached Object Editor that allows you to view and modify the attached objects.
Shows the Attached Object Editor that allows you to view and modify the attached objects.
![]() Shows the Move dialog that allows you to move the object.
Shows the Move dialog that allows you to move the object.
![]() Shows the Rotate dialog that allows you to rotate the object.
Shows the Rotate dialog that allows you to rotate the object.
![]() Shows the Scale dialog that allows you to scale the object.
Shows the Scale dialog that allows you to scale the object.
![]() Shows the Level of detail Creator form that allows you to create lower detail versions of your object.
Shows the Level of detail Creator form that allows you to create lower detail versions of your object.
![]() Save the preview to disk as a JPG image file.
Save the preview to disk as a JPG image file.
![]() Saves a HTML object report of the loaded objects to disk. The report lists the name, GUID, textures used, attachpoints of the objects. A screenshot is also included.
Saves a HTML object report of the loaded objects to disk. The report lists the name, GUID, textures used, attachpoints of the objects. A screenshot is also included.
![]() Resets the 3D preview view to its initial position. This will make sure the entire object is shown on screen.
Resets the 3D preview view to its initial position. This will make sure the entire object is shown on screen.
![]() Toggles the display of the grid in the 3D preview.
Toggles the display of the grid in the 3D preview.
![]() Toggles the display of the normals in the 3D preview.
Toggles the display of the normals in the 3D preview.
![]() Toggles the Display of attached objects in the 3D preview.
Toggles the Display of attached objects in the 3D preview.
![]() Toggles the Display of bounding boxes in the 3D preview.
Toggles the Display of bounding boxes in the 3D preview.
![]() Sets the rendering mode of the 3D preview to ""wireframe"".
Sets the rendering mode of the 3D preview to ""wireframe"".
![]() Sets the rendering mode of the 3D preview to ""faces"".
Sets the rendering mode of the 3D preview to ""faces"".
![]() Sets the rendering mode of the 3D preview to ""textured faces"".
Sets the rendering mode of the 3D preview to ""textured faces"".
![]() Sets the rendering mode of the 3D preview to ""day textures"".
Sets the rendering mode of the 3D preview to ""day textures"".
![]() Sets the rendering mode of the 3D preview to ""night textures"".
Sets the rendering mode of the 3D preview to ""night textures"".
The LOD combobox allows you to select which level of detail you want to be displayed in the preview.
![]() Play starts running the animation, this means the frame will automatically be increased by a timer.
Play starts running the animation, this means the frame will automatically be increased by a timer.
![]() Pause stops the running animation at the current frame.
Pause stops the running animation at the current frame.
![]() Rewinds the animation by decreasing the frame number.
Rewinds the animation by decreasing the frame number.
The animation frame textbox allows you to view which frame of the animation is currently displayed and gives you the ability to enter a new desired frame number.
![]() Forwards the animation by increasing the frame number.
Forwards the animation by increasing the frame number.
Event log tab
On the event log tab you can see all the messages that the preview renderer, the reader or writer module has generated. This can be information about a texture file being loaded correctly, a warning that the reader encountered some unknown command or a serious error.
![]()
At the top of the tab, just below the main toolbar, you will find a toolbar with actions specific for the event log tab. These are described below.
![]() Save the event log to a TXT file. A file save dialog will appear that allows you to select the location to save to.
Save the event log to a TXT file. A file save dialog will appear that allows you to select the location to save to.
![]() Clear the event log.
Clear the event log.
The message filter combobox box allows you to select which message level to display. If you select Any all messages will show, if you select either Information, Warning or Error only messages with the appropriate level will be displayed.
Options tab
The Options tab gives you access to all the settings of ModelConverterX. With the list at the left side you can select the different categories. Below all options are explained in detail.
General settings
The AutoSave section allows you to specify settings regarding automatically saving certain files. It contains the following options:
- AutoSaveEventLog
- Determines whether the event log is automatically saved to disk as a TXT file when you export an object.
- AutoSavePreview
- Determines whether the preview image is automatically saved to disk as a JPG file when you export an object.
The Display section allows you to specify settings regarding the display of certain items in the user interface. It contains the following options:
- GUIDStyle
- Determines whether GUIDs are displayed with the FS2004 or FSX notation.
Renderer settings

The Renderer section allows you to specify settings related to the preview renderer. It contains the following options:
- AttachPointColor
- Sets the color used to draw the square representing attached objects.
- BackgroundColor
- Sets the color used to draw the background of the preview.
- GridColor
- Sets the color used to draw the grid.
- GridOriginColor
- Sets the color used to draw the grid lines that pass through the origin.
- GridSize
- Sets the total size of the grid in meters.
- GridStep
- Sets the distance between two grid lines in meters.
- NormalColor
- Sets the color used to draw the normals.
- PanScale
- Scales the panning movement of the mouse. This allows you to tune how quickly you pan.
- SelectedAttachPointColor
- Sets the color used to draw the square representing the selected attached point.
- ZoomScale
- Scales the zooming of the mouse wheel. This allows you to tune how quickly you zoom in or out.
Importer settings

The SCASMReader section allows you to specify settings specific to the SCASM reader. It contains the following options:
- applyDefaultScale
- When enabled the default scale found in the SCASM code is applied after importing the object.
- emptyLODCreate
- When enabled an empty LOD is created automatically when exporting the object.
- emptyLODValue
- The value to be used for the empty LOD.
- lineExtrudeRadius
- The radius of the circle that will be used when turning a line into a tube.
- lineExtrudeVertexCount
- The amount of vertices of the circle that will be used when turning a line into a tube. A value of 3 will extra a triangle, 4 a rectangle, etc. Keep this value as low as possible to minimize the polygon count.
- replaceUserVariables
- When enabled a form is shown when importing an object that contains user variables. On this form you can specify the values they should have while importing.
Exporter settings

The FLTWriter section allows you to specify settings specific to the OpenFlight writer. It contains the following options:
- IgnoreSpecularColor
- Ignores the specular colour of the object and uses black instead.
- LODFOV
- Sets the field of view that is used to calculate the LOD distances. In FS objects the LOD depends on the screen resolution, therefore a target FOV is needed to determine the correct distance in the OpenFlight file.
- LODMultiplier
- Sets the multiplier that is used to calculate the LOD distance based on the size of the bounding box (currently not used).
- LODResolution
- Sets the horizontal resolution that is used to calculate the LOD distances. In FS objects the LOD depends on the screen resolution, therefore a target resolution is needed to determine the correct distance in the OpenFlight file.
- TextureType
- Allows you to specify which texture format is used in the OpenFlight file. Supported options are: RGB, DDS or BMP.
- WriteATTR
- Determines whether the ATTR files of the texture are written when the OpenFlight file is saved.
The MDLWriter section allows you to specify settings specific to the FS2004 and FSX MDL writers. It contains the following options:
- KeepASMFile
- Determines whether the ASM files are kept after compilation with MakeMDL.
- KeepXFile
- Determines whether the X file is kept after compilation with either MakeMDL or XtoMDL.
- MakeMDLPath
- Location of MakeMDL.exe on your system.
- NoCrash
- Determines whether crashboxes are generated while exporting or not.
- XtoMDLPath
- Location of XtoMDL.exe on your system.
The XtoMDL section allows you to specify settings specific to the XtoMDL compiler. It contains the following options:
- Keep
- Determines whether a XML file with object definitions is saved or not.
- SampleXML
- Determines whether a sample placement XML file is saved or not.
The XWriter section allows you to specify settings specific to the X writer. It contains the following options:
- DrawcallBatching
- Determines whether the object will have drawcall batching or working LODs.
- ModelDefPath
- Location of ModelDef.xml file on your system.
- ZBiasOffset
- The offset that is given to polygons based on their ZBias value.
TextureLoader settings

The TextureLoader section allows you to specify settings related to the texture loader. It contains the following options:
- BMPDDSEquivalence
- Determines whether BMP and DDS files are treated equivalent when looking for textures. This replicates the FSX behaviour.
- FS2004Path
- The path to the folder where FS2004 is installed.
- FSXPath
- The path to the folder where FSX is installed.

- TextureSearchPath
- The search path used when looking for a texture. The texture is first searched in the folder of the object you are reading, after that all folder in the search path will be examined. When you click on the ... button you get the texture search path editor form to help you add, remove or order folders from the search path. If you double click on a folder in the form you can edit it by typing, that way you can also specify relative folders. You can use the special tags [FS2004] and [FSX] to entire paths depending on your FS installation folder.
The TextureWriter section allows you to specify settings related to the texture writer. It contains the following options:
- DefaultType
- Determines the default texture type used when exporting textures.
- ImageToolPath
- The path to the ImageTool tool used to generate DDS and DXT BMP textures.
ObjectModel settings

The Drawcall Minimizer section allows you to specify settings related to the drawcall minimizer. The following options are available:
DrawcallMinimizerTextureSize : The size of the new texture sheet used by the drawcall minimizer.
The Optimize section allows you to specify settings related to the optimization of objects. The following options are available:
- CollapseAttachedObjects
- Determines whether attached objects are moved to be relative to the object root (when not animated).
- CollapseModelParts
- Determines whether modelparts with the same material are collapsed into one modelpart.
- CollapseNodes
- Determines whether subsequent nodes are collapsed into one.
- MergeDuplicateChildren
- Determines whether duplicate child nodes are merged into one.
- RemoveEmptyNodes
- Determines whether empty nodes are removed.
- SmallTriangleLimit
- Sets the area (square meters) below which a triangle is consider to be too small and will be removed when optimizing.
Forms & Editors
Besides the basic functionality to import and export objects, ModelConverterX also contains a number of forms and editors that allow you to view or edit additional information about the object loaded. This section describes these forms and editors.
Object information

The object information form shows you the basic information about the object. This includes:
- Name
- GUID
- Size of the bounding box
- Textures used
- Attachpoints
- Drawcall related information information (per LOD)
- Number of drawcalls
- Number of triangles
- Number of texture vertices
- Textures used (when Show detail is checked)
Material editor

The Material editor form shows you all materials that are used by the object. You can view and edit all properties of the material. For each material the colours and texture maps used are displayed. Besides that the FSX specific settings are shown.
Mass texture editor

The mass texture editor allows you to manipulate multiple textures on the object at once. You can perform a combination of the following actions:
- rename the textures
- resize the textures
- convert the textures to a different format
The Rename button will bring up a dialog to quick replace a certain text in all texture files used.
The Match button will search in the specified texture folder and replace textures in the object by the same texture found in the texture folder.
The Update button starts the process of renaming, resizing and/or converting the textures. Once this has finished the dialog will automatically close.
Drawcall minimizer

The drawcall minizer is used to reduce the amount of textures used in the object. This will result in less drawcalls and a better performance. The Start button starts the process of combining the textures, the new textures are written to the specified folder. They will have the texture type specified as the default texture type set in the options.
There are three options available that determine how the textures are combined:
- Detect duplicate textures will compare all the textures used and remove duplicates.
- Replace colours will replace materials with only a colour (no texture) with a material that uses a texture with the given colour.
- Merge textures will try to combine all the textures used on the object into bigger texture sheets. The size of these new texture sheets is specified in the options. The name of the new textures is the model name followed by a number.
When a material also has a night texture, bump map or other subtexture types, new texture sheets for these subtextures will also be generated by the drawcall minimizer.
If the texture has an alpha chanel, this alpha channel is also copied in the combined texture sheet. However the total amount of drawcalls in the end also depends on the other material settings. So if one material has the alpha blending enabled and the other not, there will still be two drawcalls. Even when they use the same texture sheet.
Attached object editor

The Attached object editor form shows you all objects that are attached to your object. You can view and edit all properties of the attached objects. The following type of objects can be attached:
- effects
- lights
- library objects
- empty attachpoints
Level of detail Creator

The Level of detail Creator allows you to automatically generate lower level of details versions of your model. A simplification algorithm is used to determine which polygons to eliminate, so that the final model is still as similar to your original one as possible. The algorithm can be tuned with the following parameters:
- Preserve material borders. This parameter gives an extra penalty to an edge where two material meet. As a result this edge is less likely to be affected by the simplification algorithm.
- Preserve texture mapping. This parameter is currently not implemented but should allow you to specify how accurate the texture mapping should be preserved.
- Ground clamp. This parameter determines if vertices that are at or below ground level should stick to the ground or not. This is to prevent buildings from floating in the air.
- Triangle area penalty. This parameter can be used to add an extra penalty to triangles based on their area. The result of this is that polygons with a bigger area are less likely to be affected by the simplification algorithm.
When you want to create a new level of detail you should take the following steps:
- Select which LOD you want to create the new LOD from.
- Enter the number of the LOD you want to create.
- Enter the triangle target for the LOD you are creating. By default this value is 40% of the LOD you create it from.
- Hit calculate and wait. Especially for complex models the calculation can take a while.
When you select the Auto calculate box the LOD will automatically be recalculated once you change any of the settings or parameters in the form. This can be useful when adjusting the triangle target, but for complex models the calculation time might be too big for this auto update function to work efficiently.
By clicking in the list of levels of detail you can select which one is displayed in the preview. If you hit the backspace key the selected LOD will be deleted from the model.
Keyboard shortcuts
To make using ModelConverterX easier most actions and button you can click with the mouse also have a keyboard shortcut. This table gives an overview of the available shortcuts:
| Alt | |
| Alt-B | Batch convert objects |
| Alt-E | Export current object |
| Alt-I | Import objects |
| Alt-O | Options tab |
| Alt-T | Open Special tools menu |
| Ctrl | |
| Ctrl-A | Toggle display of attached objects |
| Ctrl-D | Show drawcall minimizer |
| Ctrl-E | Show attached object editor |
| Ctrl-G | Toggle display of grid |
| Ctrl-I | Show object information/statistics |
| Ctrl-J | Show a list of all loaded objects |
| Ctrl-L | Show the LOD Creator form |
| Ctrl-M | Show mass texture editor |
| Ctrl-N | Toggle display of normals |
| Ctrl-O | Open recently opened files list |
| Ctrl-P | Play or pause the animation |
| Ctrl-R | Reset preview view |
| Ctrl-S | Generate object report |
| Ctrl-T | Show material editor |
| Ctrl-V | Save preview to image |
| Ctrl-X | Go to next object |
| Ctrl-Z | Go to previous object |
| Shift | |
| Shift-M | Move object |
| Shift-R | Rotate object |
| Shift-S | Scale object |
Object readers
To be able to read the objects from the different format ModelConverterX makes use of different object readers. This section gives an overview of the available readers and their capabilities. This means that features that are not explicitly mentioned are not implemented at the moment.
SCASM reader
The SCASM reader allows you to import objects from SCASM source files. This could be either API or SCM macros or a complete SCA source file directly. In the current version the following features of the object can be read:
- Object mesh (vertices, triangles, normals)
- Lines (will be converted to 3D mesh)
- SCASM automatic normal and texture mapping calculations are supported
- Transformations
- TransformCall animations (other animations are not yet supported)
- Colours
- Textures
- Night textures
- Light points
- Attached effects
- Binary commands (often used in FSDS macros to maintain backwards compatibility with old SCASM compiler versions)
If the SCASM file contains multiple objects, they will be returned to you as a list of objects through which you can browse. So importing a whole SCASM library at once is also possible.
FSX MDL reader
The FSX MDL reader allows you to import objects from the FSX MDL format. In the current version the following features of the object can be read:
- Object mesh (vertices, triangles, normals)
- Object materials (colours, textures and FSX specific options)
- Friendly name and GUID
- Levels of detail
- Transformations
- Animations (bone and skin animations not yet working)
- Attachpoints
FS2004 MDL reader
The FS2004 MDL reader allows you to import objects from the FS2004 scenery MDL format. Aircraft MDL files have a different format in FS2004 and are not yet supported. In the current version the following features of the object can be read:
- Object mesh (vertices, triangles, normals)
- Object materials (colours and textures)
- Transformations
- Animations
- Attachpoints
BGLComp BGL reader
The BGLComp BGL reader allows you to import BGL files that have been compiled with BGLComp. The reader will extract any MDL file it finds from this BGL file and then use a MDL reader to read the object.
Currently only the object itself is read, no position information or airport related data that can also be stored in these files is imported.
FSDS FSC reader
The FSDS FSC MDL reader allows you to import objects from the FSC format. Objects from FSDS version 1 are currently not supported. The following features are supported:
- Object mesh (vertices, triangles, normals)
- Object materials (colours and textures)
- Transformations
- Levels of detail
- Animations (limited implementation)
Wavefront OBJ reader
The Wavefront OBJ reader allows you to import objects from the OBJ format. In the current version the following features of the object can be read:
- Object mesh (vertices, triangles, normals)
- Object materials (colours and textures)
COLLADA DAE reader
The COLLADA DAE reader allows you to import objects from the COLLADA DAE format. The COLLADA format is often used as interchange format and for example supported by Sketchup. The following features of the object can be read:
- Object mesh (vertices, triangles, normals)
- Object materials (colours and textures)
- Transformations
Google Earth KMZ reader
The Google Earth KMZ reader allows you to import object from the KMZ format. KMZ files are zipped files that contain a COLLADA DAE object file and the used textures. See the COLLADA DAE reader for details about the supported features.
Object writers
To be able to write the objects to the different format ModelConverterX makes use of different object writers. This section gives an overview of the available writers and their capabilities/limitations.
FSX X file writer
The FSX X file writer is able to generate a X file from an object. This X file can then be compiled with the XtoMDL tool from the SDK to get a MDL object to be used in Flight Simulator.
The current version of the X file writer is able to export the following functionality:
- Object mesh (vertices, triangles, normals)
- Materials (colours, textures and some of the FSX specific settings (double sided, transparency))
- Night textures
- Attachpoints
- Levels of detail
- Animations (only working correctly for scenery objects at the moment, not yet for aircraft)
- GUID and friendly name
FSX MDL file writer
The FSX MDL file writer is able to generate a MDL file for FSX directly. It makes use of the FSX X file writer, so please see its limitations as well. So in fact it is a wrapper that calls XtoMDL for you automatically. To do so you need to make sure you have set the XtoMDL path in the options.
FS2004 MDL file writer
The FS2004 MDL file writer is able to generate a MDL file for FS2004 directly. It makes use of the FSX X file writer, so please see its limitations as well. So in fact it is a wrapper that calls MakeMDL for you automatically. To do so you need to make sure you have set the MakeMDL path in the options.
Please note this exporter uses the FSX X file for FS2004, this could lead to problems for some features, but in general it works fine.
3DS writer
The 3DS writer is able to generate a 3DS file from an object. 3DS files are quite common and can therefore be imported in many other programs, for example into GMax or 3DS Max. This does allow you to import your old objects and update them for FSX.
The current version of the 3DS writer is able to export the following functionality:
- Object mesh (vertices, triangles, but no normals)
- Materials (colours and textures)
- Levels of detail (by using the naming convention supported by the FS gamepacks)
OpenFlight writer
The OpenFlight writer is able to generate a OpenFlight (FLT) file from an object. OpenFlight files are the de facto standard in professional flight simulators.
The current version of the OpenFlight writer is able to export the following functionality:
- Object mesh (vertices, triangles, normals)
- Materials (colours and textures)
- Levels of detail
Wavefront OBJ writer
The Wavefront OBJ writer is able to generate a OBJ file from an object. OBJ files are supported by many 3D programs, so they can be used to exchange objects.
The current version of the OBJ writer is able to export the following functionality:
- Object mesh (vertices, triangles, normals)
- Materials (colours and textures)
Texture loaders
To display the textures of your object in the preview window, ModelConverterX contains loaders for different texture formats. At the moment the following formats are supported:
- BMP (8 bit, 16 bit, 24 bit, 32 bit)
- Extended BMP (DXT1, DXT3, DXT3)
- DDS (DXT1, DXT3, DXT5)
- RAW/R8 format using the FS5 colour palette
- TGA
- JPG
- PNG
Background information
This section provides some interesting background information that might be useful to you while using ModelConverterX.
Video tutorials
I have made a few video tutorials about ModelConverterX.
There is also a YouTube channel where I try to post quick videos of ModelConverterX functions. Many of new functions from the development release that are not yet in the manual.
Performance
One of the reasons why you might want to convert your objects to the FSX MDL format is to gain more performance. There are several reasons why FSX MDL objects have a better performance than older objects:
- The scenery engine is most optimized for them and the format itself is optimized in such a way that drawing the objects becomes easy.
- The older objects are not always optimized as much as they could be. When looking at the SCASM code produced by most of the older modelling tools (VOD, EOD, FSDS v1, etc) it has to be concluded that this code can be cleaned up a lot. After doing that the performance of those macros would be better, but when converting them to FSX MDL this is done for you by the tool.
Another benefit of using ModelConverterX is that it will merge all polygons that use the same material automatically, that why the amount of drawcalls used by your object is optimized for you. That alone is good for the performance already.
In some tests performed the results were quite surprising. By converting around 30 objects, used in a city, from API to FSX MDL file we were able to gain more than 10 frames. The improvement was bigger than expected. Of course one test is not full proof, but you will probably gain performance.
Drawcalls
For the performance of an object in Flight Simulator the amount of drawcalls used by the object is an important factor. ModelConverterX has a tool to minimize the amount of drawcalls. But what is a drawcall?
Simply said a drawcall is a group of triangles that use the same material settings (colours and textures) when the graphical card draws your object. Every change in a material setting means that the graphics card has to set its state again and that is a relatively expensive operations for the performance.
So to optimize performance you can best make sure you have as little different materials as possible. Even one small parameter that is different in the material results in a new drawcall already. Another why to reduce them is to not use colours on your triangles, instead give a piece of unused texture that colour and map it on the triangle.
Support
If you have any problems while using the program or if you have suggestions and other feedback to improve the tool, please let me know. Any report about a object or a texture not loading correctly will help me to improve the tool, so please be sure to report those.
You can either contact me directly or visit the ModelConverterX subforum at FSDeveloper.com.
Credits
The following persons or organisations deserve credit for helping me while creating this tool:
- Everybody who reported feedback on the previous versions, this helped me to improve the tool. A special thanks goes to the beta testers who dared to try my development releases that were sometimes a little buggy.
- Michael Garland for his papers on object simplification
- Colin Fahey for his C# OpenGL wrapper
- The Tango Desktop Project for their icon set
- The DotNetZip library
- Remi at the COLLADA forum for his C# COLLADA code.
User license
When using ModelConverterX you agree to the following user license:
I do hereby agree that I will only use ModelConverterX to convert objects I have created myself. I will not change the work of others, without their prior written permission. This does include any objects obtained by decompilation of BGL files.
(c) 2007-2010 SceneryDesign.org / Arno Gerretsen
This software program is distributed without charge to other scenery designers, redistribution of the original ZIP file is allowed. You are NOT allowed to sell this software program or ask money for its distribution. Object created with this software program can be used in commercial scenery projects if you wish.
The copyright and any intellectual property relating to this program remain the property of the author.
The software distributed in this way may represent work in progress, and bears no warranty, either expressed or implied.