Introduction to modeling with GMax
| This page needs improvement. This could mean that a link is broken, part of the explanation is not clear or missing. |
In the first part of the series Build your own house I showed you which software you need, how to install and configure the software, and which steps to take to get a model into FS2004. In a recent tutorial Gmax for FsX almost the same is told for FsX. Both tutorials resulted in a model at Lelystad airport. The purpose of this part is to build the framework of your own house or another model of your choice. In combination with the first tutorial you will be able to show it in FS2004 or FsX.
I won't go into detail how to construct a house, because these tutorials are already available. From personal experience however I can tell you which tutorials are good, and I'll show you tips & tricks how to get a quick result and how to get information about buildings. Don't forget to hit the links in between for a more detailed description of several tools. In the next tutorial I'll explain how to make textures and use these in Gmax. So for now you have to deal with a house in one color without windows and doors.
Introduction
Did you ever wonder what applications an architect is using to draw a house in 3D? Gmax is such an application. It's developed by Discreet, which is a division of Autodesk. Autodesk is the developer of AutoCad, a serious and accepted application with a wide support. Somewhere in 2006 AutoDesk decided to discontinue development for Gmax, but it is still the only tool to use which Microsoft supports. Don't get confused by the amount of complicated possibilities at first sight. With a few mouse clicks away pretty neat things can be made, because you will only need to use a few of those possibilities. With regular exercise you can achieve quicker and nicer results every time.
Collecting information
Before you start building you need information about your house. A floor plan is really nice, but most of the time you have to do without it. The buildings in MS Flight Simulator are not accurate each centimeter and even not accurate each meter. Beside that you only need the measurements of the outer walls. It's a good assumption trying to get an accuracy in meters. With a bit of practice you can make steps of one meter and soon you have all data available. My way:
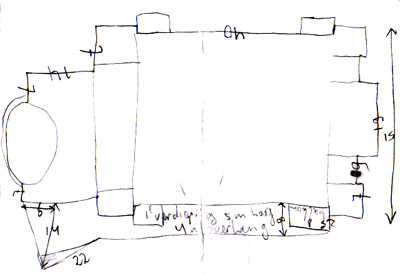
- The way I did it in 2004/2005: Most of the times I make a rough sketch in upper view. After all this sketch isn't accurate (because I don't have any drawing skills). So don't be hard on yourself and draw some quick lines. Now walk around your house with steps of one meter and make a note of each distance in the sketch. This is my favorite part, because at this time I take a really good look at the building and a lot of times I discover beautiful and interesting architectural details. This is a very nice way being cultural and breath some fresh air.
- The way I do it now (faster but less cultural):
- Start Google Earth
- Zoom in on the building
- Make a screenshot and print it
- Start the ruler (tools > ruler)
- Set the unit to meters
- Measure the lengths and note these on the paper
- Next make a sketch of the sides. Determining the height is a more difficult job:
- If you have a photo, taken right in front of a wall, and you know the height of a door or a window frame, then you can determine the height of, for example the gutter or ridge.
- A tape measure is one alternative. Measuring your own house this way isn't that strange, but if you're going to measure other buildings with this alternative, don't be surprised if some people stare at you.
- I've seen a lot of buildings with big bricks or panels. Measure one such brick or panel and count them on a photo.
- A lot of information is available on the internet about sky scrapers or special buildings.
- Estimate the height of one floor and count all floors. Approximate 2,8 or 3 meter per floor is a good choice. Be aware that the ground floor and upper floor are often higher than the other floors.
Besides the tips mentioned above, I use other resources:
- At sites like Terradesk you can have a birds eye view and watch the aerial photo of your house. Via the menu of that tool it's possible to measure a distance with an accuracy of one meter.
- Have a look at the website of your local authority. The municipal archive of Amsterdam is such an example.
- Just look around on the internet for information and photo's of the building you like to model.
A rough sketch
This is a rough sketch of the "Concertgebouw" in Amsterdam. As you can see you don't have to draw accurate :-)
Gmax basics
Start Gmax and build your house. Hmmm. Every house is different so I can't exactly show you how to build your specific house in Gmax. However, a tutorial is available in the FS2004 gamepack. If you don't have it installed, download and install it.
Have a look in the installation directory of Gmax where you will find a directory called gamepacks\fs2004. Useful directories are listed here, but we are now looking for the document gmaxSceneryTutorial.doc in the doc directory. This document shows step by step, with a lot of useful images, how to build a house. Skip the first three pages and start at chapter Creating a model of a house at step 4 and end with step 68. After this step the subject is about textures, which will be discussed in another tutorial.
Create and modify tabs

In the right part of the window you see six tabs, but most of the times you will only use two. The first tab is called the Create tab and the second tab is called the Modify tab. The Create tab is used to create a basic object or to use the Boolean tool. Especially the Modify tab is often too long to fit in the window. At the right there is a hardly visible scrollbar. Move your mouse next to the buttons or fields and you'll see the arrow changing in a hand. Now you can drag the content of the tab up and down. The information in the Modify tab depends on which object and/or modifier is selected.
Manoeuvering in Gmax
Some basic tools are located in the upper toolbar used for selecting, moving or resizing:
 Select tool. With this tool you can select an object, polygon, vertex, etc. It's also possible to select multiple objects at once by dragging a frame around the objects. If you select multiple vertices at once, be aware it's very likely you also selected vertices at the back of the object by accident. Particularly in combination with the tool collapse, you can get very strange results.
 Move tool. Tool to move the selected things. Three big arrows (red, green and blue) will appear at the selected object, complying with the axis colors in the lower left part of the active viewport. Grab one of the three arrows and you'll see the object will only move in the direction of that particular axis.
 Rotate tool. This is used to rotate the selected objects. Use the same arrows for rotating the objects around that particular axis.
 Scale tool. You can see a small arrow in the lower right corner of the button. Keep this button pressed and you'll be able to select one of the three modes of this tool. I can't get used to this tool, because it cooperates with the X, Y and Z buttons up in the window. Trial and error is the best method. If a notification message shows up, you can ignore this message for the future.
Some tools are located at the lower right to look at objects from serveral points of view, and some tools to zoom in and out. If your mouse has a mouse wheel, it's possible to zoom in and out by turning the wheel (same function as the magnifying glass). Pressing the wheel and dragging at the same time, is the same function as pan (the hand). Combine these scroll wheel actions with the shift, alt or control key to get even more possibilities. Notice the small arrows on some of the buttons and the accompanied modes, which change the behavior of the tool.
 Zoom in- and out on a selected object in the active viewport.
 Zoom in- and out on a selected object in all viewports at once.
 Fill the viewport with the selected objects in one click.
 Fill all viewports in one click with the selected objects.
 Select the objects you want to fill the viewport with.
 Moving the point of view.
 Rotate around the object. Notice the difference if you point the mouse on the inner or outer part of the yellow circle. You can also grab the boxes on the circle.
 Full screen of the active viewport. Press again to go back to the normal view.
Editable mesh
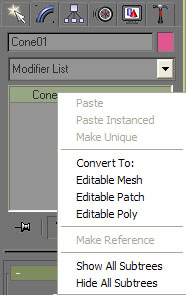
What are the most important points in this tutorial? The most important point is probably making editable mesh of a box (point 26 in the turorial). Only from that moment on it's possible to transform the box by grabbing a corner, edge or polygon and change it the way you want. If you don't turn the box into editable mesh, you can only transform it in limited ways which will practically never lead to the result you want. Editable mesh is the keyword.
Frame rate
Editable mesh is at the same time a good starting point to make a building which end up being a frame rate killer. Every point or poly you add, must be calculated by the engine of MS Flight Simulator and creates a bigger load on the processor and graphics card. It's no problem to construct a very detailled building, because the frame rate of Gmax object seems great. But it's all about vertices and faces which are added without knowing you are adding them. This usually happens in the first phase by placing a basic shape, even before you convert it to editable mesh. An example (imagine a chimney):
- Select the Create tab.
- Click Cylinder (button changes into orange).
- Click and drag in perspective view while making the base of the cylinder. Then let go the mouse button and move your mouse determining the height. Click again to fix the size of the cylinder.
- Click with the right mouse button on the word Perspective in the Perspective view and select Edged Faces.
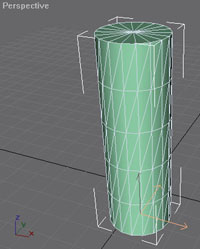
You see a lot of faces and a lot of them are useless. How to solve this:
- Select the Modify tab.
- Beneath the header Parameters you'll see some options.
- Change the values (or drag an arrow and move it up and down) of the fields Height Segments, Cap Segments and Sides.
- Cap Segments defaults to 1 which is fine.
- Height Segments should almost always set on 1. This is the main cause.
- Changing the Sides parameter changes how smooth the cylinder get. This is mostly a matter of taste.
- Just play with the option Slice On and the accompanied options Slice From and Slice To for nifty results.
A well defined basic object is a good start before converting it to editable mesh. Later on you can change the amount of polys as much as needed with several tools like Extrude and Slice.
Modify stack
In the Create tab directly beneath the dropdown box Modifier List the Modifier stack is situated. This is a list of modifiers applied on the selected object. At first this list is empty, but after converting the object to editable mesh you will see a plus sign with Editable Mesh. You can add modifiers from the modifier list (the dropdown box) to the modifier stack. If you're not satisfied with the result of one of the modifiers, just remove the modifier from the stack. I'm always having trouble to explain what the modifier stack exactly is, so it's better to explain this with an example:
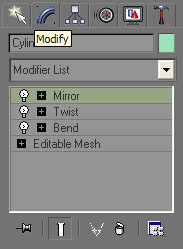
- Select the cylinder from the example above.
- Add a modifier, for instance the Bend modifier and play with the parameters which will show up in the Create tab.
- Next add the modifier Twist and try the parameters too.
- Add the modifier Mirror.
- The modifier stack shows 4 modifiers.
- More options are available under the plus sign.
- Just select all modifier in the stack one by one and have a look at the result each time.
- Remove for instance the modifier Twist from the stack (click Twist > right mouse button > delete) and watch the result.
Important! If you're pretty sure that the object has the right shape you need to collapse the stack. Click with the right mouse button somewhere on the modifier stack and select Collapse All. All transformations and other modifications you've done by the modifiers are final. So it sounds tempting never collapsing the stack, but you really need to do this often and quick after modifications:
- Before an export from Gmax. The stack of all objects must be collapsed before you make an export.
- When you apply textures on an object. I will explain this in the next part.
Regularly used tools
Making a box or other basic shape is simple, but to create more complex shapes I will explain some of the tools which are used in the tutorial of the Gmax gamepack. These tools all assume the object is converted to editable mesh.
- Extrude. With this tool you can pull out poly's (surface) from an object or push the poly into the object. This can be repeated almost infinite to create very complex shapes. If you only want to extrude half of a poly, than you first need to use the tool Slice pane (see below) to cut the poly into half. Most people tend to create two boxes and place them next to each other. Think about the number of objects, poly's and vertices you'll end up. Compare this with the amount of objects, poly's and vertices you'll end up using the tool extrude. The lesser poly's and vertices in the final result, the better the famous frame rate of MS Flight Simulator.
- Collapse. With this tool you mostly merge vertices to only one vertex. This way is used in the tutorial (step 43) to make a peaked roof out of a box. Beside this I also use this tool to merge vertices which are created by accident by the tools extrude or slice plane with again the frame rate in mind.
- Function key F2. Select a poly and press F2. The poly turns into red, so you're sure you've selected the correct poly.
Beside the tools mentioned above I also use the following tools very often:
- Slice Plane. Cuts a poly in half. I use Slice Plane a lot if I only want to extrude a part of an existing poly or to apply two different textures to a poly.
- Boolean. This is a very nifty tool which is hardly described anywhere. This tool enables you to
- simply merge two objects into one object.
- remove a portion from an object in the shape of another object.
- create a poly in the middle of a surface of an object, in the shape of another object.
- do some other nifty thing.
Be careful however, Booleans can create large numbers of vertices, or long thin triangles which don't make good "light" models. They can create in-game rendering problems and boost the poly-count unnecessarily.
Convert to editable mesh
|
|
Editable Mesh modes
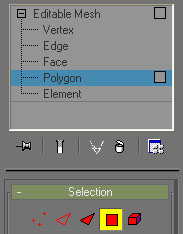
As you probably noticed in the tutorial from the Gmax gamepack, it's possible to edit an object in different modes. First select the mode. In the example on the right, Polygon is selected. Then select one or several of the sub objects and modify those. Notice the red figures which you can also use to select a mode.
- Vertex. Drag for example a selection around several vertices, or keep the control key pressed and select several vertices by clicking the vertices one by one. Chose the Collapse button on the bottom of the modify tab after selecting two vertices for example to create a peaked roof.
- Edge. Drag or collapse edges to create strange objects or to move 2 vertices (one edge) at once.
- Face. Honestly I don't use this mode often. A face is always a triangle. A poly is always constructed out of one or more faces. The polygon mode is in most of the times a better option.
- Polygon. A surface which has a minimum of 3 vertices and is constructed out of faces. Together with vertex mode this is the most used mode. Polygon mode is a perfect combination with the tool extrude.
- Element.
If you want to select to entire object (so not one of the modes above) click one time on the words Editable Mesh and the figure behind one of the modes will disappear.
Extrude
Collapse

- Select two vertices by keeping the control key pressed.
- Click the button Collapse on the bottom of the Modify tab.
Slice Plane
Boolean
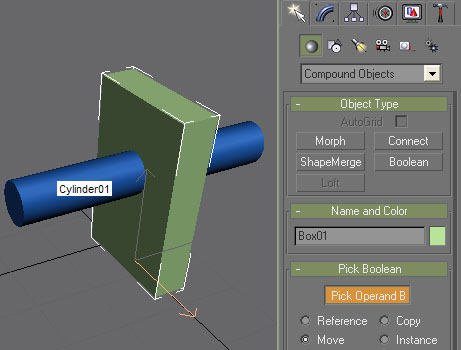
Imagine a door of a building which should be placed a bit inside the building so a nice entrance is created.
- First create the house and next make a box in the size of the entrance with a random depth at least the depth of the entrance.
- Move the box into the house at the place where the entrance should be. Then select the house again.
- Select the Create tab and chose Compound Objects in the dropdown box.
- Click the button Boolean turning it into orange.
- Click the button Pick Operand B.
- Click the box you just moved into the house. Watch the result.
- Underneath the button Pick Operand B you will see a section Operation. Select one by one the five options and have a look at the results. Select in our example the option Cut and then Refine. At first sight nothing happened in Perspective view but have a look at the other viewports and notice that a polygon has been created.
- Select the Modify tab and notice the word Boolean in the stack. Right mouse click on the stack and choose Editable mesh again.
Saving your work
Save your work regularly. By the setting (Customize > Preferences > tab Files > Increment on Save) you had to apply in the previous part, a backup is created every time you save your work. An incremental number is added to the filename each time. Once in a while you need to clean up the directory, but history taught me that I sometimes needed these backup files because I made some irreversible mistakes.
Sometimes Gmax will crash, but luckily it saves your work during that crash in the installation directory of Gmax. Start Gmax again and notice the saved file in the history list of the menu File. Open the file and save it immediately in the correct directory with a new number at the end.
Documentation
Of course I didn't tell you everything what you can do with Gmax. By experimenting you will accomplish a lot and Gmax itself has some tutorials and help files which you can download:
- gmax12_help.exe. Unpack the file in the directory Help
- gmax12_tutorials.exe. Unpack the file in the directory tutorials. Especially tutorials 1, 2 and 7 are recommended.
- Don't forget the documentation of the Gmax gamepack SDK itself which you already installed in gamepacks\fs2004\docs or the Environment kit of the FsX SDK.
Who can do without online documentation:
Some books are available too:
- 3DS MAX for windows (isbn 0321180879 ). 3DS MAX is Gmax's commercial big brother, but about 95% of the book covers the functionalities of Gmax.
- Gmax Bible by Kelly L Murdock (isbn 0764537571)
- The Gmax Handbook (1584502207)
Have fun
