ModelConverterX: Difference between revisions
m (Platform prereq's added) |
|||
| Line 281: | Line 281: | ||
|- | |- | ||
| Ctrl-I || Show object information/statistics | | Ctrl-I || Show object information/statistics | ||
|- | |||
| Ctrl-J || Show a list of all loaded objects | |||
|- | |||
| Ctrl-L || Show the LOD Creator form | |||
|- | |- | ||
| Ctrl-N || Toggle display of normals | | Ctrl-N || Toggle display of normals | ||
| Line 286: | Line 290: | ||
| Ctrl-O || Open recently opened files list | | Ctrl-O || Open recently opened files list | ||
|- | |- | ||
| Ctrl-P || | | Ctrl-P || Play or pause the animation | ||
|- | |- | ||
| Ctrl-R || Reset preview view | | Ctrl-R || Reset preview view | ||
| Line 295: | Line 299: | ||
|- | |- | ||
| Ctrl-X || Go to next object | | Ctrl-X || Go to next object | ||
|- | |||
| Ctrl-Z || Go to previous object | |||
|- | |- | ||
| '''Shift''' || | | '''Shift''' || | ||
Revision as of 15:09, 25 February 2009
| | This page is a work-in-progress. Generic message - Please note some detail may possibly be missing or incorrect. |
ModelConverterX is a tool which primary function is to convert models, as the name already implies. The tools allows you to import models from different formats and can then export them to other formats again. For example you can import your old SCASM macros and export them in the FSX MDL format. But also exporting to the 3DS or OpenFlight format is possible.
A second functionality that you can use ModelConverterX for is as a model viewer. After loading the model a 3D preview of it is shown.
The current version of ModelConverterX is a release candidate. This means that the tool should be stable and functional, but you might still encounter some minor bugs and problems. If you encounter any problems please let me know.
The rest of this manual will discuss how to install and use ModelConverterX. It also contains a detailed description of the features supported by the readers and writers of the different model format.
Prerequisite(s)
Microsoft .NET Framework version 2.0
Installation
You can download the latest release of ModelConverterX from the support forum. Check out the thread with the latest release.
Once you have downloaded the ZIP file containing the program, you need to unzip it to a folder of your choice. If you have used a previous version before, you can replace those files with the new version.
You will also need to have the graphical DLL files by Martin Wright installed. These are used for reading the various texture formats that can be used on your objects. If you don't have these files installed, download them from Martin's website and install them first.
Howto
Further down in this manual you will find a detailed explanation of the user interface and the features of the different object readers and writers. But in this section some quick howtos will be shown that explain how to perform common tasks. This should be enough to get you going quickly.
When using ModelConverterX for the first time, make sure that you have set the options correctly. Especially the paths to compilers like XtoMDL or MakeMDL should correspond with the location of those compilers on your machine.
Convert a SCASM macro into a FSX MDL object
This howto explains how to convert a SCASM macro object into a FSX MDL object. So to complete this howto you need to have a SCASM macro that you want to convert. Start ModelConverterX and we are ready to go. You can find the images illustrating the steps at the bottom of this section.
- Import to SCASM macro into ModelConverterX. To do so press the Import button and browse to the file you want to load. After you press the Open button ModelConverterX will start loading the object. Once this is done a preview of the object will appear.
- Check if there were any problems during the import. To do so click on the Event log tab at the bottom of the screen. You should always see some entries in the log, look for events that are of the type Warning or Error to see if there were any serious trouble. It could for example be that there was a not supported command in your SCASM macro.
- Now that your object is loaded and you have verified that there are no big problems with it, it is time to export the object. To do so press the Export button and enter the name and location of the MDL file you want to export. Once you have done that press Save. ModelConverterX will start exporting now.
- Once the export process has finished, check the Event log again, the messages from the exporter will have been added to it. Especially look for the output of XtoMDL as well, while it was compiling your MDL file. But normally there should not be any errors in this process.
Now you have the MDL file that you can use in your scenery, like you would do with any MDL object. So put it in an library BGL and start placing it with your favourite placement tool.
-

Selecting SCASM macro for import
-
Preview of the imported object
-

Event log after importing
-

Select MDL file for export
-

Event log after exporting


Convert a SCASM macro into a 3DS object and import it into GMax
This howto explains how to import a SCASM macro object into GMax, so that you can manipulate the object. In this process the 3DS format will be used as an intermediate step. So let's get started.
- The first steps are similar to the howto about converting from a SCASM macro to a MDL file. So you need to load the macro into ModelConverterX and check for any errors during that process.
- Now press the Export button and instead of saving to a MDL file, we will save to a 3DS file this time. So select where you want to save it and press Save.
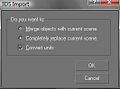
- Next start up GMax and from the File menu select the import option. Browse to your 3DS file and select it. In the next dialog I usually leave the default settings. Once the importing is done you should be able to see your geometry.
- But there is more, the materials and textures have also been exported. They are just not showing. So open the material navigator and from that one by one load all the materials used in the scene. For each of them you will have to select the white/blue checkerboard icon to display the textures.
- Also note that the 3DS format has a limitation in storing the texture names, it only allows the old style short DOS names. So if you used names with more than 8 characters they might not always be exported correctly. So in this case select if the right texture is assigned to the material and if this is not the case select the correct one yourself.
Now you have your object in GMax, so you can manipulate it further. From GMax you can export to MDL like usual.
-
Import 3DS in GMax
-
Import 3DS dialog
-

Material editor display textures
-

Material with DOS style texture name


Batch convert objects
When you want to convert a lot of objects it can take quite some time to import and export them one by one in ModelConverterX. For this kind of situations the batch convert option has been included. It allows you to convert multiple objects at once, with the same settings. Just follow these steps and you should be done in no time. The images to illustrate the steps are at the bottom of this section.
- Click the Batch convert button to open the batch converter form.
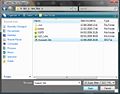
- Select the exporter you want to use and the folder in which you want the converted objects to be placed. Once you have set these two opens press Select objects.
- This will bring up a screen where you can select all the objects you want to convert. You can use the Shift and Control key to select multiple files like normally in Windows. After selecting all files you want to convert press the Open button.
- Now ModelConverterX will start importing and exporting all the objects you selected. You can see the progress in the status bar and the preview will also shortly show the loaded objects.
- Once the conversion is completed, check the event log by clicking on that tab to see if anything went wrong during the conversion.
That's all, now you will find the objects in the required format in the output folder you selected.
-
Setting output folder
-

Selecting objects
-

Event log after conversion


User interface
All your activities in ModelConverterX are done from the main screen. At the bottom of this screen you can find a toolbar with buttons to access the frequent actions you will be taking. The rest of the form can display any of the three tabs, that allow you to see either a preview, a log of events or the options. Each of these tabs can have a toolbar to access functions specific to that tab. Below you will find three sections describing the details of each tab and those of the main toolbar.
-
Preview tab
-
Event log tab
-
Options tab
Main toolbar
![]()
The main toolbar is the toolbar of ModelConverterX that is always visible, no matter which of the tabs you are viewing at the moment. It gives you access to the most important functions like importing or exporting objects. In this section all of the functions accessible are explained.
![]() Import Shows an open file dialog that allows you to select an object to import in ModelConverterX. If you click on the arrow next to the button you will get a list of the 8 most recently opened files, so that you can reload them more quickly.
Import Shows an open file dialog that allows you to select an object to import in ModelConverterX. If you click on the arrow next to the button you will get a list of the 8 most recently opened files, so that you can reload them more quickly.
![]() Export Shows an save file dialog that allows you to export the current object in the format you want.
Export Shows an save file dialog that allows you to export the current object in the format you want.
![]() Batch convert Shows the batch convert dialog that allows you to quickly convert multiple objects between two formats. See the howto about batch converting for more information.
Batch convert Shows the batch convert dialog that allows you to quickly convert multiple objects between two formats. See the howto about batch converting for more information.
![]() Special tools This menu gives you access to some special tools that can be used for certain specific tasks. Currently the following tools are available:
Special tools This menu gives you access to some special tools that can be used for certain specific tasks. Currently the following tools are available:
- SCASM macro to XML placement converter brings up a new dialog that allows you to convert a SCASM file into a XML placement file. For every Macro command in the SCASM file a XML SceneryObject command will be written.
![]() Manual Brings up a dialog that shows this Wiki manual. For this function to work it is required that you are online at the moment of using it.
Manual Brings up a dialog that shows this Wiki manual. For this function to work it is required that you are online at the moment of using it.
![]() About Shows the about dialog that show for example version information about the ModelConverterX version you are using.
About Shows the about dialog that show for example version information about the ModelConverterX version you are using.
Statusbar
The statusbar gives you feedback about the the activities currently taking place. During the import or export you will for example see a progress bar to indicate how far that process is at the moment.
Besides that in the right corner of the statusbar an icon can be displayed to indicate the event log status. If there is no icon the event log is empty, but if there are entries in the log the following icons can be displayed:
![]() Indicates that there is at least one information message in the event log.
Indicates that there is at least one information message in the event log.
![]() Indicates that there is at least one warning message in the event log, there can also be information messages present.
Indicates that there is at least one warning message in the event log, there can also be information messages present.
![]() Indicates that there is at least one error message in the event log, there can also be information or warning messages present.
Indicates that there is at least one error message in the event log, there can also be information or warning messages present.
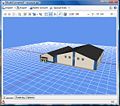
Preview tab
On the preview tab you will see a 3D preview of your object. This allows you to see if your object has been imported correctly or that some parts might not be right. Also it can be used as a simple way to visualize your objects.
You can move and rotate the preview with your mouse. If you keep the left mouse button pressed you can rotate around the object and if you keep the right mouse button pressed you can move the object. With the mouse wheel or the + and - keys you can zoom in or out.
![]()
At the top of the tab, just below the main toolbar, you will find a toolbar with actions specific for the preview tab. These are described below.
![]() If multiple objects are loaded, this allows you to go to the next object in the list.
If multiple objects are loaded, this allows you to go to the next object in the list.
![]() If multiple objects are loaded, this allows you to go to the previous object in the list.
If multiple objects are loaded, this allows you to go to the previous object in the list.
![]() Shows information and statistics about the loaded object.
Shows information and statistics about the loaded object.
![]() Shows the Material Editor that allows you to view and modify the materials used in the object.
Shows the Material Editor that allows you to view and modify the materials used in the object.
![]() Shows the Attached Object Editor that allows you to view and modify the attached objects.
Shows the Attached Object Editor that allows you to view and modify the attached objects.
![]() Shows the Move dialog that allows you to move the object.
Shows the Move dialog that allows you to move the object.
![]() Shows the Rotate dialog that allows you to rotate the object.
Shows the Rotate dialog that allows you to rotate the object.
![]() Shows the Scale dialog that allows you to scale the object.
Shows the Scale dialog that allows you to scale the object.
![]() Resets the 3D preview view to its initial position. This will make sure the entire object is shown on screen.
Resets the 3D preview view to its initial position. This will make sure the entire object is shown on screen.
![]() Toggles the display of the grid in the 3D preview.
Toggles the display of the grid in the 3D preview.
![]() Toggles the display of the normals in the 3D preview.
Toggles the display of the normals in the 3D preview.
![]() Toggles the Display of attached objects in the 3D preview.
Toggles the Display of attached objects in the 3D preview.
![]() Save the preview to disk as a JPG image file.
Save the preview to disk as a JPG image file.
The LOD combobox allows you to select which level of detail you want to be displayed in the preview.
![]() Play starts running the animation, this means the frame will automatically be increased by a timer.
Play starts running the animation, this means the frame will automatically be increased by a timer.
![]() Pause stops the running animation at the current frame.
Pause stops the running animation at the current frame.
![]() Rewinds the animation by decreasing the frame number.
Rewinds the animation by decreasing the frame number.
The animation frame textbox allows you to view which frame of the animation is currently displayed and gives you the ability to enter a new desired frame number.
![]() Forwards the animation by increasing the frame number.
Forwards the animation by increasing the frame number.
Event log tab
On the event log tab you can see all the messages that the preview renderer, the reader or writer module has generated. This can be information about a texture file being loaded correctly, a warning that the reader encountered some unknown command or a serious error.
![]()
At the top of the tab, just below the main toolbar, you will find a toolbar with actions specific for the event log tab. These are described below.
![]() Save the event log to a TXT file. A file save dialog will appear that allows you to select the location to save to.
Save the event log to a TXT file. A file save dialog will appear that allows you to select the location to save to.
![]() Clear the event log.
Clear the event log.
The message filter combobox box allows you to select which message level to display. If you select Any all messages will show, if you select either Information, Warning or Error only messages with the appropriate level will be displayed.
Options tab
The Options tab gives you access to all the settings of ModelConverterX. With the list at the left side you can select the different categories. Below all options are explained in detail.
General settings

The AutoSave section allows you to specify settings regarding automatically saving certain files. It contains the following options:
- AutoSaveEventLog
- Determines whether the event log is automatically saved to disk as a TXT file when you export an object.
- AutoSavePreview
- Determines whether the preview image is automatically saved to disk as a JPG file when you export an object.
The Renderer section allows you to specify settings related to the preview renderer. It contains the following options:
- AttachPointColor
- Sets the color used to draw the square representing attached objects.
- BackgroundColor
- Sets the color used to draw the background of the preview.
- GridColor
- Sets the color used to draw the grid.
- GridOriginColor
- Sets the color used to draw the grid lines that pass through the origin.
- GridSize
- Sets the total size of the grid in meters.
- GridStep
- Sets the distance between two grid lines in meters.
- NormalColor
- Sets the color used to draw the normals.
- ZoomScale
- Scales the zooming of the mouse wheel. This allows you to tune how quickly you zoom in or out.
Importer settings

The SCASMReader section allows you to specify settings specific to the SCASM reader. It contains the following options:
- lineExtrudeRadius
- The radius of the circle that will be used when turning a line into a tube.
- lineExtrudeVertexCount
- The amount of vertices of the circle that will be used when turning a line into a tube. A value of 3 will extra a triangle, 4 a rectangle, etc. Keep this value as low as possible to minimize the polygon count.
Exporter settings

The FLTWriter section allows you to specify settings specific to the OpenFlight writer. It contains the following options:
- LODMultiplier
- Sets the multiplier that is used to calculate the LOD distance based on the size of the bounding box.
- TextureType
- Allows you to specify which texture format is used in the OpenFlight file. Supported options are: RGB, DDS or BMP.
- WriteATTR
- Determines whether the ATTR files of the texture are written when the OpenFlight file is saved.
The MDLWriter section allows you to specify settings specific to the FS2004 and FSX MDL writers. It contains the following options:
- KeepASMFile
- Determines whether the ASM files are kept after compilation with MakeMDL.
- KeepXFile
- Determines whether the X file is kept after compilation with either MakeMDL or XtoMDL.
- MakeMDLPath
- Location of MakeMDL.exe on your system.
- XtoMDLPath
- Location of XtoMDL.exe on your system.
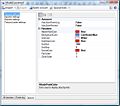
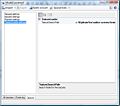
TextureLoader settings
The TextureLoader section allows you to specify settings related to the texture loader. It contains the following options:
- TextureSearchPath
- The search path used when looking for a texture. The texture is first searched in the folder of the object you are reading, after that all folder in the search path will be examined. When you click on the ... button you get the texture search path editor form to help you add or remove folders from the search path. If you double click on a folder in the form you can edit it by typing, that way you can also specify relative folders.
-
TextureLoader options
-

Texture path editor


Keyboard shortcuts
To make using ModelConverterX easier most actions and button you can click with the mouse also have a keyboard shortcut. This table gives an overview of the available shortcuts:
| Alt | |
| Alt-B | Batch convert objects |
| Alt-E | Export current object |
| Alt-I | Import objects |
| Alt-T | Open Special tools menu |
| Ctrl | |
| Ctrl-A | Toggle display of attached objects |
| Ctrl-E | Show attached object editor |
| Ctrl-G | Toggle display of grid |
| Ctrl-I | Show object information/statistics |
| Ctrl-J | Show a list of all loaded objects |
| Ctrl-L | Show the LOD Creator form |
| Ctrl-N | Toggle display of normals |
| Ctrl-O | Open recently opened files list |
| Ctrl-P | Play or pause the animation |
| Ctrl-R | Reset preview view |
| Ctrl-T | Show material editor |
| Ctrl-V | Save preview to image |
| Ctrl-X | Go to next object |
| Ctrl-Z | Go to previous object |
| Shift | |
| Shift-M | Move object |
| Shift-R | Rotate object |
| Shift-S | Scale object |
Object readers
To be able to read the objects from the different format ModelConverterX makes use of different object readers. This section gives an overview of the available readers and their capabilities/limitations.
SCASM reader
The SCASM reader allows you to import objects from SCASM source files. This could be either API or SCM macros or a complete SCA source file directly. In the current version the following features of the object can be read:
- Object mesh (vertices, triangles, normals)
- Lines (will be converted to 3D mesh)
- SCASM automatic normal and texture mapping calculations are supported
- Transformations
- Colours
- Textures
- Night textures
- Light points
- Attached effects
- Binary commands (often used in FSDS macros to maintain backwards compatibility with old SCASM compiler versions)
FSX MDL reader
The FSX MDL reader allows you to import objects from the FSX MDL format. In the current version the following features of the object can be read:
- Object mesh (vertices, triangles, normals)
- Object materials (colours and textures, not all FSX specific options supported yet)
- Friendly name and GUID
- Levels of detail
- Transformations
- Animations (bone and skin animations not yet working)
Object writers
To be able to write the objects to the different format ModelConverterX makes use of different object writers. This section gives an overview of the available writers and their capabilities/limitations.
FSX X file writer
The FSX X file writer is able to generate a X file from an object. This X file can then be compiled with the XtoMDL tool from the SDK to get a MDL object to be used in Flight Simulator.
The current version of the X file writer is able to export the following functionality:
- Object mesh (vertices, triangles, normals)
- Materials (colours, textures and some of the FSX specific settings (double sided, transparency))
- Night textures
- Attachpoints
- GUID and friendly name
FSX MDL file writer
The FSX MDL file writer is able to generate a MDL file for FSX directly. It makes use of the FSX X file writer, so please see its limitations as well. So in fact it is a wrapper that calls XtoMDL for you automatically. To do so you need to make sure you have set the XtoMDL path in the options.
FS2004 MDL file writer
The FS2004 MDL file writer is able to generate a MDL file for FS2004 directly. It makes use of the FSX X file writer, so please see its limitations as well. So in fact it is a wrapper that calls MakeMDL for you automatically. To do so you need to make sure you have set the MakeMDL path in the options.
Please note this exporter uses the FSX X file for FS2004, this could lead to problems for some features, but in general it works fine.
3DS writer
The 3DS writer is able to generate a 3DS file from an object. 3DS files are quite common and can therefore be imported in many other programs, for example into GMax or 3DS Max. This does allow you to import your old objects and update them for FSX.
The current version of the 3DS writer is able to export the following functionality:
- Object mesh (vertices, triangles, but no normals)
- Materials (colours and textures)
OpenFlight writer
The OpenFlight writer is able to generate a OpenFlight (FLT) file from an object. OpenFlight files are the de facto standard in professional flight simulators.
The current version of the OpenFlight writer is able to export the following functionality:
- Object mesh (vertices, triangles, normals)
- Materials (colours and textures)
Background information
This section provides some interesting background information that might be useful to you while using ModelConverterX.
Performance
One of the reasons why you might want to convert your objects to the FSX MDL format is to gain more performance. There are several reasons why FSX MDL objects have a better performance than older objects:
- The scenery engine is most optimized for them and the format itself is optimized in such a way that drawing the objects becomes easy.
- The older objects are not always optimized as much as they could be. When looking at the SCASM code produced by most of the older modelling tools (VOD, EOD, FSDS v1, etc) it has to be concluded that this code can be cleaned up a lot. After doing that the performance of those macros would be better, but when converting them to FSX MDL this is done for you by the tool.
Another benefit of using ModelConverterX is that it will merge all polygons that use the same material automatically, that why the amount of drawcalls used by your object is optimized for you. That alone is good for the performance already.
In some tests performed the results were quite surprising. By converting around 30 objects, used in a city, from API to FSX MDL file we were able to gain more than 10 frames. The improvement was bigger than expected. Of course one test is not full proof, but you will probably gain performance.
Support
If you have any problems while using the program or if you have suggestions and other feedback to improve the tool, please let me know. You can either contact me directly or visit the ModelConverterX subforum at FSDeveloper.com.
User license
When using ModelConverterX you agree to the following user license:
I do hereby agree that I will only use ModelConverterX to convert objects I have created myself. I will not change the work of others, without their prior written permission. This does include any objects obtained by decompilation of BGL files.
(c) 2007-2008 SceneryDesign.org / Arno Gerretsen
This software program is distributed without charge to other scenery designers, redistribution of the original ZIP file is allowed. You are NOT allowed to sell this software program or ask money for its distribution. Object created with this software program can be used in commercial scenery projects if you wish.
The copyright and any intellectual property relating to this program remain the property of the author.
The software distributed in this way may represent work in progress, and bears no warranty, either expressed or implied.