Taxiline creation with GMax: Difference between revisions
From FSDeveloper Wiki
Jump to navigationJump to search
No edit summary |
No edit summary |
||
| Line 5: | Line 5: | ||
# in the "Create" menu, choose "Shapes". | # in the "Create" menu, choose "Shapes". | ||
# select Rectangle | # select Rectangle | ||
# draw one in the FRONT viewport (size doesn't matter now)<br><br>[[Image:taxilines_gmax_01.jpg]]<br><br> | # draw one in the FRONT viewport (size doesn't matter now)<br><br>[[Image:taxilines_gmax_01.jpg|400x400px]]<br><br> | ||
# adjust the size of your rectangle. The important size is the WIDTH of your taxiway line. | # adjust the size of your rectangle. The important size is the WIDTH of your taxiway line. | ||
# center your rectangle to (0,0,0)! <br><br>[[Image:taxilines_gmax_02.jpg]]<br><br> | # center your rectangle to (0,0,0)! <br><br>[[Image:taxilines_gmax_02.jpg|400x400px]]<br><br> | ||
# convert the rectangle to a "Editable Spline" and turn on "Segment" selection. | # convert the rectangle to a "Editable Spline" and turn on "Segment" selection. | ||
# select the indicated 3 segments and delete them.<br><br>[[Image:taxilines_gmax_03.jpg]]<br><br> | # select the indicated 3 segments and delete them.<br><br>[[Image:taxilines_gmax_03.jpg|400x400px]]<br><br> | ||
# now, set the top segment to ground level 0.0m. Template is done. (You may rename it to "TWYLINE_TEMPLATE" or so for the next steps)<br><br>[[Image:taxilines_gmax_04.jpg]]<br><br> | # now, set the top segment to ground level 0.0m. Template is done. (You may rename it to "TWYLINE_TEMPLATE" or so for the next steps)<br><br>[[Image:taxilines_gmax_04.jpg|400x400px]]<br><br> | ||
# create your taxiline "guides" using splines. For straight lines, just use "line" and for bends, the "arc" object is perfect. Don't connect the splines to a network, just leave them as single objects. The Loft method doesn't seem to work with spline-networks. Your transitions should be more exact than my quick try.<br><br>[[Image:taxilines_gmax_05.jpg]]<br><br> | # create your taxiline "guides" using splines. For straight lines, just use "line" and for bends, the "arc" object is perfect. Don't connect the splines to a network, just leave them as single objects. The Loft method doesn't seem to work with spline-networks. Your transitions should be more exact than my quick try.<br><br>[[Image:taxilines_gmax_05.jpg|400x400px]]<br><br> | ||
== Now the fun part, Line designing == | == Now the fun part, Line designing == | ||
=== Method for straight lines === | === Method for straight lines === | ||
# Select your LINE-Spline <br> "Create" -> "Geometry" -> "Compound Objects" lets you select "Loft". <br><br>[[Image:taxilines_gmax_06.jpg]]<br><br> | # Select your LINE-Spline <br> "Create" -> "Geometry" -> "Compound Objects" lets you select "Loft". <br><br>[[Image:taxilines_gmax_06.jpg|400x400px]]<br><br> | ||
# Click on "Get Shape". | # Click on "Get Shape". | ||
# Open up the "Select by name" window. | # Open up the "Select by name" window. | ||
# Now, choose your template and pick it. TWYLINE_TEMPLATE in my case (that's why it's good to use a strong name ). There it is, your twy-line. Just zoom in to have a look at it. <br><br>[[Image:taxilines_gmax_07.jpg]]<br><br> | # Now, choose your template and pick it. TWYLINE_TEMPLATE in my case (that's why it's good to use a strong name ). There it is, your twy-line. Just zoom in to have a look at it. <br><br>[[Image:taxilines_gmax_07.jpg|400x400px]]<br><br> | ||
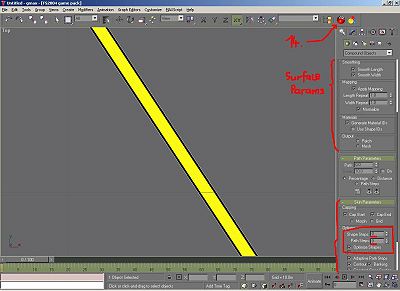
# Simply apply your twy material to the loft. No extra uvw mapping needed Play with the surface parameters: If you need a repetetive texture, use the length repeat option. Else, just leave it as is. | # Simply apply your twy material to the loft. No extra uvw mapping needed Play with the surface parameters: If you need a repetetive texture, use the length repeat option. Else, just leave it as is. | ||
# Import settings are the "Skin Parameters". Shape Steps lets you choose the "resolution" of your polygon in the "width"-direction. We don't need more than 0 steps!!! Path Steps is for the "resolution" along the line. For straight lines, a value of 0 gives us the best option. (least amount of polys -> 2 faces for each straight line!) <br><br>[[Image:taxilines_gmax_08.jpg]]<br><br> | # Import settings are the "Skin Parameters". Shape Steps lets you choose the "resolution" of your polygon in the "width"-direction. We don't need more than 0 steps!!! Path Steps is for the "resolution" along the line. For straight lines, a value of 0 gives us the best option. (least amount of polys -> 2 faces for each straight line!) <br><br>[[Image:taxilines_gmax_08.jpg|400x400px]]<br><br> | ||
=== Method for bends === | === Method for bends === | ||
# Select you ARC-spline <br> "Create" -> "Geometry" -> "Compound Objects" lets you select "Loft". Repeat Steps 2 to 5 from the straight line section! | # Select you ARC-spline <br> "Create" -> "Geometry" -> "Compound Objects" lets you select "Loft". Repeat Steps 2 to 5 from the straight line section! | ||
# The good thing of lofting is the control over your "smoothness" of your bends. In "Skin Parameters" again, Shape steps are set to 0. But now, Path steps will refine your arc At 0, we have a fairly "hard" bend. Now increase the number until you think it looks good. But don't go crazy, keep the amount of polys in mind A value of 4-6 is already good imho! <br><br>[[Image:taxilines_gmax_09.jpg]]<br><br> | # The good thing of lofting is the control over your "smoothness" of your bends. In "Skin Parameters" again, Shape steps are set to 0. But now, Path steps will refine your arc At 0, we have a fairly "hard" bend. Now increase the number until you think it looks good. But don't go crazy, keep the amount of polys in mind A value of 4-6 is already good imho! <br><br>[[Image:taxilines_gmax_09.jpg|400x400px]]<br><br> | ||
# For demonstration, I used 15 here, and we have a smooth arc. Also, a benefit of lofting, the texture follows perfectly your line! <br><br>[[Image:taxilines_gmax_10.jpg]]<br><br> | # For demonstration, I used 15 here, and we have a smooth arc. Also, a benefit of lofting, the texture follows perfectly your line! <br><br>[[Image:taxilines_gmax_10.jpg|400x400px]]<br><br> | ||
---- | ---- | ||
Revision as of 00:41, 12 November 2007
Loft Method
Create a taxiway line template (spline):
- in the "Create" menu, choose "Shapes".
- select Rectangle
- draw one in the FRONT viewport (size doesn't matter now)
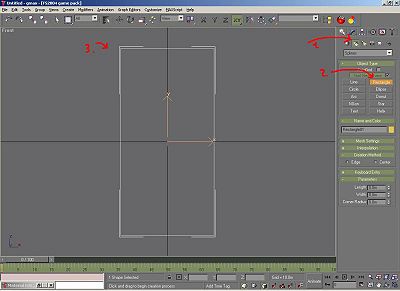
- adjust the size of your rectangle. The important size is the WIDTH of your taxiway line.
- center your rectangle to (0,0,0)!
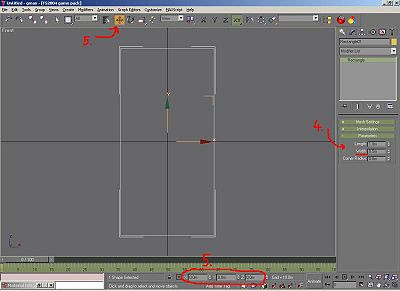
- convert the rectangle to a "Editable Spline" and turn on "Segment" selection.
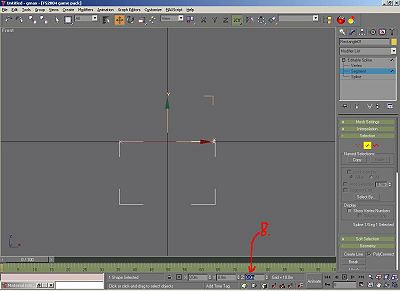
- select the indicated 3 segments and delete them.

- now, set the top segment to ground level 0.0m. Template is done. (You may rename it to "TWYLINE_TEMPLATE" or so for the next steps)
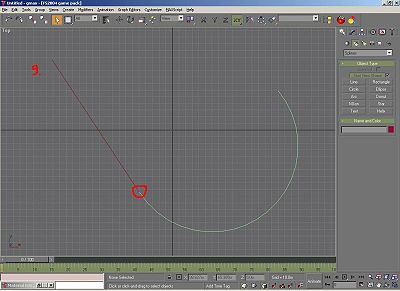
- create your taxiline "guides" using splines. For straight lines, just use "line" and for bends, the "arc" object is perfect. Don't connect the splines to a network, just leave them as single objects. The Loft method doesn't seem to work with spline-networks. Your transitions should be more exact than my quick try.


Now the fun part, Line designing
Method for straight lines
- Select your LINE-Spline
"Create" -> "Geometry" -> "Compound Objects" lets you select "Loft".
- Click on "Get Shape".
- Open up the "Select by name" window.
- Now, choose your template and pick it. TWYLINE_TEMPLATE in my case (that's why it's good to use a strong name ). There it is, your twy-line. Just zoom in to have a look at it.

- Simply apply your twy material to the loft. No extra uvw mapping needed Play with the surface parameters: If you need a repetetive texture, use the length repeat option. Else, just leave it as is.
- Import settings are the "Skin Parameters". Shape Steps lets you choose the "resolution" of your polygon in the "width"-direction. We don't need more than 0 steps!!! Path Steps is for the "resolution" along the line. For straight lines, a value of 0 gives us the best option. (least amount of polys -> 2 faces for each straight line!)


Method for bends
- Select you ARC-spline
"Create" -> "Geometry" -> "Compound Objects" lets you select "Loft". Repeat Steps 2 to 5 from the straight line section! - The good thing of lofting is the control over your "smoothness" of your bends. In "Skin Parameters" again, Shape steps are set to 0. But now, Path steps will refine your arc At 0, we have a fairly "hard" bend. Now increase the number until you think it looks good. But don't go crazy, keep the amount of polys in mind A value of 4-6 is already good imho!

- For demonstration, I used 15 here, and we have a smooth arc. Also, a benefit of lofting, the texture follows perfectly your line!


There you have it. Another Gmax-trick unvealed. For different Line-widths use, just create another templates. If you get the hang out of it, it's a really efficient way to create Twy-Lines in gmax. And don't worry about the spline "guides", they won't be exported with MakeMdl