Gaiiden
FSDevConf team
- Messages
- 751
- Country

Been wanting to do this for a while now and finally took the time to put it together using a FranceVFR project I worked on last month. What you are seeing is my main development screen only, which has ADE on it (and briefly Paint.NET as I edit the background image). I have a monitor to either side that holds reference data (images, Google/Bing aerial views, charts, etc) so that's why you never see me leave ADE, although I would have edited those out anyways.
The project took 11.8 hours to complete according to my work log and probably would have been an hour or so less but I spent some R&D time on seeing if Vehicle links could be used to draw white line ground markings (in some cases yes but in most no, you'll see me remove a lot of them) and also the helicopter parking markings took a bit of trial-and-error to get right, although I had already gotten them working at another airport but the line running through them was different this time. Speaking of trial-and-error, you also don't see me enter the sim from time to time to check on things.
I used Chronolapse to capture an image of my screen every 5 seconds. These images were stored as high-res PNG files (7,289 of them totaling 4.41GB) and then I went through them all to remove any that held the screen for several images without changing (probably while I was off referencing on another monitor) and also some screens that caught me in other programs or one time when ADE crashed - stuff that would jar you out of the rest of the time lapse within ADE. I then loaded all the images in Sony Vegas Pro 9 for final editing. The video plays at a rate of 10 images per second, although some repetitive sections you'll notice are sped up (to 30 images per second).
The video is just over 11 minutes long, with some shots afterwards of the finished airport in FSX (unfortunately without the ground texture):
http://youtu.be/yGzbYUBbhpw
(it's too bad there aren't any 11min long songs I can attach to this video I would subject any of you to)
To explain what you're seeing as the video progresses: First I begin with the default airport and strip it entirely down to just the runway(s). Then I go through and check properties of the airport and runways and comms against real world data. Next I need to edit and load my background image. Next I need to align the runways and PAPI lights against the background image. Next I put in perimeter fencing where required. Next I need to draw all the apron/taxiway surfaces aircraft will be moving on. Next I need to draw all the taxi lines and ground markings. Next I add all the available parking. Next I put in taxi signs around the airport. Next I draw the AI path system and hook it up to the parking spots. Next I place any vehicle roads and paths needed around the airport. Next I place a flatten poly within the airport grounds as dictated by the perimeter fence. There's also some final stuff like starting positions, the tower viewpoint, fuel triggers, etc. There are a few short pauses as I complete each of these major steps.
My rather unorthodox approach to airport design has several reasons. First, "drawing" the aprons the way I do gives me a huge amount of accuracy in matching the ground textures. I can draw an apron so that it covers the taxiway but leaves gravel runoff on either side visible, as well as light locations even. This makes the "blend" between the ground and the taxiway surface practically seamless. With the taxiways and aprons being bare surface, I can use Apron links to similarly "draw" ground markings with increased accuracy to make all taxi lines and markings appear almost exactly as they do at the real airport. Keeping everything within the default capabilities FSX offers means I'm left with two BGL files (airport and flatten) without having to mess with a bunch of textures as well.
There is a single major downside to this technique, and it was big enough to keep me from developing commercial airports until I solved it last year. Proper taxi-in clearance for aircraft is still an issue caused by the ATC node jump (explained in detail in Don Grovestine's Drive Through Parking tutorial - Page 4), especially on taxiways that curve as they leave the runway, but with careful planning and foresight during development the issue can be avoided.
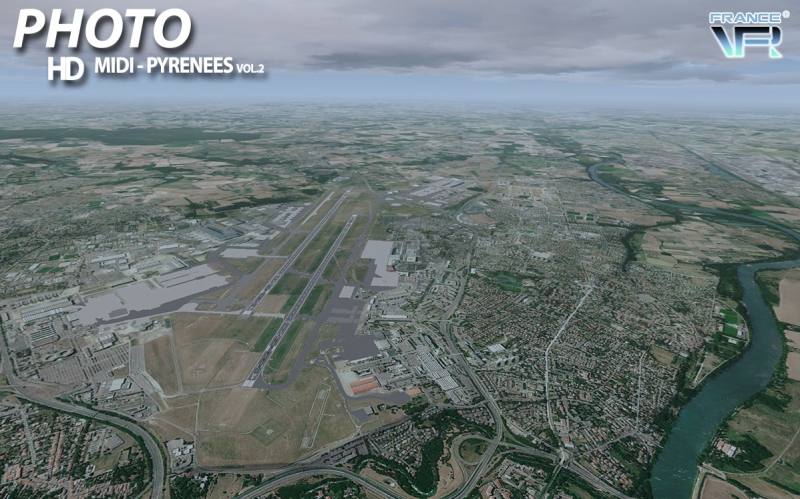
Currently I develop airports in this way to blend into photoreal scenery. I have many personal freeware projects that use this technique for airports in the NJ area for MegaSceneryEarth textures (you can find these at MSE Airports) and for the past few months I've been assisting the fine folks over at FranceVFR at blending and upgrading airports all over France for their commercial products. Below is a shot of my most recent project (LFBO) for the recently released Midi-Pyrénées vol 2 scenery:
Thanks for watching/reading It was a good deal of effort to make the time lapse, I will admit. I don't see myself doing another one but hopefully some of you will give it a shot. Would love to see some other airports come to life!
The project took 11.8 hours to complete according to my work log and probably would have been an hour or so less but I spent some R&D time on seeing if Vehicle links could be used to draw white line ground markings (in some cases yes but in most no, you'll see me remove a lot of them) and also the helicopter parking markings took a bit of trial-and-error to get right, although I had already gotten them working at another airport but the line running through them was different this time. Speaking of trial-and-error, you also don't see me enter the sim from time to time to check on things.
I used Chronolapse to capture an image of my screen every 5 seconds. These images were stored as high-res PNG files (7,289 of them totaling 4.41GB) and then I went through them all to remove any that held the screen for several images without changing (probably while I was off referencing on another monitor) and also some screens that caught me in other programs or one time when ADE crashed - stuff that would jar you out of the rest of the time lapse within ADE. I then loaded all the images in Sony Vegas Pro 9 for final editing. The video plays at a rate of 10 images per second, although some repetitive sections you'll notice are sped up (to 30 images per second).
The video is just over 11 minutes long, with some shots afterwards of the finished airport in FSX (unfortunately without the ground texture):
http://youtu.be/yGzbYUBbhpw
(it's too bad there aren't any 11min long songs I can attach to this video I would subject any of you to)
To explain what you're seeing as the video progresses: First I begin with the default airport and strip it entirely down to just the runway(s). Then I go through and check properties of the airport and runways and comms against real world data. Next I need to edit and load my background image. Next I need to align the runways and PAPI lights against the background image. Next I put in perimeter fencing where required. Next I need to draw all the apron/taxiway surfaces aircraft will be moving on. Next I need to draw all the taxi lines and ground markings. Next I add all the available parking. Next I put in taxi signs around the airport. Next I draw the AI path system and hook it up to the parking spots. Next I place any vehicle roads and paths needed around the airport. Next I place a flatten poly within the airport grounds as dictated by the perimeter fence. There's also some final stuff like starting positions, the tower viewpoint, fuel triggers, etc. There are a few short pauses as I complete each of these major steps.
My rather unorthodox approach to airport design has several reasons. First, "drawing" the aprons the way I do gives me a huge amount of accuracy in matching the ground textures. I can draw an apron so that it covers the taxiway but leaves gravel runoff on either side visible, as well as light locations even. This makes the "blend" between the ground and the taxiway surface practically seamless. With the taxiways and aprons being bare surface, I can use Apron links to similarly "draw" ground markings with increased accuracy to make all taxi lines and markings appear almost exactly as they do at the real airport. Keeping everything within the default capabilities FSX offers means I'm left with two BGL files (airport and flatten) without having to mess with a bunch of textures as well.
There is a single major downside to this technique, and it was big enough to keep me from developing commercial airports until I solved it last year. Proper taxi-in clearance for aircraft is still an issue caused by the ATC node jump (explained in detail in Don Grovestine's Drive Through Parking tutorial - Page 4), especially on taxiways that curve as they leave the runway, but with careful planning and foresight during development the issue can be avoided.
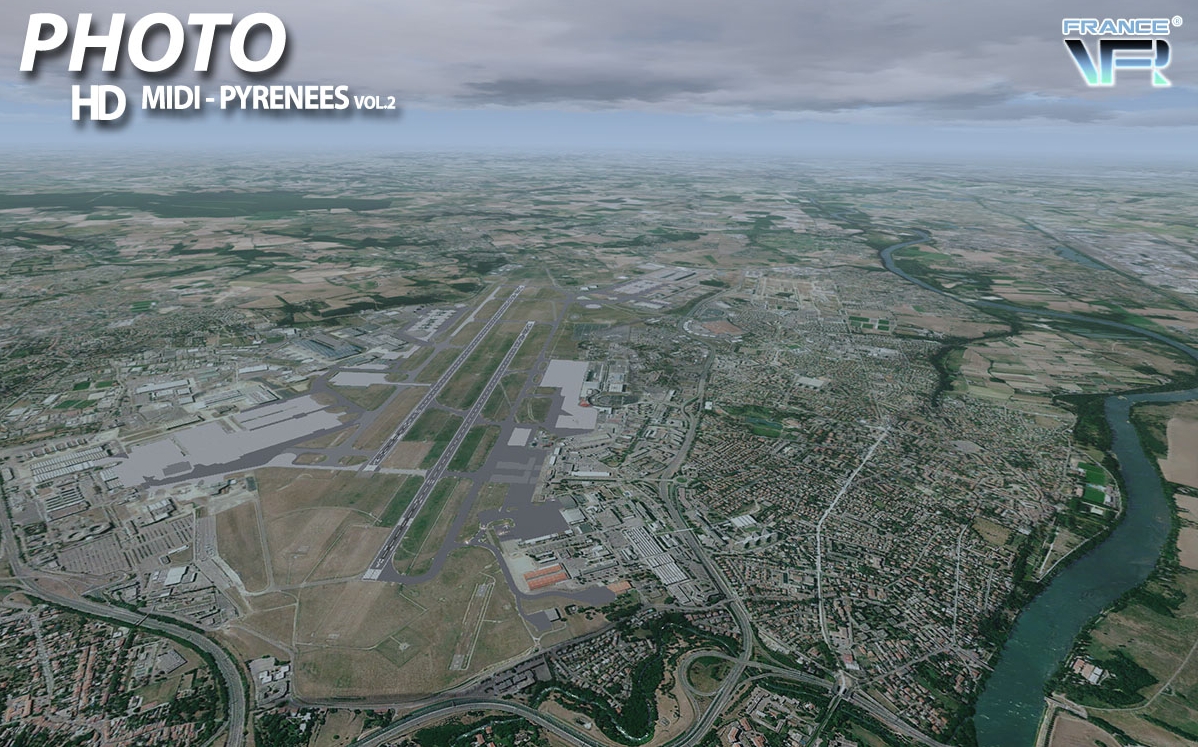
Currently I develop airports in this way to blend into photoreal scenery. I have many personal freeware projects that use this technique for airports in the NJ area for MegaSceneryEarth textures (you can find these at MSE Airports) and for the past few months I've been assisting the fine folks over at FranceVFR at blending and upgrading airports all over France for their commercial products. Below is a shot of my most recent project (LFBO) for the recently released Midi-Pyrénées vol 2 scenery:
Thanks for watching/reading
It was a good deal of effort to make the time lapse, I will admit. I don't see myself doing another one but hopefully some of you will give it a shot. Would love to see some other airports come to life!
Last edited: