
ok now I have the MDL file for p3dv4, how can I create the library bgl??You will need model converter x, which you can download here:https://www.scenerydesign.org/modelconverterx/
Once you have done this, export the .blend file as an obj and import in to model converter x, and convert to an MDL file. Then create a library bgl file and put the textures into the textures folder and put information about the object in the library object manager and place the object in the ADE display. And put the textures into your textures folder and put the library bgl you created into addon scenery\scenery and textures into addon scenery\texture. Hope this helps.
-
Which the release of FS2020 we see an explosition of activity on the forun and of course we are very happy to see this. But having all questions about FS2020 in one forum becomes a bit messy. So therefore we would like to ask you all to use the following guidelines when posting your questions:
- Tag FS2020 specific questions with the MSFS2020 tag.
- Questions about making 3D assets can be posted in the 3D asset design forum. Either post them in the subforum of the modelling tool you use or in the general forum if they are general.
- Questions about aircraft design can be posted in the Aircraft design forum
- Questions about airport design can be posted in the FS2020 airport design forum. Once airport development tools have been updated for FS2020 you can post tool speciifc questions in the subforums of those tools as well of course.
- Questions about terrain design can be posted in the FS2020 terrain design forum.
- Questions about SimConnect can be posted in the SimConnect forum.
Any other question that is not specific to an aspect of development or tool can be posted in the General chat forum.
By following these guidelines we make sure that the forums remain easy to read for everybody and also that the right people can find your post to answer it.
You are using an out of date browser. It may not display this or other websites correctly.
You should upgrade or use an alternative browser.
You should upgrade or use an alternative browser.
elevated bridge before the jetway
- Thread starter davide96
- Start date
- Messages
- 82
- Country

There is an excellent tutorial here: https://scruffyduck.screenstepslive...9783-adding-library-object-information-to-ade

ok now I have the MDL file for p3dv4, how can I create the library bgl??
AFAIK, you can either:
* export from MCX as a FSX scenery BGL
...or:
* 'place' the FSX format MDL in MCX with the MCX Object Placement feature, then export from MCX as a FSX scenery BGL
...or:
* add the MDL to a FSX format "scenery object library" BGL external to MCX, with this utility:
Library Creator XML 2.0.3
https://www.fsdeveloper.com/forum/resources/library-creator-xml.86/
......before attempting to import that BGL into ADE Library Object Manager, and then 'place' the 3D model with ADE.
GaryGB
Last edited:
- Messages
- 82
- Country
Yes. Don't forget, when you are importing into ADE, you position the object parallel to the jetway.
 , but the problem is that I don't have the texture but the 3d model is ok
Ok, the 3d model is ok but the texture a completely black, in model converter x i see the texture, but not in the simYes. Don't forget, when you are importing into ADE, you position the object parallel to the jetway.
Before exporting from MCX as a FSX or P3D scenery, in MCX Material Editor, did you: ?
* set the Texture output path to a new project \Texture sub-folder (paired with a local \Scenery sub-folder under a Top-folder)
* Convert to DDS texture in "Powers of 2" file format with permission to over-write originals
When exporting from MCX as a FSX or P3D scenery object library BGL containing the 3D model with placement, did you: ?
* set the Scenery BGL output path to a new \Scenery sub-folder (paired with the above \Texture sub-folder under a Top-folder)
If creating a separate placement BGL via ex: ADE, did you put that placement BGL into the above local paired \Scenery folder ?
GaryGB
how to do these steps???Before exporting from MCX as a FSX or P3D scenery, in MCX Material Editor, did you: ?
* set the Texture output path to a new project \Texture sub-folder (paired with a local \Scenery sub-folder under a Top-folder)
* Convert to DDS texture in "Powers of 2" file format with permission to over-write originals
When exporting from MCX as a FSX or P3D scenery object library BGL containing the 3D model with placement, did you: ?
* set the Scenery BGL output path to a new \Scenery sub-folder (paired with the above \Texture sub-folder under a Top-folder)
If creating a separate placement BGL via ex: ADE, did you put that placement BGL into the above local paired \Scenery folder ?
GaryGB
I didn't understand this: * set the Texture output path to a new project \Texture sub-folder (paired with a local \Scenery sub-folder under a Top-folder)Before exporting from MCX as a FSX or P3D scenery, in MCX Material Editor, did you: ?
* set the Texture output path to a new project \Texture sub-folder (paired with a local \Scenery sub-folder under a Top-folder)
* Convert to DDS texture in "Powers of 2" file format with permission to over-write originals
When exporting from MCX as a FSX or P3D scenery object library BGL containing the 3D model with placement, did you: ?
* set the Scenery BGL output path to a new \Scenery sub-folder (paired with the above \Texture sub-folder under a Top-folder)
If creating a separate placement BGL via ex: ADE, did you put that placement BGL into the above local paired \Scenery folder ?
GaryGB
and this:
When exporting from MCX as a FSX or P3D scenery object library BGL containing the 3D model with placement, did you: ?
* set the Scenery BGL output path to a new \Scenery sub-folder (paired with the above \Texture sub-folder under a Top-folder)
If creating a separate placement BGL via ex: ADE, did you put that placement BGL into the above local paired \Scenery folder ?
Hi Davide:
FSX / P3D will not detect and load 3D scenery MDLs unless they are packaged inside a BGL.
FSX / P3D will not detect and load 3D scenery MDLs unless they are 'placed' via instructions inside a BGL.
FSX / P3D will not detect and load 3D scenery in an assigned display priority unless listed and set 'active' via Scenery.Cfg
IMHO, it is not a good idea to simply drop 'mod' BGLs / mapped textures into FS default Addon Scenery folder chain.
It is best, IMHO, to create a 'folder chain' for one's mods / add-ons, and link an Area layer to it in Scenery Library GUI.
The scenery folder chain linked to an Area layer is assigned a display priority by its "stack" position in Scenery.Cfg.
We control BGL load / display priority within a linked \Scenery folder's Area layer via BGL "alphanumeric" file naming.
For a 3D model mod to display in assigned priority, we create a "folder chain":
* A "Top-Folder" with (2) locally paired sub-folders, named:
* Scenery
...and:
* Texture
LIRF_Davide_Mods <-- Top-Folder
...|_Scenery <-- 3D model (MDL) packaged inside 'Scenery Object Library' format & placement BGLs go here
...|_Texture <-- Texture Material(s) mapped onto 3D model go here
.............................(convert copy of original texture to DDS file format for FSX / P3D)
For a 3D model mod to display in assigned priority, we must link a "Top-Folder" with (2) locally paired sub-folders to an Area layer in FSX / P3D Scenery Library GUI.
Once linked via the FSX / P3D Scenery Library, the new Area is positioned at the desired layer position in the "stack".
Area layers higher towards the top of the "stack" of layers, have higher display priority.
Typically we place airport mods near the top of the "stack" of layers to achieve display priority above FS default.
This allows us to exclude- and replace- or add to- the underlying default airport / any add-on airport ...scenery.
When processing a 3D model exported by our 3D modeling application via MCX, have a target folder chain ready.
In MCX, [Import] the Blender exported 3D model in OBJ, DAE or other format
On the MCX icon toolbar > click button #7 to launch Material Editor.
Refer to the MCX Manual which comes inside MCX' ZIP file installer and all development version updates:
ModelConverterX.pdf > 6.5 Material editor > 6.5.2 Textures tab
On MCX {Textures} tab on the second line of the dialog box:
* Texture Folder > click [...] button to Browse / Select MCX target output sub-folder path to ex:
[FSX install path]\Addon Scenery\LIRF_Davide_Mods\Texture
On MCX {Textures} tab on the second line of the dialog box:
[Format Convert] pick-list > DDS (required for FSX / P3D) "check" both these options:
* Ensure size Power of two
* Over-write existing textures (this means any already inside that target folder but not one's original source MDL)
Click to highlight and select the entire stack of textures listed as mapped onto the 3D MDL you are converting
Click [Save Textures] button; (...wait for all files to be converted before proceeding further)
On MCX {Textures} tab on the second line of the dialog box:
If desired, click [Prefix all with model name] to add the 3D model's name at the start of all mapped Texture names
Close Material Editor, and return to MCX 3D Preview workspace
On the MCX icon toolbar > click button #5 to launch Object Placement.
Refer to the MCX Manual which comes inside MCX' ZIP file installer and all development version updates:
ModelConverterX.pdf > 6.3 Object placement editor
After your 3D model is 'placed', close Object Placement Editor, and return to MCX 3D Preview workspace
On the MCX Menu > click [Export Scenery] > Save As dialog > Save as type: FSX BGL file (*.bgl)
Browse / Select MCX target output sub-folder path to your target locally-paired scenery Area layer sub-folder ex:
[FSX install path]\Addon Scenery\LIRF_Davide_Mods\Scenery
(...or as previously shown above as a folder chain: )
[FSX install path]
...|_\Addon Scenery
......|_\LIRF_Davide_Mods
......|_\Scenery
After export of your scenery as a (hybrid) FSX Scenery Object Library consisting of (1) 3D model with placement code:
In FSX / P3D Scenery Library GUI >Add Area > link your scenery folder chain > position in 'stack' for display priority,
Run FSX / P3D and inspect your results.
I hope this gives you a more informative guide to the steps that may be performed via the MCX export feature set.")
NOTE: There is a FSX / P3D export plugin for Blender that may help automate (some) of the steps described above:
https://www.fsdeveloper.com/forum/forums/blender.136/
PS: As you may know, the default FSX / P3D Rome LIRF airport is in:
[FSX install path]\Scenery\0602\scenery\APX51170.bgl
This can be imported to ADE / used as a guide for your mod 3D model size / shape / position with default JetWays.
FYI, the default FSX / P3D Rome LIRF terminal 3D model is in:
[FSX install path]\Scenery\EURW\scenery\Rome.bgl
This can be imported to MCX / used as a guide for your mod 3D model size / shape / position with default JetWays.
GaryGB
FSX / P3D will not detect and load 3D scenery MDLs unless they are packaged inside a BGL.
FSX / P3D will not detect and load 3D scenery MDLs unless they are 'placed' via instructions inside a BGL.
FSX / P3D will not detect and load 3D scenery in an assigned display priority unless listed and set 'active' via Scenery.Cfg
IMHO, it is not a good idea to simply drop 'mod' BGLs / mapped textures into FS default Addon Scenery folder chain.
It is best, IMHO, to create a 'folder chain' for one's mods / add-ons, and link an Area layer to it in Scenery Library GUI.
The scenery folder chain linked to an Area layer is assigned a display priority by its "stack" position in Scenery.Cfg.
We control BGL load / display priority within a linked \Scenery folder's Area layer via BGL "alphanumeric" file naming.
For a 3D model mod to display in assigned priority, we create a "folder chain":
* A "Top-Folder" with (2) locally paired sub-folders, named:
* Scenery
...and:
* Texture
LIRF_Davide_Mods <-- Top-Folder
...|_Scenery <-- 3D model (MDL) packaged inside 'Scenery Object Library' format & placement BGLs go here
...|_Texture <-- Texture Material(s) mapped onto 3D model go here
.............................(convert copy of original texture to DDS file format for FSX / P3D)
For a 3D model mod to display in assigned priority, we must link a "Top-Folder" with (2) locally paired sub-folders to an Area layer in FSX / P3D Scenery Library GUI.
Once linked via the FSX / P3D Scenery Library, the new Area is positioned at the desired layer position in the "stack".
Area layers higher towards the top of the "stack" of layers, have higher display priority.
Typically we place airport mods near the top of the "stack" of layers to achieve display priority above FS default.
This allows us to exclude- and replace- or add to- the underlying default airport / any add-on airport ...scenery.
When processing a 3D model exported by our 3D modeling application via MCX, have a target folder chain ready.
In MCX, [Import] the Blender exported 3D model in OBJ, DAE or other format
On the MCX icon toolbar > click button #7 to launch Material Editor.
Refer to the MCX Manual which comes inside MCX' ZIP file installer and all development version updates:
ModelConverterX.pdf > 6.5 Material editor > 6.5.2 Textures tab
On MCX {Textures} tab on the second line of the dialog box:
* Texture Folder > click [...] button to Browse / Select MCX target output sub-folder path to ex:
[FSX install path]\Addon Scenery\LIRF_Davide_Mods\Texture
On MCX {Textures} tab on the second line of the dialog box:
[Format Convert] pick-list > DDS (required for FSX / P3D) "check" both these options:
* Ensure size Power of two
* Over-write existing textures (this means any already inside that target folder but not one's original source MDL)
Click to highlight and select the entire stack of textures listed as mapped onto the 3D MDL you are converting
Click [Save Textures] button; (...wait for all files to be converted before proceeding further)
On MCX {Textures} tab on the second line of the dialog box:
If desired, click [Prefix all with model name] to add the 3D model's name at the start of all mapped Texture names
Close Material Editor, and return to MCX 3D Preview workspace
On the MCX icon toolbar > click button #5 to launch Object Placement.
Refer to the MCX Manual which comes inside MCX' ZIP file installer and all development version updates:
ModelConverterX.pdf > 6.3 Object placement editor
After your 3D model is 'placed', close Object Placement Editor, and return to MCX 3D Preview workspace
On the MCX Menu > click [Export Scenery] > Save As dialog > Save as type: FSX BGL file (*.bgl)
Browse / Select MCX target output sub-folder path to your target locally-paired scenery Area layer sub-folder ex:
[FSX install path]\Addon Scenery\LIRF_Davide_Mods\Scenery
(...or as previously shown above as a folder chain: )
[FSX install path]
...|_\Addon Scenery
......|_\LIRF_Davide_Mods
......|_\Scenery
After export of your scenery as a (hybrid) FSX Scenery Object Library consisting of (1) 3D model with placement code:
In FSX / P3D Scenery Library GUI >Add Area > link your scenery folder chain > position in 'stack' for display priority,
Run FSX / P3D and inspect your results.
I hope this gives you a more informative guide to the steps that may be performed via the MCX export feature set.
NOTE: There is a FSX / P3D export plugin for Blender that may help automate (some) of the steps described above:
https://www.fsdeveloper.com/forum/forums/blender.136/
PS: As you may know, the default FSX / P3D Rome LIRF airport is in:
[FSX install path]\Scenery\0602\scenery\APX51170.bgl
This can be imported to ADE / used as a guide for your mod 3D model size / shape / position with default JetWays.
FYI, the default FSX / P3D Rome LIRF terminal 3D model is in:
[FSX install path]\Scenery\EURW\scenery\Rome.bgl
This can be imported to MCX / used as a guide for your mod 3D model size / shape / position with default JetWays.
GaryGB
Last edited:

I have not yet tested this in FSX / P3D yet, but it loads OK in MCX; however it is not "placed".
You could try to add this scenery object library of (1 - MDL within a BGL) to ADE Library Object Manager, and place it with ADE,
I shall test this later this morning in FSX / P3D using MCX, ADE, and another scenery object library utility to "place" it.
GaryGB
You could try to add this scenery object library of (1 - MDL within a BGL) to ADE Library Object Manager, and place it with ADE,
I shall test this later this morning in FSX / P3D using MCX, ADE, and another scenery object library utility to "place" it.
GaryGB
Last edited:
Hi Davide:
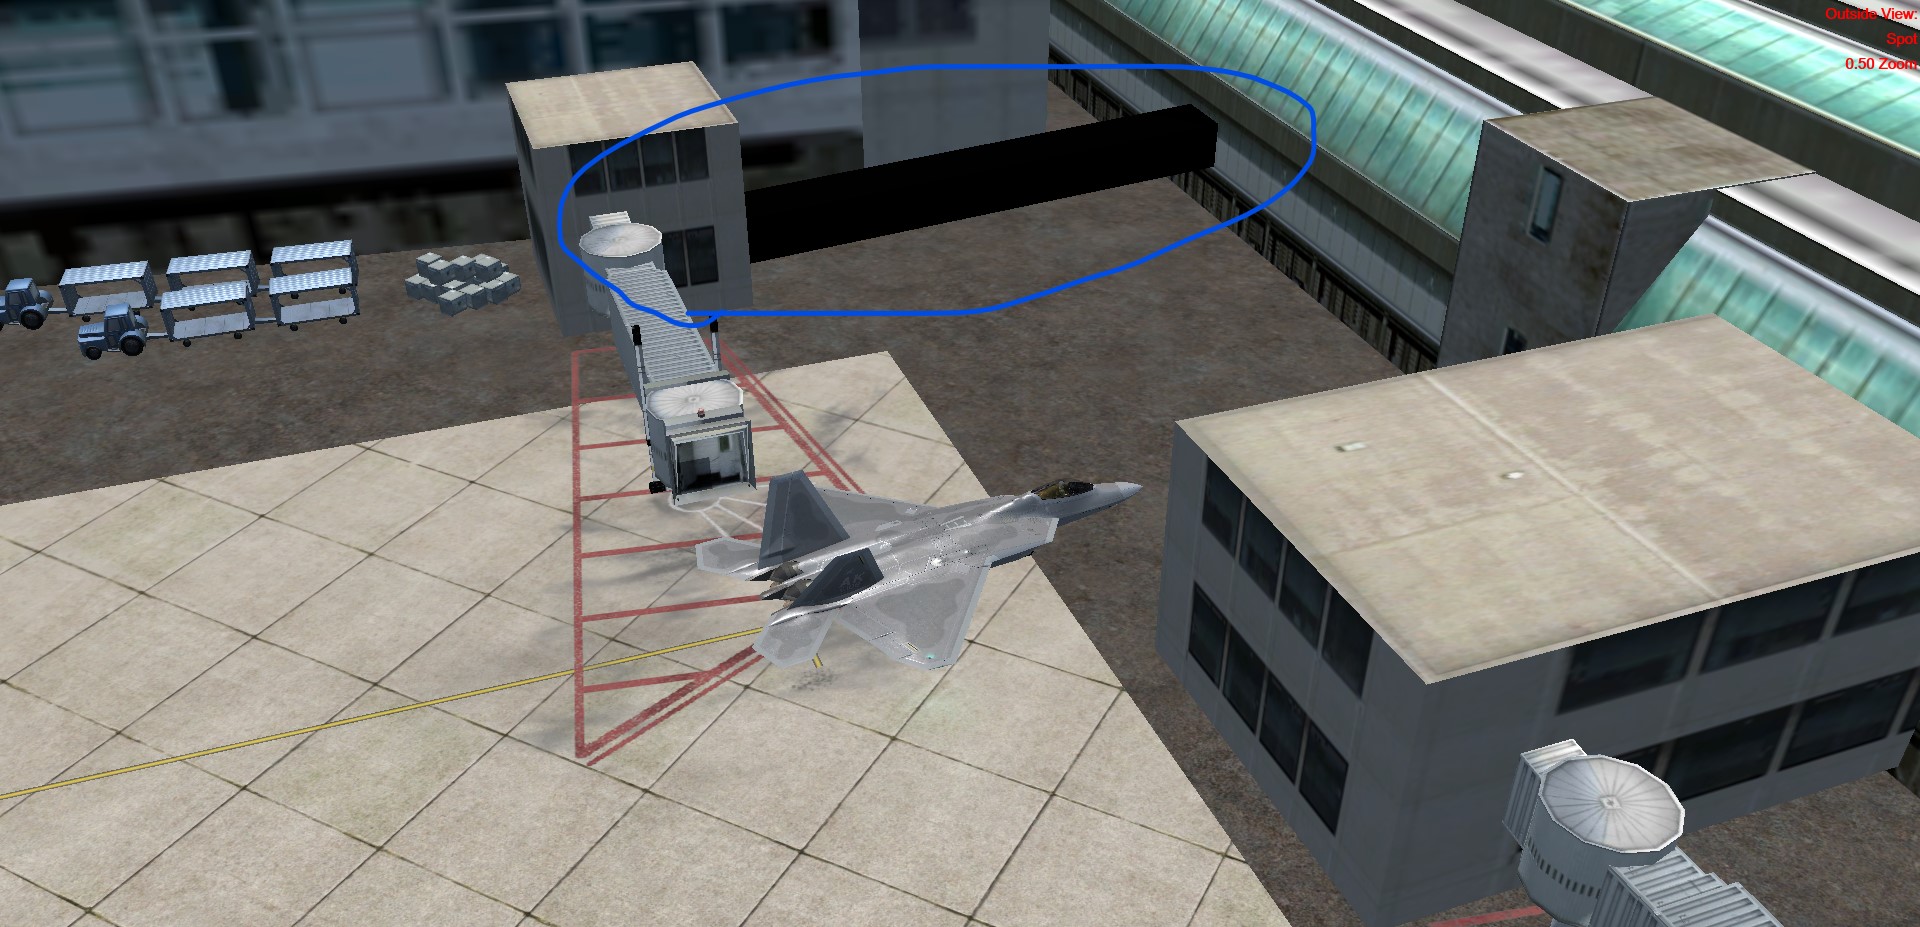
I have looked at your 3D model of a Jetway "Bridge" object relative to the proposed task of adding it to FS scenery.
In theory, you could simply "place" your 3D model of a Jetway "Bridge" object relative to Terminal / Jetway objects in LIRF FS scenery.
But, IMHO, we must determine exactly what your scenery installation / configuration actually consists of at this point in time.
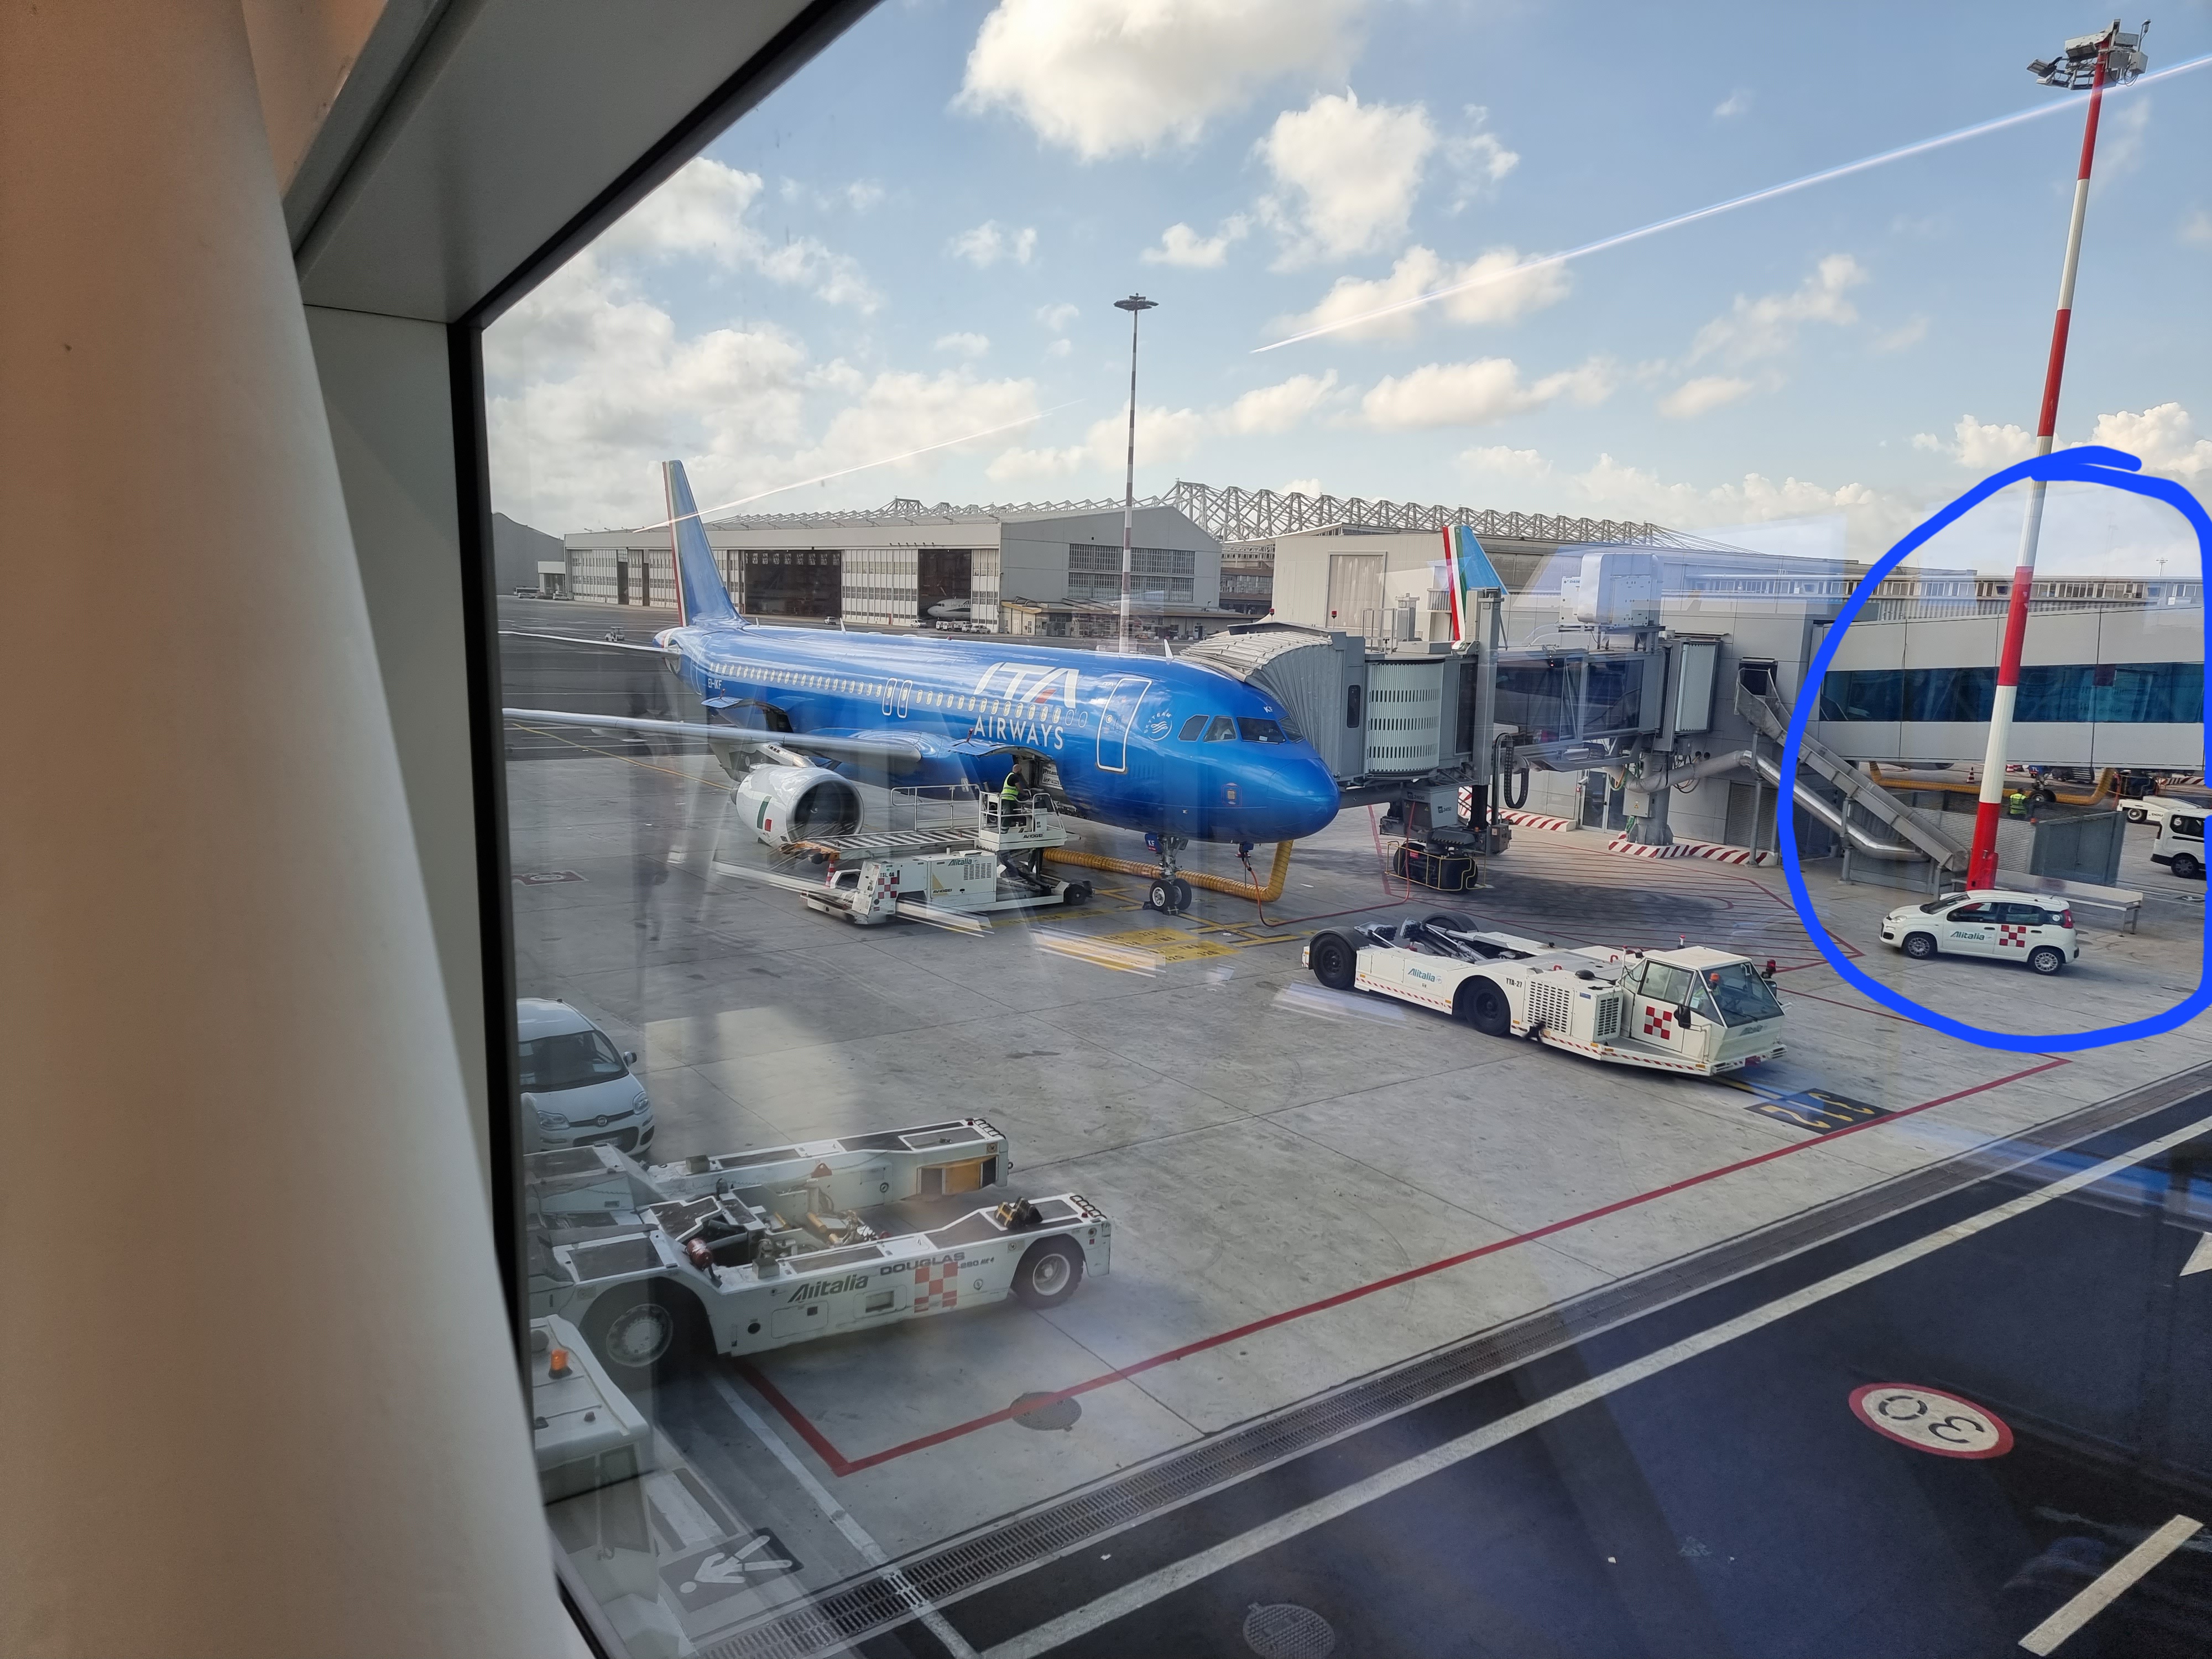
First, your photo:
...shows a different configuration for LIRF than FSX / P3D default scenery.
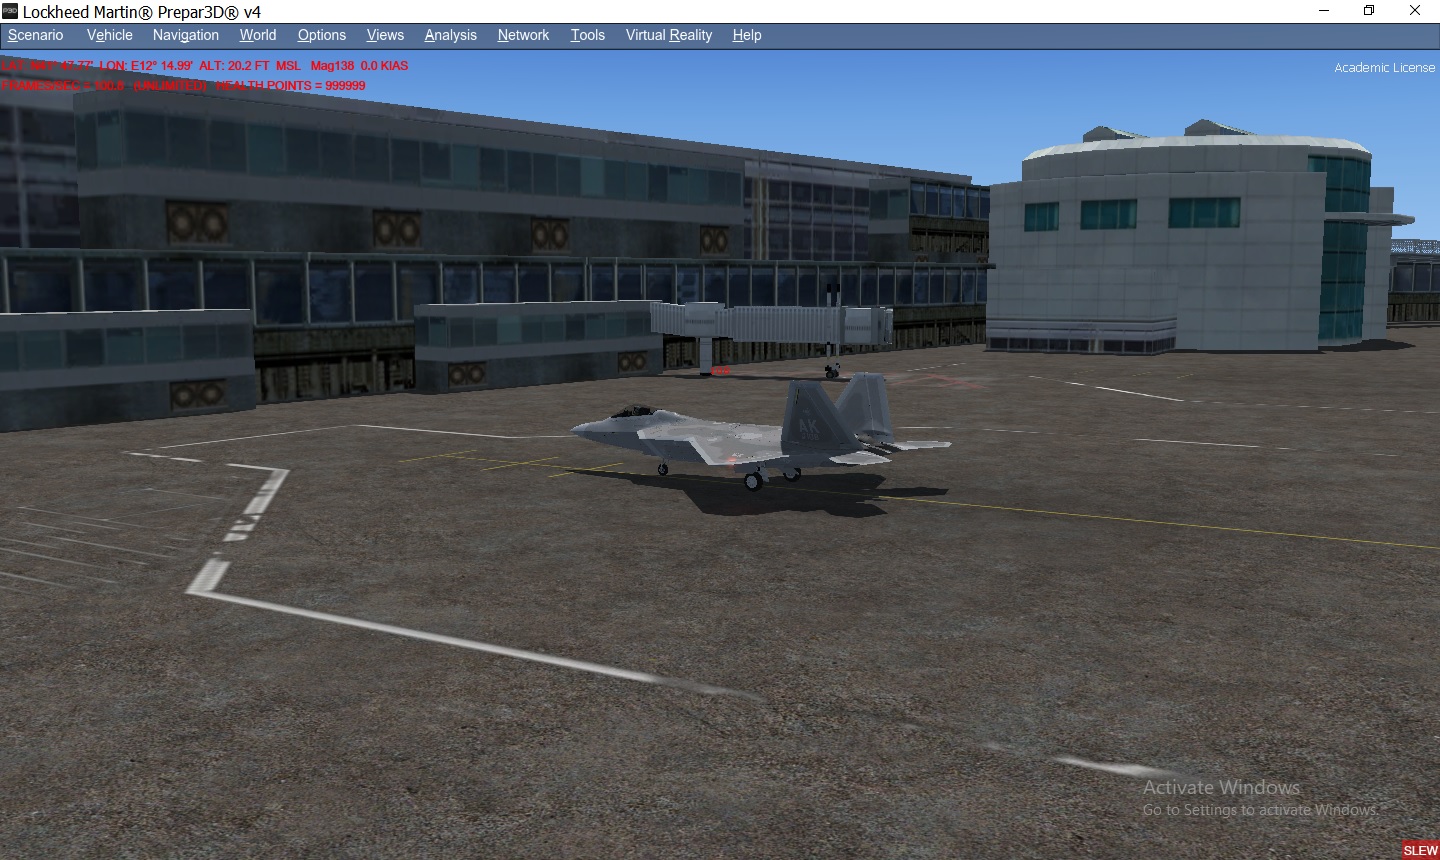

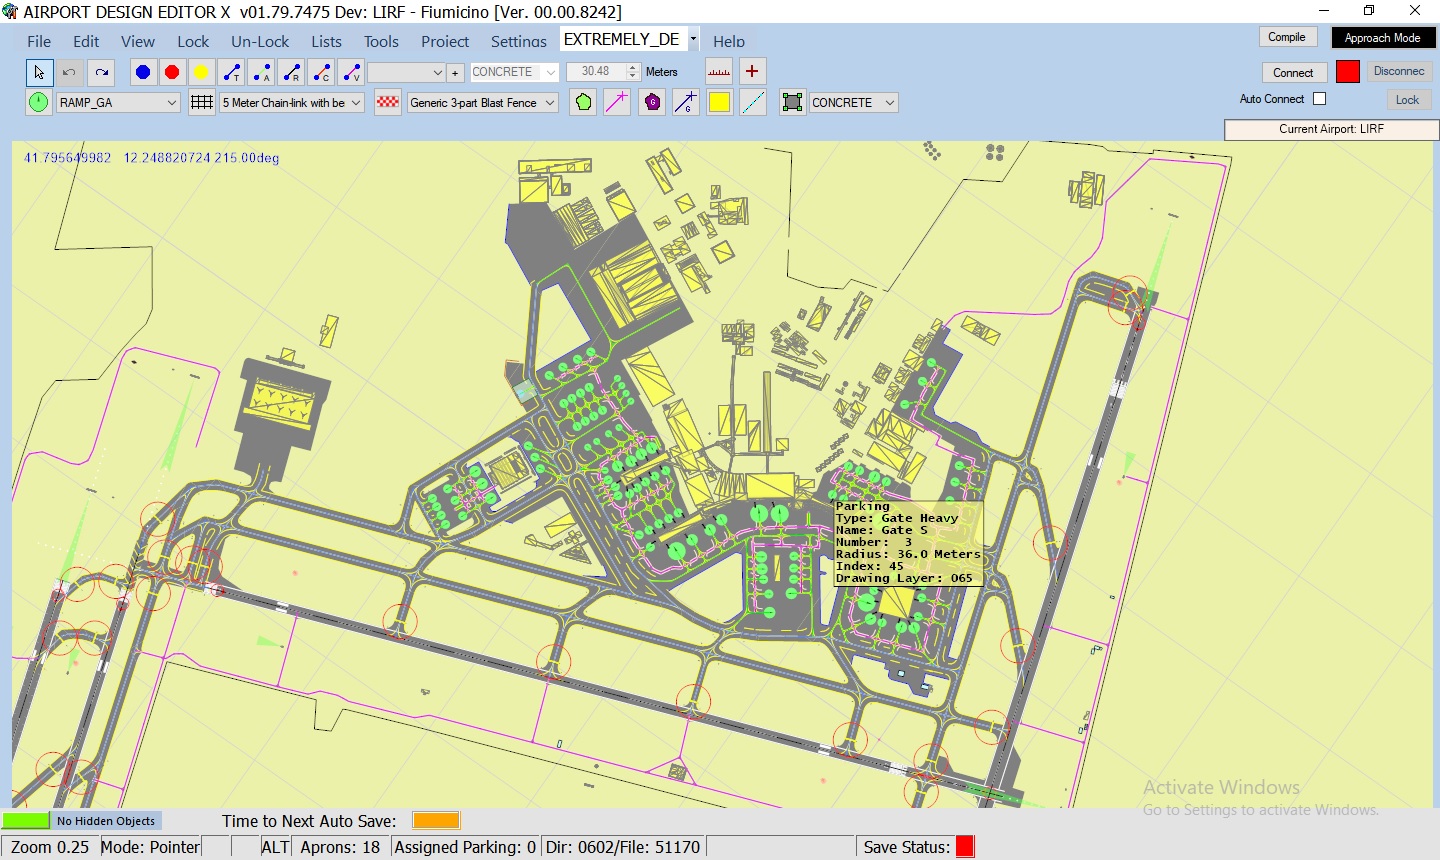
Also, we can compare the FSX default AFD configuration viewed in ADE ...with your photo above:
If we look at the IRL photo in your OP, I infer it is a view from LIRF taken approximately at what 'was' a (year 2015) Parking 333 position:
If you download / install Google Earth Desktop Edition here:
https://www.google.com/earth/versions/#download-pro
...then download / un-ZIP / double-click the KMZ file in the ZIP attached at the bottom of this post, IIUC, you see this Google Earth view of LIRF from the vantage point, of your OP photo using imagery and 3D photogrammetry derived from year 2015.

Obviously the LIRF configuration between all these sources does not match very well.
What add-on(s) are you using, and are they freeware or payware ?
I assume this is intended for personal use only, and will not be released to the public in any way.
While you could import FS' default LIRF Main Terminal into MCX, export it as an OBJ, then edit it in Blender or Sketchup, any "Bridge" objects such as you have made would need to be placed adjacent to- / not interfering with- Jetways intended to be animated at run time.
But if you planned to exclude / replace, or move any Jetways, replacement Jetways would need to be placed using ADE and/or SODE, adjacent to any "Bridge" objects such as you have made, in order to be animated at run time.
FYI: Animated Jetways involve complex considerations / parameters for positioning and control of conditional display ...in order to work.
Also, AFAIK, run time conditions for display of animated Jetways has some distinctions in FSX and P3Dv4.x.
Since that is an advanced topic for highly experienced airport developers, I suggest that you use a fully functional payware LIRF scenery.
Personally, my FS development activities do not involve "heavies" at large airports with Jetways; others here may offer you more help.
But, if you still want to modify LIRF as you describe in your OP above in this thread, there will be substantial learning involved.
If you disclose all LIRF add-ons (payware or freeware) you intend to use, a tutorial may be posted by someone who also has that scenery.
GaryGB
I have looked at your 3D model of a Jetway "Bridge" object relative to the proposed task of adding it to FS scenery.
In theory, you could simply "place" your 3D model of a Jetway "Bridge" object relative to Terminal / Jetway objects in LIRF FS scenery.
But, IMHO, we must determine exactly what your scenery installation / configuration actually consists of at this point in time.
First, your photo:
...shows a different configuration for LIRF than FSX / P3D default scenery.
Also, we can compare the FSX default AFD configuration viewed in ADE ...with your photo above:
If we look at the IRL photo in your OP, I infer it is a view from LIRF taken approximately at what 'was' a (year 2015) Parking 333 position:
If you download / install Google Earth Desktop Edition here:
https://www.google.com/earth/versions/#download-pro
...then download / un-ZIP / double-click the KMZ file in the ZIP attached at the bottom of this post, IIUC, you see this Google Earth view of LIRF from the vantage point, of your OP photo using imagery and 3D photogrammetry derived from year 2015.
Obviously the LIRF configuration between all these sources does not match very well.
What add-on(s) are you using, and are they freeware or payware ?
I assume this is intended for personal use only, and will not be released to the public in any way.
While you could import FS' default LIRF Main Terminal into MCX, export it as an OBJ, then edit it in Blender or Sketchup, any "Bridge" objects such as you have made would need to be placed adjacent to- / not interfering with- Jetways intended to be animated at run time.
But if you planned to exclude / replace, or move any Jetways, replacement Jetways would need to be placed using ADE and/or SODE, adjacent to any "Bridge" objects such as you have made, in order to be animated at run time.
FYI: Animated Jetways involve complex considerations / parameters for positioning and control of conditional display ...in order to work.
Also, AFAIK, run time conditions for display of animated Jetways has some distinctions in FSX and P3Dv4.x.
Since that is an advanced topic for highly experienced airport developers, I suggest that you use a fully functional payware LIRF scenery.
Personally, my FS development activities do not involve "heavies" at large airports with Jetways; others here may offer you more help.
But, if you still want to modify LIRF as you describe in your OP above in this thread, there will be substantial learning involved.
If you disclose all LIRF add-ons (payware or freeware) you intend to use, a tutorial may be posted by someone who also has that scenery.
GaryGB
Attachments


Last edited:
OK, which one, and where can we download it ?it is a freeware add on, and I wanted to modify it as real as possible.
GaryGB
OK, which one, and where can we download it ?
GaryGB
AVSIM Library
Flight simulators premier web site. Freeware, forums, community; it all comes together at AVSIM.
library.avsim.net
NOTICE to all interested readers:
This thread continues here:
https://www.fsdeveloper.com/forum/threads/scenery-objects-issue.455715/#post-905631
GaryGB
This thread continues here:
https://www.fsdeveloper.com/forum/threads/scenery-objects-issue.455715/#post-905631
GaryGB