-
Which the release of FS2020 we see an explosition of activity on the forun and of course we are very happy to see this. But having all questions about FS2020 in one forum becomes a bit messy. So therefore we would like to ask you all to use the following guidelines when posting your questions:
- Tag FS2020 specific questions with the MSFS2020 tag.
- Questions about making 3D assets can be posted in the 3D asset design forum. Either post them in the subforum of the modelling tool you use or in the general forum if they are general.
- Questions about aircraft design can be posted in the Aircraft design forum
- Questions about airport design can be posted in the FS2020 airport design forum. Once airport development tools have been updated for FS2020 you can post tool speciifc questions in the subforums of those tools as well of course.
- Questions about terrain design can be posted in the FS2020 terrain design forum.
- Questions about SimConnect can be posted in the SimConnect forum.
Any other question that is not specific to an aspect of development or tool can be posted in the General chat forum.
By following these guidelines we make sure that the forums remain easy to read for everybody and also that the right people can find your post to answer it.
You are using an out of date browser. It may not display this or other websites correctly.
You should upgrade or use an alternative browser.
You should upgrade or use an alternative browser.
Sketchup and UVMAP
- Thread starter AeroFiles
- Start date
- Messages
- 34,385
- Country

Hi,
Internally SketchUp uses UV coordinates as well, but there is no UVMap edit like in GMax. If there would be a plugin for that I would be happy to know it as well.
As far as I know the only way is to position and rotate the texture for each polygon. Which can indeed be quite annoying.
Internally SketchUp uses UV coordinates as well, but there is no UVMap edit like in GMax. If there would be a plugin for that I would be happy to know it as well.
As far as I know the only way is to position and rotate the texture for each polygon. Which can indeed be quite annoying.
- Messages
- 308
- Country

Maybe this will work, but it is not free and uses an external editor for the texture coordinates and then gets the model back into Sketchup.
http://www.smustard.com/script/SketchUV
http://www.smustard.com/script/SketchUV
tgibson
Resource contributor
- Messages
- 11,781
- Country

You do know about the basic mapping tool in Sketchup, right? It allows you to place, rotate, and scale a texture onto a polygon or polygons? And it is a visual tool, like UVWMap.
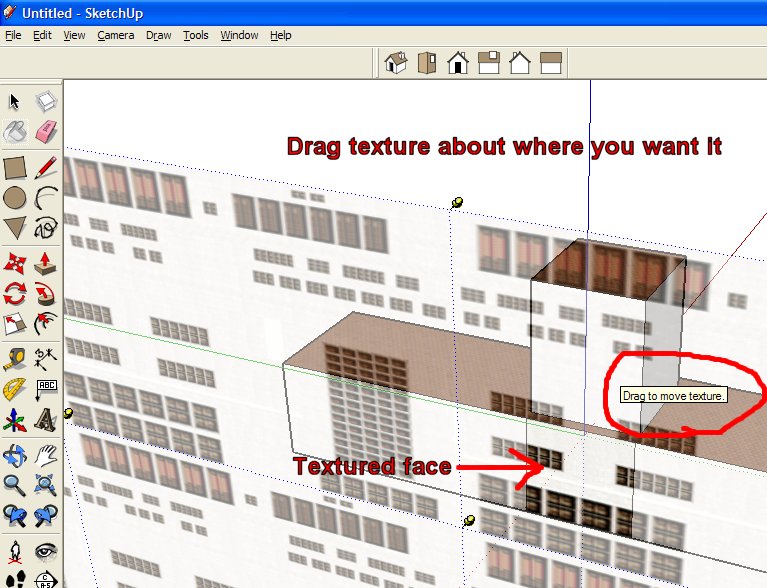
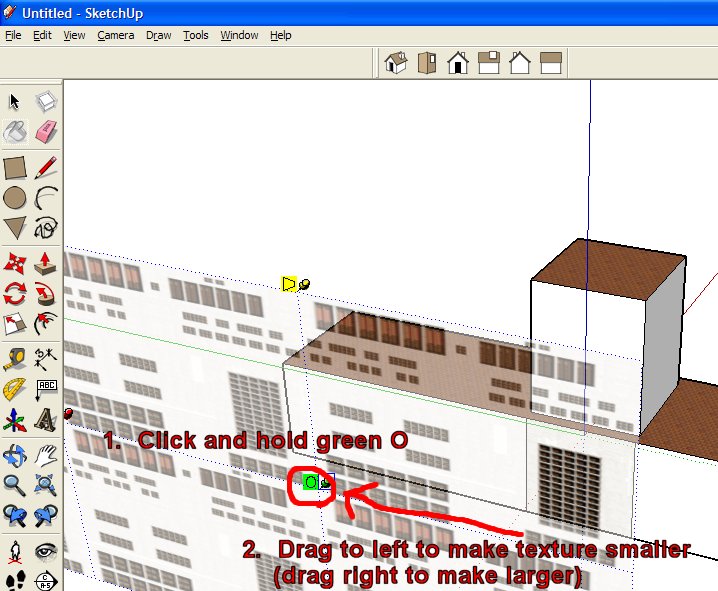
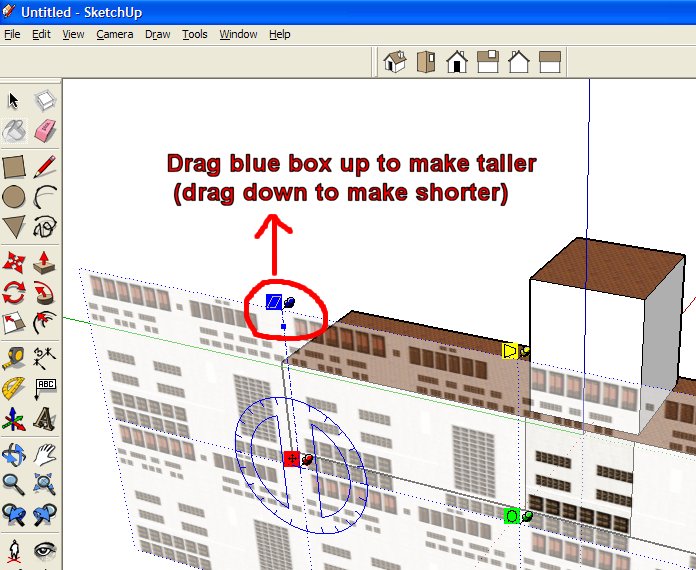
More details about these images in my tutorial:
http://www.calclassic.com/sketchup_tutorial.htm
Hope this helps,
More details about these images in my tutorial:
http://www.calclassic.com/sketchup_tutorial.htm
Hope this helps,
- Messages
- 308
- Country
Thanks for that guide there ")
When I export it to 3DS to import in ModelConverterX do I export without materials from Sketchup or that does not matter?
I have only used it for a few days.
Edit: It is a painfull task to adjust the textures when it is for an entire airport.
When I export it to 3DS to import in ModelConverterX do I export without materials from Sketchup or that does not matter?
I have only used it for a few days.
Edit: It is a painfull task to adjust the textures when it is for an entire airport.
Last edited:
tgibson
Resource contributor
- Messages
- 11,781
- Country
It is painful in GMAX too, but I agree it is a bit easier than Sketchup. You do get pretty fast once you've done it a few times. There are Sketchup texturing tutorials out there that include more sophisticated techniques (my tutorial is just for beginners), but AFAIK they all use this interface.
If you are going to do your texture mapping in GMAX it doesn't matter, but if you want to keep what mapping you have done in Sketchup you should export with Materials. Then after exporting the 3DS file using MCX, you can import it into GMAX.
Some tips:
1. Import the Sketchup file into ModelConverterX.
2. Export model as a 3DS file.
3. Copy any textures used and place into folder with 3DS file. Convert those copied textures to 24 bit BMP with DXTBmp. You can get a list of textures used by that model in ModelConverterX's Material Editor.
4. In GMAX, File/Import/3DS, browse to your new 3DS file.
5. Open Material Navigator (3 colored balls button up top).
6. Choose From Entire
7. Double click each material with a texture, click each Map (texture) that starts with ~ and browse to the real one, and click the blue and white checkerboard box (displays texture on model). Close Navigator with red X. Your model should appear fully textured.
8. Select all objects using the parts list (h key, Select All)
9. Add an Edit Mesh modifier to the stack on the right from the drop down box, open it (black +) and choose Vertices mode.
10. Edit/Select All
11. From the stack, scroll down and press Weld Selected, with setting to the right at 0.005
12. Right click the stack, and choose Collapse All, click Yes at the warning
13. For any objects that need to be smooth (cylinders, spheres, etc.):
a. Select them in the parts list (press h) or Ctrl Click on each one in Select mode (arrow button up top).
b. Add an Edit Mesh modifier to the stack
c. Click black + and choose Polygon mode
d. Edit/Select All
e. From the stack, scroll down and choose AutoSmooth (or smooth manually if you need to).
f. Right click the stack and choose Collapse All, say yes at the warning.
14. Save the object as a GMAX file.
15. Edit the model as you like. Do not use the Mirror button at the top - instead add a Mirror modifier to the stack (use of button displays incorrectly in FS).
16. Save any changes with a new incremental number (GMAX can do this automatically in Settings) - it has a bad habit of corrupting files.
17. Now your object should be ready to export as an MDL file, using the MS SDK of your choice.
Hope this helps,
hcornea
Resource contributor
- Messages
- 2,388
- Country

OBJ is already an export option in ModelconverterX
Are you using one of these plugins Arno?
http://www.turbosquid.com/Forum/Index.cfm/stgAct/PostList/intThreadID/16045
Are you using one of these plugins Arno?
http://www.turbosquid.com/Forum/Index.cfm/stgAct/PostList/intThreadID/16045
Last edited:
- Messages
- 34,385
- Country
Hi,
In this blog post I made about it some time ago I have the link to the script I use:
http://www.scenerydesign.org/2011/10/importing-into-gmax/
In this blog post I made about it some time ago I have the link to the script I use:
http://www.scenerydesign.org/2011/10/importing-into-gmax/
- Messages
- 34,385
- Country
Does the OBJ export/import retain part smoothing and welded vertices, unlike 3DS?
Normals are stored so smoothing should be fine. Welding I am not sure.
Send from my phone using Tapatalk, so excuse the short sentences and possible typos