• Which the release of FS2020 we see an explosition of activity on the forun and of course we are very happy to see this. But having all questions about FS2020 in one forum becomes a bit messy. So therefore we would like to ask you all to use the following guidelines when posting your questions:

    • Tag FS2020 specific questions with the MSFS2020 tag.
    • Questions about making 3D assets can be posted in the 3D asset design forum. Either post them in the subforum of the modelling tool you use or in the general forum if they are general.
    • Questions about aircraft design can be posted in the Aircraft design forum
    • Questions about airport design can be posted in the FS2020 airport design forum. Once airport development tools have been updated for FS2020 you can post tool speciifc questions in the subforums of those tools as well of course.
    • Questions about terrain design can be posted in the FS2020 terrain design forum.
    • Questions about SimConnect can be posted in the SimConnect forum.

    Any other question that is not specific to an aspect of development or tool can be posted in the General chat forum.

    By following these guidelines we make sure that the forums remain easy to read for everybody and also that the right people can find your post to answer it.

FSXA Blend & Water Masks

Messages
217
Country
azerbaijan
What am I doing wrong?! This is my workflow for saving and compiling blend and water masks:

BLEND MASK
1. Open BMP image
2. Make a new layer, fill it with white
3. Make another blank layer, choose hard or semi-hard brush and start coloring in black the areas I don't want to see in FSX.
4. Make sure that 3 layers (background, white, and blend mask) are visible (discard hidden layers, if water mask layer is also present in the PSD file) and flatten the image.
5. Save as file *_B.TIF with default options (no compression, etc.) untouched.

WATER MASK
1. Open BMP image
2. Make a new layer, fill it with white
3. Make another blank layer, choose hard brush and start coloring in black the areas I want to see water in FSX.
4. Make sure that 3 layers (background, white, and water mask) are visible (discard hidden layers, if blend mask layer is also present in the PSD file) and flatten the image.
5. Save as file *_W.TIF with default options (no compression, etc.) untouched.

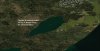
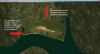
But from the attached images you can see that even if the contours of blend and water masks are subtle in TIF files, after resampling they become cragged... Also after resample I can visually see a group of autogen objects appeared on the island - just beside the water areas masked.

Also, I think I can't grasp the idea of combining both blend and water mask files in a single BGL - since blend mask TIF file (see the image) contains the contours of both the invisible and water areas why should one add a separate water mask file to the resampling process? But I do understand that otherwise water mask doesn't work - I mean if I would blend mask the areas (river) around the island only, I can't see water mask (small lakes on the island) applied to the resultant BGL. But as you can see my blend mask covers both the river flowing around the island AND the lakes on the island (file *_B.tif). Plus I had to make another file (*_W.tif) - this time with lakes blacked only. Only after that I could see both blend and water masks applied. Strange but true...

And this is my .INF file, if this can help:
Code:
[Source]
   Type = MultiSource
   NumberOfSources = 3

[Source1]
   Type = BMP
   Layer = Imagery
   SourceDir = "."
   SourceFile = "L16X97043X97098Y31888Y31933.BMP"
   Variation = All
   Channel_BlendMask = 2.0
   Channel_LandWaterMask = 3.0
   NullValue = 255,255,255
   SamplingMethod = Gaussian
   ulyMap =  67.4580815084579
   ulxMap =  86.5365600585938
   xDim =  1.07288360595703E-05
   yDim =  4.11718926957379E-06

[Source2]
   Type = TIFF
   Layer = None
   SourceDir = "."
   SourceFile = "L16X97043X97098Y31888Y31933_B.TIF"
   SamplingMethod = Gaussian
   ulyMap =  67.4580815084579
   ulxMap =  86.5365600585938
   xDim =  1.07288360595703E-05
   yDim =  4.11718926957379E-06

[Source3]
   Type = TIFF
   Layer = None
   SourceDir = "."
   SourceFile = "L16X97043X97098Y31888Y31933_W.TIF"
   SamplingMethod = Gaussian
   ulyMap =  67.4580815084579
   ulxMap =  86.5365600585938
   xDim =  1.07288360595703E-05
   yDim =  4.11718926957379E-06

[Destination]
   DestDir = "."
   DestBaseFileName = "island"
   DestFileType = BGL
   LOD = Auto
   UseSourceDimensions = 1
   CompressionQuality = 85

Thanks!
 

Attachments

  • blend_mask.jpg
    blend_mask.jpg
    77.9 KB · Views: 1,112
  • Capture-1.jpg
    Capture-1.jpg
    140.3 KB · Views: 1,057
  • Capture-2.jpg
    Capture-2.jpg
    176.4 KB · Views: 1,075
  • water_mask.jpg
    water_mask.jpg
    58.7 KB · Views: 862
Last edited:
I would check your main .bmp for an alpha channel and if it has one fill it with white and try it again. Black on the alpha channel of a 32 bit .bmp will be interpreted as a water mask so maybe that's where the square corners are coming from somehow.
 
Make sure it is grey scale 8 bit and use LZW compression.
Those square water polygons look like default water. So you have to take them out and put in new water.
Your water mask looks like it is putting water ripples all over the place except where there is water (invert black and white).
 
I would check your main .bmp for an alpha channel and if it has one fill it with white and try it again. Black on the alpha channel of a 32 bit .bmp will be interpreted as a water mask so maybe that's where the square corners are coming from somehow.
It does have an alpha channel - the BMP was taken and saved by SBX as a 32-bit bitmap. Before resampling I only balanced the colors in PS to make it more appealing in FSX.
Also, do you mean I don't need a separate layer filled with white color any more and work on the alpha channel instead? (see: attachment)

Make sure it is grey scale 8 bit and use LZW compression.
I will. In fact that's what I did with blend mask, not water mask. I simply flattened the image in PS, then applied greyscale 8bit to the flattened image and only after that saved it as *_B.TIF. No compression though, only default PS TIF options.
I'll try the same with water mask also.

Those square water polygons look like default water. So you have to take them out and put in new water.
How can I do that? Do you mean replacing default water textures with custom textures using SBX?!

Your water mask looks like it is putting water ripples all over the place except where there is water (invert black and white).
Not sure I understand you. As you can see, I put solid black to areas I don't want to see in the sim (blend mask). But with water mask I couldn't see a noticeable change in the sim after making water areas black - therefore, I included the same water areas in the blend mask too (*_B.TIF) to make them invisible in the sim AND after that applied water from water mask (*_W.TIF).
 

Attachments

  • Untitled-1.jpg
    Untitled-1.jpg
    133.3 KB · Views: 743
Last edited:
A water mask only makes the water (and land !) 'ripple' where the TIFF texture is painted white (it does not suppress anything).
A blend mask blends out the parts that you painted black or blends it gradually where you have a fuzzy (greyish) transition between the black and the white.
You have to exclude the default water polygons and then draw the correct borders of your lakes and tag that polygon with a type of water (inland water or lake or such). The default water showed up because you blended out the photo real water.
And you do not need an alpha channel at all in your textures!
 
Last edited:
I wouldn't even recommend blending the lakes. Bina, your blend mask actually would be perfect as a water mask. As for the blend mask I recommendmaking the whole island white, including the lakes and a blurred transition to black just some distance away from the beach. Doing this you will neither get autogen objects nor straight edged lakes on your island without even having to draw polygongs.
 
Correct and that would save you also the trouble of excluding those jagged lake borders and putting in new water.
 
Hello:

I see the OP stated that he has thus far opted to not use LZW compression with his TIF source files for FS SDK Resample (which may help reduce processing time).


However, for the potential future benefit of the OP and other readers, I believe it merits mentioning here that use of LZW compression with any (ex: 8-bit, 24-bit or 32-bit TIF source files for FS SDK Resample ...may have undesirable side effects, as pointed out previously by Jim Robinson: :idea:

http://www.fsdeveloper.com/forum/threads/photoreal-blend-mask-issue.426688/

http://www.fsdeveloper.com/forum/threads/resample-exe-performance-question.433597/


BTW: Because the OP's project area covers a large area, it may be subdivided into many "tiles", and the 2GB output BGL file size limits may compel use of a multi-source INF file for FS SDK Resample to process the many aerial imagery and "mask" source files.

Perhaps some related ideas on how to more easily generate the INF files for such a large area when subdivided into many "tiles" might also prove to be of interest here:

http://www.fsdeveloper.com/forum/threads/max-photoreal-tile-size.426368/


Hope this helps ! :)

GaryGB
 
Last edited:
Thank you, Gary, I think I still need some time read and digest the contents of these posts. Further tonight...

In the meanwhile, after some trial and error I think I start to understand the problem of watermask visibility. I have removed the photoreal image and, as advised by Roby and Dave, made a simple vector polygon (Hydro_Polygons_Generic_Lake_Perennial) for one of the lakes on the island using SBX and put the CVX file into the scenery folder. As you can see on attachments, the island lake shows perfectly well over default FSX terrain and follows the contours specified in SBX. I even didn't specify altitude, layer priorities in SBX - just a vector polygon with default water landclass texture. However, probably due to elevation issues (no addon mesh, just FSX default) the edges of the lake are jagged (see: the last image).

So, after re-reading your posts now me thinks it's all about priorities (please correct me if I'm wrong). Why?:

i) my blend mask covers only the surroundings of the island, the island itself is white while with blend AND water masks applied over inland water (i.e. lakes on the island) the water becomes barely visible (ripple) on top of photoreal image. Ripples are ok but still not what I want. So, without blend mask for inland waters nothing happens, water mask doesn't work. Therefore, I assume water mask has a higher priority over blend mask to be visible;

ii) since photoreal BGL is on top of all terrain features, it hides the custom polygon and, therefore, nothing changes even with the CVX file. I also tried to exclude all terrain objects with SBX but even this didn't help unless I removed the photoreal image from the scenery folder.

So, the issues now are:
i) Can I somehow combine both the photoreal image (with masks applied) and waterclass polygon (inland waters). Is it possible to change priorities of these scenery objects so that CVX lakes are visible on top of photoreal image?
ii) Do I need to forget about photoreal scenery and re-create the whole island from scratch (still considering the toilsome work associated with excluding the underlying terrain and remaking the QMID-scaled terrain features like coastlines, landclass, etc.) :(

Thanks!
 

Attachments

  • Capture-2.jpg
    Capture-2.jpg
    373.9 KB · Views: 964
  • Capture-3.jpg
    Capture-3.jpg
    279.1 KB · Views: 929
  • Capture-1.jpg
    Capture-1.jpg
    207.3 KB · Views: 1,015
Last edited:
Hi again:

You may wish to review these tutorials and discussion threads to see how use of a gradient gray-scale in one's 8-bit TIF Blend Mask source image file allows the underlying vector water class texture to 'show through to the top' of the raster water texture image in the photo-real aerial imagery layer:

http://www.flightsim.com/vbfs/showthread.php?250762-How-to-create-photoreal-scenery-for-FSX

[EDITED]

Luis Feliz-Tirado's tutorials
:

http://www.ptsim.com/forum/viewtopic.php?p=3416

http://library.avsim.net/search.php...z-tirado&Sort=Added&ScanMode=1&Go=Change+View


BTW: When one uses vectors to form a textured polygon (ex: a water body or island), one must have a sufficient number of vertices to accurately reproduce the desired real world shape.

When that shape is rendered in FS at run time, one must set the terrain mesh settings so that one has a 100 % complexity slider, with a sufficiently small distance in meters between terrain tile (quad 'Area Point') vertices for the FS GUI terrain mesh "resolution" slider (ex: 10 Meters or less) ...to accurately render the desired polygon shape in FS at run time.

You may wish to review this thread for info regarding creation of scenery content with consideration for quad tile (QMID 'grid') vertex density:

http://www.fsdeveloper.com/forum/threads/flattens.425495/page-2

[END_EDIT]


However, on a practical basis, it is generally a better idea to use the 1-bit raster water mask texture image to define the boundary of land / water areas with the precision of tiny pixels, rather than via vector polygons and terrain quad vertices having small inter-point distances (along with the 8-bit TIF Blend Mask source image file) ...to allow the vector water class texture to 'show through to the top' of the raster water texture image in the photo-real aerial imagery layer.

[EDITED]

NOTE: Final output source file format for TIFF Masks must actually be 8-Bit gray-scale; see:

http://www.fsdeveloper.com/forum/th...-scenery-achievable.440912/page-4#post-789447

[END_EDIT]

That way the shape of vector land / water polygons underlying the photo-real layer need not be drawn with so many vertices, the quad matrix terrain vertex density need not be so dense, and photo-real textures will "cling" to the terrain with less ground surface 'aliasing' anomalies (ex: pits or spikes) at edges of textured vector polygons and terrain vertices. ;)


Hope this helps ! :)

GaryGB
 
Last edited:
Thanks again, Gary! I've read the posts but still...

The problem with blend and water masks not visible was due ORBX Vector scenery sandwiched between my photoreal image and the default FSX terrain. So, when I apply masks ORBX Vector penetrates through, hence the jagged edges of the lakes.
I tried to exclude the shorelines of ORBX lakes locally but it seems this doesn't work... When ORBX Vector is disabled and masks applied to default FSX terrain, it works though. This is what I did:

1- Compiled photoimage with my blend and water masks.
2- In SBX (AddToCells=False) created an exclude for shorelines only to exclude ORBX Vector data and compiled with shp2vec. But since excludes clip to QMID level 11, the BGL excluded all terrain features within the said QMID level.

I looked at Nauru island tutorial, particularly the section about exclusion of default terrain features and applying a QMID-7 water polygon - it's OK when one has QMID-7 full of water but what can be done if the island is amidst the river, as in my case? Even the lower QMID-11 excludes all terrain features, as far as I can see...

Please see the images attached for better visualization.

Thanks!!!
 

Attachments

  • Capture-1.jpg
    Capture-1.jpg
    497 KB · Views: 1,105
  • Capture-2.jpg
    Capture-2.jpg
    494.2 KB · Views: 1,073
  • Capture-3.jpg
    Capture-3.jpg
    268.8 KB · Views: 957
Hello:

FYI: Use of (AddToCells=False) when compiling with the FS SDK SHP2VEC compiler to create CVX vector BGLs is likely to result in complications for the FS developer as well as the end user. :alert:


Although I do not presently have FTX Vector installed to test this, you should be able to instead use (AddToCells=True) when compiling with the FS SDK SHP2VEC compiler via this SBuilderX workflow ...to exclude the FTX vector "lakes" cited above... ;)


In SBuilderX:

1.) Enable display of a aerial imagery background "map" in the work-space for your project area

a.) Zoom in on one of the "lakes"


2.) With the SBuilderX polygon tool, create a 3-point (3-vertex) polygon inside the area of the image for one of the "lakes".

a.) Click that triangular polygon so that all 3 of its vertex points are 'selected' (they turn green when selected)

b.) Right-click a edge line of that selected triangular polygon; choose "Properties" (SBuilder Polygon Properties dialog opens)

c.) In SBuilder Polygon Properties dialog > [Vector Polys tab], set "Type" to "Type 13 - Exclude_All_Parks_Polygons"


3.) With the SBuilderX polygon tool, create another 3-point (3-vertex) polygon inside the area of the image for one of the "lakes".


NOTE: You may wish to overlap the (first) triangle so each triangle points in an opposite direction (ex: like a 4 or 6 pointed star)


a.) Click the (second) triangular polygon so that all 3 of its vertex points are 'selected' (they turn 'green' when selected)

b.) Right-click a edge line of that selected triangular polygon, and choose "Properties" (SBuilder Polygon Properties dialog opens)

c.) In SBuilder Polygon Properties dialog > [Vector Polys tab], set "Type" to "Type 11 - Exclude_All_Water_Polygons"


4.) With the SBuilderX cursor still in "Polygon Tool" Mode:

a.) Right-click a edge line of the (first) triangular polygon to select all 3 of its vertices

b.) SBuilderX Menu > Edit > click "Copy"

c.) SBuilderX Menu > Edit > click "Place" (aka 'Paste')

d.) Drag the 'placed copy' of the (first) triangular polygon into a position inside the area of the image for the other "lake"


5.) Again, with the SBuilderX cursor still in "Polygon Tool" Mode:

a.) Right-click a edge line of the (second) triangular polygon to select all 3 of its vertices

b.) SBuilderX Menu > Edit > click "Copy"

c.) SBuilderX Menu > Edit > click "Place" (aka 'Paste')

d.) Drag the 'placed copy' of the (first) triangular polygon into a position inside the area of the image for the other "lake"


NOTE: Again, you may wish to overlap the (first) triangle so each triangle points in an opposite direction as above


6.) In SBuilderX "Pointer Mode" with the 'Arrow' cursor, hold down the <Ctrl> key, and with the left mouse button, 'click-hold-draw' a frame around each 'pair' of triangular polygons to 'select' them

7.) SBuilderX Menu > click "BGL compile..." (SBuilderX BGL Compilation dialog opens)

a.) In "SBuilderX BGL Compilation" dialog, "Terrain Vector" should already be "checked"

b.) "Check" any other desired check-boxes, then click the "Compile" button


You should now have a BGL which excludes (only) the FTX vector "lakes" cited above. :pushpin:


BTW: This exclude BGL should work even when loaded from alongside the photo-real BGL within the local \Scenery sub-folder for your project. :idea:


Hope this helps ! :)

GaryGB
 
Last edited:
Hi Gary,

I hope I did everything as instructed. If interested, you can download the results of my work with detailed screenshots and shp2vec files from this link: DOWNLOAD

As I posted earlier in a different thread, I still feel a lack of knowledge about FSX layer priorities which I think is directly related to my issue. I think as a noob, if I knew this part of scenery design better, I'd be less troublesome for everyone reading through this boring thread... :)

EDIT:
1) On one of the screenshots you'll see that the excludes affect the whole of QMID-12 cell. I wonder WHY not level 11, as explained in Terrain SDK?
2) My scenery sits on top of all other sceneries in Scenery Library (the highest layer number in scenery.cfg)

Thanks a lot for your generous help and support!!!
 
Last edited:
Hello:

[EDITED]

AFAIK, the option to use these CVX vector object-specific excludes which work at the "local" QMID-12 (LOD-10) rather than at the entire QMID-11 (LOD-9) level ...is apparently "un-documented" in the FS SDK.


The good news is that, with a LOD-10 (QMID-12) exclusion work-space, one need only re-create the excluded vector content for a smaller-sized Quad area ...than one would otherwise have needed to with a LOD-9 (QMID-11) exclusion work-space. ;)

And this is a big difference in extent from what we might otherwise have had to do in FS9 or earlier versions of FS, wherein we would be excluding and replacing an entire QMID-7 / LOD-5 area. :eek:

[END_EDIT]


I would recommend that you re-size the above cited vector exclusion triangular polygons so that they overlap the shorelines (they only need to just "touch" the shoreline poly-line without any substantial excess 'overlap' ...to trigger the exclude process). :idea:


If the shorelines seen in your screenies above will still not exclude the shorelines, then add another such vector exclusion triangular polygon with the attribute for shorelines:


In SBuilderX, with your existing, 'saved' SBP or SBX project for "Igarsk" loaded:

1.) Enable display of a aerial imagery background "map" in the work-space for your project area

a.) Zoom in on one of the "lakes"


2.) With the SBuilderX polygon tool, create another 3-point (3-vertex) polygon which slightly overlaps the shoreline area of the image for one of the "lakes" and the existing (2) over-lapping triangular vector 'exclusion' polygons created as above:

http://www.fsdeveloper.com/forum/threads/blend-water-masks.435509/#post-726633


a.) Click that triangular polygon so that all 3 of its vertex points are 'selected' (they turn green when selected)

b.) Right-click a edge line of that selected triangular polygon; choose "Properties" (SBuilder Polygon Properties dialog opens)

c.) In SBuilder Polygon Properties dialog > [Vector Polys tab], set "Type" to "Type 4 - Exclude_All_Shorelines"


3.) With the SBuilderX cursor still in "Polygon Tool" Mode:

a.) Right-click a edge line of the (latter) triangular polygon to select all 3 of its vertices

b.) SBuilderX Menu > Edit > click "Copy"

c.) SBuilderX Menu > Edit > click "Place" (aka 'Paste')

d.) Drag the 'placed copy' of the (latter) triangular polygon into a position over the area of the image for the other "lake", so that it slightly overlaps the shoreline area of the image for that "lake" and the existing (2) over-lapping triangular polygons created as above:

http://www.fsdeveloper.com/forum/threads/blend-water-masks.435509/#post-726633


4.) In SBuilderX "Pointer Mode" with the 'Arrow' cursor, hold down the <Ctrl> key, and with the left mouse button, 'click-hold-draw' a frame around each group of (3) triangular polygons ...to 'select' them all

5.) SBuilderX Menu > click "BGL compile..." (SBuilderX BGL Compilation dialog opens)

a.) In "SBuilderX BGL Compilation" dialog, "Terrain Vector" should already be "checked"

b.) "Check" any other desired check-boxes, then click the "Compile" button


You should now have a BGL that excludes (only) the above cited FTX vector "lakes" with their "shorelines". :pushpin:


Hope this helps a bit more ! :)


PS: For interested parties following this thread: "Jump" / "Go to" coordinates for the area under discussion are:

(FS SDK TMFViewer / SBuilderX)

67.448334 North Latitude
86.551834 East Longitude

(Google Earth)

67.448334,86.551834

GaryGB
 
Last edited:
Hello Gary (and the interested parties),

This drives me up the wall, to say the least... :banghead::banghead::banghead: And I finally bought ORBX Vector to test the scenery on my rig. I know, it's either me doing smth wrong or the solution is quite obvious. Anyway...

Using CVX Extractor (great tool, btw!), TMFViewer, and Google Earth, I took a sneak peak at the ORBX file (7108_WTR_Waterbodies.bgl) covering the Igarka island and the rest of QMID-11. Here is my conclusions and actions so far:

1- ORBX uses a combination of the following terrain features to make up the "virtual" island of Igarka. Maybe "virtual" is not a proper word in this case but the island (versus a peninsula existing in FSX by default) looks indeed as a hole shaped with the river vector flowing around it, similar to technique used to make a hole in SBuilderX (SBX). All GUIDs can be found in the ORBX-modified terrain.cfg (see: attachment):
  • ORBX shoreline vector with texture GUID {7AA3C96C-DA07-45F5-B80D-32CD914585E7} for contours of the Yenisei River.
  • ORBX shoreline vector with texture GUID {12D73DC0-9704-4860-BA16-A28BEA218AFC} for contours of the Igarka island PLUS the inland lakes.
  • FSX water polygon Hydro_Polygons_Default_Perennial with texture GUID {CB2D5672-CCBC-429B-BA43-2EA24E37EF4C} covering inland lakes.
2- Having "AddToCells" set to "True" in SBuilder.ini, I tried Gary's recommendations for the excludes - both excluding individual lakes and even stretching (a greater) polygon beyond the island to overlap the river banks (see: item 1)... to no avail yet. :( Shorelines get removed but now the water polygons stay intact!

3-
Then I thought it would help to create two separate folders - for the photoreal island and the CVX exclude, respectively, with CVX folder layer set below photoreal layer in scenery.cfg. So, photoreal scenery of the island has a higher priority. No way!

4-
Also, I tried to exclude specific terrain type (Hydro_Polygons_Default_Perennial=123) in SBX by going Polygon Properties -> Exclude_Specific_Terrain_Type -> Terrain to exclude (click to change) -> Hydro_Polygons_Default_Perennial but I can't select the polygon type, nor am I able to change the property of the selected polygon.

5- I also tried to modify EXX*.dbf by adding ORBX-specific GUID (see: item 1) to exclude the water polygon only but I think I'm doing this incorrectly trying to save the file with MS Excel instead of a specific (proprietary?) software. Dunno, can't comment more on this...

So, this is my "progress" so far... But I still hope to find a solution for excluding ORBX vectors and polygons properly.:cool:
 

Attachments

Hello:

Again, although I do not presently have the FTX Vector package installed to allow testing this in FS, you may alternatively be able to utilize 2 distinct and separate sets of overlapped triangular exclude polygons (which are not super-imposed on top of each other) when compiling with the FS SDK SHP2VEC compiler via SBuilderX ...in order to exclude the FTX vector "lakes" cited above.


NOTE: This is a slightly different method from my original workflow as described above:

http://www.fsdeveloper.com/forum/threads/blend-water-masks.435509/#post-726633
...and:
http://www.fsdeveloper.com/forum/threads/blend-water-masks.435509/#post-726703


The different methods of implementing the above cited vector excludes may be seen in the screenies attached below which show the vector exclude(s) superimposed on the "7108_WTR_Waterbodies.bgl" (included in your attachment cited below) ...as a background.


Your cvx_Igarka.BGL attached above: http://www.fsdeveloper.com/forum/threads/blend-water-masks.435509/#post-726649

...in files_Igarka.zip: https://www.dropbox.com/s/2ldvytziq40hu9p/files_Igarka.zip?dl=1
igarka_vector_id_exclude_bina_cvx_igarka_bgl-jpg.25381


[EDITED]
A vector "Exclude_All_Park+Water_Polygons" BGL (bottom set of overlapped triangular exclude polygons with GUIDs)
[END_EDIT]
igarka_vector_id_exclude_all_park-water_polygons-jpg.25382


A vector "Exclude_All_Park+Shoreline_Polygons" BGL (top set of overlapped triangular exclude polygons with GUIDs)
igarka_vector_id_exclude_all_park-shoreline_polygons-jpg.25383


It is also possible that other GUIDs for vector objects may need to be tested until one is able to successfully exclude the above cited FTX vector "lakes" with their "shorelines".


IIUC, the important consideration is that the polygon excludes require only that a vector polygon's edge 'poly-line' be touched / intersected by a "pair" of overlapped triangular 'vector exclude' polygons (one of which matches the specific GUID of the vector object to be excluded) ...as shown in the latter screenshots I posted above. :pushpin:


Hope this might help further with troubleshooting and/or fine-tuning the "local and specific" vector object exclude process for the above FS 3rd party BGL file load scenario. :)

GaryGB
 

Attachments

  • Igarka_Vector_ID_Exclude_Bina_cvx_Igarka_BGL.jpg
    Igarka_Vector_ID_Exclude_Bina_cvx_Igarka_BGL.jpg
    187 KB · Views: 3,002
  • Igarka_Vector_ID_Exclude_All_Park+Water_Polygons.jpg
    Igarka_Vector_ID_Exclude_All_Park+Water_Polygons.jpg
    187.2 KB · Views: 3,124
  • Igarka_Vector_ID_Exclude_All_Park+Shoreline_Polygons.jpg
    Igarka_Vector_ID_Exclude_All_Park+Shoreline_Polygons.jpg
    189.5 KB · Views: 3,135
Last edited:
PS: On a practical basis, if one wishes to utilize the photo-real textures of the aerial imagery of the island and its shoreline with some adjacent shallow water, then blend that into the display of any vector "in-land" water class texture (which is underlying that top photo-real layer), one will likely have to fully exclude and replace any and all underlying land and water vectors so that they 'match' the shape of ex: water bodies in the top layer real-world aerial imagery. :pushpin:

In most cases the recommended workflow is to perform this "full" exclude and replace of any underlying land and water vectors at the level of an entire QMID-11 / LOD-9 quad tile.

Interested readers may wish to also review the very helpful information and worked examples Jim Robinson posted for the OP and others ...in this thread on a related topic: :idea:

http://www.fsdeveloper.com/forum/posts/726997/


GaryGB
 
Last edited:
Hi again,

I do not use SbuilderX. I use FSEarthTiles for the photoreal and ADE for the flattens and the excludes, GIMP to do the masks and I make my own .inf file.
In other words, I am not sure if the workflow I suggested is the same when not working with those programs but the principle should be the same.
Sorry if it took long to reply but it took some time to settle down in our sunnier and warmer home and have the laptop do at least some of the stuff my lonely abandoned PC can do up north.
I apologize for the confusion about the water mask. I must have had a black and white out:(.
(In any case, ORBX, though it can ruin a lot of stuff, should not be able to interfere with a photo real except where the photo real (or one of its channels) is made 'transparent' for the underlying land- or waterclass to show through. Take out the water and rebuild the coastline is the only thing to do.)
I have nothing more to add to the thorough explanation Gary has given in this respect (do not ask Gary to do a concise anything :D).
 
Thank you both, guys!!! :)

Well, I'm progressing slowly but steadily thanks to precious tips I can get from developers like you and reading through tens of other related topics here and there...

As regards ORBX, sometimes it makes me think that what I've read so far re: scenery development was... wrong. As if intentionally... :ziplip:

Seriously though, I've managed to get rid of Orbx shorelines and water polygons, as described above, by making a small exclusion similar to those shown by Gary and putting it between ORBX Vector stuff and my scenery in the Scenery Library, but am still scratching my head trying to understand what happened afterwards: adding custom terrain features like water polygons and shorelines now exclude ORBX terrain stuff like roads and powerlines from QMID-11 cell as well... Even though my terrain elements are of different types (water polygons and shorelines only) and don't touch/overlap ORBX features (roads and powerlines) within the cell. Removing my EXX file doesn't help either. More on this here...

Water masks: I don't really understand how they live in FSX World. Probably it's due my own fault:

1. I made a water-mask covering both the river AND the inland lakes.
2. To make a blend mask, I just copied the water mask layer in Photoshop, reworked only the parts beyond the island and the lakes.
3. Then, the standard procedure - make only the blend- or water-mask layer and the layer with white color visible, flatten the image (disregard hidden layers), convert the flattened image to grayscale, save as TIFF.

Now, all I can see are empty holes with only the contours of inland lakes visible. Eventually, water masks don't work, only the blend masks do! So, without further ado I decided to make lake polygons in SBX.
 
Last edited:
I don't have Vector, maybe they're doing something different but I'm not sure shp2vec would even allow it? I did this quick replacement, most of the little ponds in the remainder of the QMID cell will be missing but the island and some of the little lakes on it are done (roughly/quickly). Also I'm using default CVX for the area and the shorelines don't come close to matching the default shorelines at the edges of the QMID cell but maybe Vector will be closer. That can be dealt with later.

Anyway, just as a test remove all your CVX .bgls from your active scenery folders (temporarily) and replace them with this one. See if it excludes Vector like you would expect it to:

http://www.cat-tamer.com/flightsim/atchmnts/CVX_qmid_1137_128.zip

Jim
 
Back
Top