• Which the release of FS2020 we see an explosition of activity on the forun and of course we are very happy to see this. But having all questions about FS2020 in one forum becomes a bit messy. So therefore we would like to ask you all to use the following guidelines when posting your questions:

    • Tag FS2020 specific questions with the MSFS2020 tag.
    • Questions about making 3D assets can be posted in the 3D asset design forum. Either post them in the subforum of the modelling tool you use or in the general forum if they are general.
    • Questions about aircraft design can be posted in the Aircraft design forum
    • Questions about airport design can be posted in the FS2020 airport design forum. Once airport development tools have been updated for FS2020 you can post tool speciifc questions in the subforums of those tools as well of course.
    • Questions about terrain design can be posted in the FS2020 terrain design forum.
    • Questions about SimConnect can be posted in the SimConnect forum.

    Any other question that is not specific to an aspect of development or tool can be posted in the General chat forum.

    By following these guidelines we make sure that the forums remain easy to read for everybody and also that the right people can find your post to answer it.

On fraction bits

Messages
1,510
Country
unitedstates
On "PixelIsPoint=X"

I've always been unclear on that SDK example, my question is "what does this square represent?" (the red area)

pixelispoint.jpg


If that square represents the entire source .tif (say a 10000 x 10000px .tif) then yeah, pixelispoint=? is a big deal because it means the NW corner as called out in the .inf wouldn't be the NW corner at all but rather the center of the source. In that case using the wrong pixelispoint value could misplace your photoreal/mesh/etc. by a degree or more in longitude and latitide depending on the size and resolution of your source.

If the red square represents the first pixel in the NW corner of your source .tif then we're talking about a discrepancy of half a pixel max and whether the value in the .inf is 1 or 0 would be insignificant with the possible exception being a 256 x 256px .raw file that you were using to resample landclass, waterclass, seasons, population density, etc.

When I do gdalinfo on a .tif I've reprojected and then use GeoTiffToInf to generate an .inf I find that ulxMap and ulyMap from the .inf match the upper left corner coordinates from the gdalinfo report. That's with PixelIsPoint=0. What happens if I then change PixelIsPoint=0 to PixelIsPoint=1 and resample it again? Here's what I found:
pixelispoint2.jpg


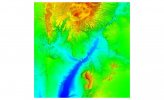
That's the NW corner of two .bgls overlayed in TMFViewer, one resampled with PixelIsPoint=0 and the other resampled with PixelIsPoint=1 and highly zoomed in. The semi-transparent row of pixels across the top is the difference in their positioning, PixelIsPoint=1 appears to have shifted the .bgl one pixel northward. (I would have expected a shift of 1/2 pixel northward and 1/2 pixel westward but maybe we're only working in whole pixels here?) My conclusion is that the red square in the first image represents the first pixel in the NW corner of the source .tif rather than the source .tif in it's entirety, and on a source larger than 10px in either direction the value of PixelIsPoint=X is completely insignificant for our purposes.

Am I missing something? :)
 
Messages
491
Country
us-missouri
We must keep in mind Ollyau's GeoTiffToInf is intended for use in creating imagery BGLs, and the *.INF output must be edited for use with DEM source data for terrain mesh BGLs.
Yes, and the .INF format I use is one that you helped me fine-tune -- for which I am eternally grateful, Gary! I'll try resampling with Pixelispoint=1 like I always have and hopefully everything else will sort itself out. :)

I've always been unclear on that SDK example, my question is "what does this square represent?"
I always figured it was a highly zoomed-in pixel, but most of this stuff goes way over my head... I am only now able to understand some of the answers Gary sent me months ago. Granted, part of that is because I am doing a thousand things at once, but my point is that I really don't know enough to comment yet.
 
Messages
7,450
Country
us-illinois
Hi Jim:

Indeed, mapped pixel dimensions in the source grid submitted, as well as output parameter values within the output *.INF file ...would determine how significant of a Geo-Referencing offset actually results, when one arbitrarily uses the incorrect PixelIsPoint parameter values in a SDK Resample *.INF file that does NOT match what the GIS application assigned to the data file. :)

[EDITED]

We must also consider ACES' inference that for WGS84 datum, GeoTIFF / TIF sources submitted to SDK Resample, PixelIsPoint=1 is the default as seen in the SDK docs screenshot attached above:

https://www.fsdeveloper.com/forum/threads/on-fraction-bits.448084/post-860824

...and as discussed here (although Lance Tucker aka "Meshman" aka "LCSims") makes it clear that he opted to advocate an arbitrary interpretation of the SDK Docs within his own work-flow:

https://www.avsim.com/forums/topic/354275-fsx-using-pixeiispoint-1-with-resample/

[END_EDIT]


I've not had occasion since FS2Kx offsets were reported, to look at this in the detail you are referring to above; but to make a case for precision here, perhaps a brief walk down memory lane is in order. :p

Back in FS2Kx we were dealing with low resolution (READ: more Meters / fractional Arc Degrees between pixels) in source data and BGLs which suffered more from incorrectly configured PixelIsPoint parameter values in a SDK Resample *.INF file, when compared to the current much smaller pixel dimensions for Chris' 10 Meter between elevation data point resolution source data files / output terrain mesh BGLs. ;)

A fascinating 'resolution' technicality here; but I'd still want to assign a correct PixelIsPoint parameter value in a SDK Resample *.INF file ...that matches what the GIS application assigned to the data file. :pushpin:

GaryGB
 
Last edited:
Messages
491
Country
us-missouri
Something dawned on me: I had been using QGIS to export a "raw image." Studying Gary's comments about 32 bits per pixel made me wonder if I should be exporting a rendered RGB image instead of raw data.

But then I realized that Jim doesn't have my problem even though he is using the same data, and I am using the re-projection method he shared. Plus, when I accidentally exported rendered images for the Las Vegas area, it made everything sea level. And also the GeoTifftoInf settings I use are those I learned from working with Gary a few months ago (https://www.fsdeveloper.com/forum/t...nd-mesh-for-us-and-need-some-guidance.447467/).

Would you mind sharing your work flow Jim? I'm doing something wrong and I would like to be able to share my terrain with the FS community before the end of the year if at all possible.
 
Messages
1,510
Country
unitedstates
I re-downloaded USGS_13_n36w118.tif from the first post and tried it again. One thing I may be doing differently is I'm downloading these dems from here:

rather than here:
ftp://rockyftp.cr.usgs.gov/vdelivery/Datasets/Staged/NED/13/TIFF/n36w118/USGS_13_n36w118.tif

...because I have better luck with my laggy satellite internet. They're about the same speed-wise once the download actually starts but for some reason the rockyftp downloads take forever to start. I've used both however and I don't remember any issues with the ones from rockyftp, in fact I think that's where I got them all when I did Colorado.

I used the "for" command I posted on the previous page to reproject them all:
Code:
for %f in ("%dems%\*.tif") do gdalwarp -of GTiff -co "INTERLEAVE=PIXEL" -t_srs "+proj=latlong +datum=WGS84" -r cubic %f "%remote%\%~nf_WGS84.tif"

I used GeoTiffToInf to get ulxMap, ulyMap, xDim, and yDim and then I copied and pasted them into my own .inf, here is an example (all wrong I guess, but it seemed to work fine from my perspective):

Code:
[Source]
Type = MultiSource
NumberOfSources = 4

[Source1]
Type                = GeoTIFF
Layer               = Elevation
NullValue = 0,0,0
SourceDir="."
SourceFile="USGS_13_n36w104_WGS84.tif"
PixelIsPoint=0
ulxMap=-104.000555555994
ulyMap=36.0005555562948
xDim=9.25925926922441E-05
yDim=9.25925926922441E-05

[Source2]
Type                = GeoTIFF
Layer               = Elevation
NullValue = 0,0,0
SourceDir="."
SourceFile="USGS_13_n36w105_WGS84.tif"
PixelIsPoint=0
ulxMap=-105.000555555555
ulyMap=36.0005555555551
xDim=9.25925925258455E-05
yDim=9.25925925258455E-05

[Source3]
Type                = GeoTIFF
Layer               = Elevation
NullValue = 0,0,0
SourceDir="."
SourceFile="USGS_13_n37w104_WGS84.tif"
PixelIsPoint=0
ulxMap=-104.000555555994
ulyMap=37.0005555560949
xDim=9.25925926922441E-05
yDim=9.25925926922441E-05

[Source4]
Type                = GeoTIFF
Layer               = Elevation
NullValue = 0,0,0
SourceDir="."
SourceFile="USGS_13_n37w105_WGS84.tif"
PixelIsPoint=0
ulxMap=-105.000555555555
ulyMap=37.0005555555552
xDim=9.25925925258458E-05
yDim=9.25925925258458E-05

[Destination]
DestDir             = "D:\P3D v4 Addons\New_Mexico_Mesh_LOD12\Scenery"
DestBaseFileName    = "NM_mesh_LOD12_n37w105"
FractionBits = 2
;BaseValue = 0
DestFileType = BGL
UseSourceDimensions = 0
LOD = 4,12
;LOD = Auto


Another thing I may be doing differently was the airport holes, which means I'm saving the reprojected .tif in Photoshop. That strips the geodata from the .tif of course but by the time I did that I'd already run GeoTiffToInf and made up my .inf. I didn't do anything in PS except drag the selected areas for the holes and fill them with black (which is the point of NullValue = 0,0,0 in the .inf). I then simply saved the .tif in Photoshop, didn't convert from 32 bits/channel or anything of the sort, drag the selection, fill with black, save. In PS I'm seeing a white .tif with some black spots on it where the airports are:

n36w118_01.jpg


In order to see any actual elevation data in PhotoShop I have to convert the .tif to 16 bits/channel and adjust the exposure and gamma downwards which I've found serves no purpose but to really screw up the elevations in the finished .bgl :)

n36w118_04.jpg


I looked at the .bgl in TMFViewer first before the PhotoShop save and again after. Couldn't see any difference (except for the airport holes) either way. I looked all over the .bgl for the anomalies you showed in this shot from the first post:


...but I couldn't find anything that looked like that. I do see some slight vertical streaking in spots:

n36w118_02.jpg


...but I looked at the same mesh that's included with Orbx's SCA region and I see the same streaks there:

n36w118_03.jpg


That's about the size of it :)
Jim
 
Messages
491
Country
us-missouri
I didn't include any ulxmap, ulymap, xdim, or ydim figures in my INF file, but I have the same vertical streaks in my BGL file. I think the bad terracing has been resolved by cutting QGIS out of the process, but I need to try this on a more mountainous region to be sure. My most recent example is a particularly flat part of Northern Texas I was working on when I noticed the terracing. I think I'll have to do everything over again, but with the automated scripts you shared, and now that I know how to download massive amounts of data simultaneously, it shouldn't be nearly as hard as the first time.

I'm no expert, but I am pretty confident the two different URLs (s3.amazonaws / ftp.rocktyop) are just different access points for the same data. When I need elevation data and the National Map interface is down, I can just access the s3.amazonaws files directly by typing out the files.

Thanks Jim and Gary!
 
Messages
7,450
Country
us-illinois
Hi Jim:

I am running a test via Global Mapper using the same 4 files that you used in your worked example above.

Would you please attach a saved flight *.FLT file of (1) location / aircraft camera view of your choice from ex: P3D for the 4-tile DEM areas in your latter worked example above:

https://www.fsdeveloper.com/forum/threads/on-fraction-bits.448084/post-860995

...which we can use for comparison ?


If you would also please be so kind, set your terrain mesh resolution sliders at 10 Meters and 100 % complexity.


Alternatively, we could just use the NW corner of all 4 DEM tiles when composited as a 1-piece tile:

37.0005092597986,-105.000509259259

If that is satisfactory for your testing purposes, we could compare via the *.FLT file attached below.

BTW: I used CH+ Crosshairs Plus aircraft, but IIRC FSX/P3D still falls back to a C172 if it is not installed.


Thanks for taking the time to explore this work-flow with us here. :)

GaryGB
 

Attachments

  • NM_DEM_Test_N37_0005092597986_W105_000509259259_FLT.zip
    2.9 KB · Views: 96
Last edited:
Messages
1,510
Country
unitedstates
What impresses me about this 1/3 arc-sec mesh is the subtle little things you notice near ground level while scrutinizing something completely unrelated. I've noticed a lot of them around KLAM in the past month I've been working on it. TBH I haven't really even looked at the 4 tiles I randomly included in the post above, I just grabbed an .inf and pasted it into my post without really knowing what area it even covered. Can I suggest you abort those 4 tiles and grab this one instead? I'm a lot more familiar with things worth looking at here:


Here are a few of the things I've noticed:


Cochiti Dam on the Rio Grande, 35.6249 -106.3232. That's all mesh, no flatten polygons, no messin' around, that's just how it came out. (I did make a new hydro poly to flatten the water and get rid of the FTX Vector polys that didn't match my imagery very well)

n36w107_01.jpg


This is some random cloverleaf/on ramp type affair, 35.5156 -106.3448. Yeah, kind of rough, I was a little too close for the 1m imagery to look good, but to me it's impressive given the relatively subtle changes in elevation in such a small area

n36w107_02.jpg


I'm not sure what this is, there's another dam nearby and my guess is they got fill for the dam here, 35.3802 -106.5444. Haven't gotten around to autogen here yet.

n36w107_03.jpg


Finally this fill right off the end of Los Alamos airport, 35.8771 -106.2562. That's 60cm NAIP BTW so a little sharper than all the rest (1m).

n36w107_04.jpg


Jim
 
Messages
491
Country
us-missouri
Looks great! Did you manually place the extrusion bridge Jim? The 10m mesh has grades that absolutely scream for accurate overpasses like that. I can easily filter out sections of road that are bridges from Open Street Map data, but nonexistent altitude data seems to be a significant roadblock for me on hydro vectors and bridges. If I was only applying data at a few points it would probably be very easy to just layer the vector data on top of the elevation raster and have it magically assign an elevation field to the vector points, but when you're creating a statewide vector set for California, you'd need several dozen tifs. It's too much for me right now, so my sim drivers all had to become stuntmen and my water tends to creep uphill.
 
Messages
1,510
Country
unitedstates
Did you manually place the extrusion bridge Jim?

No, I believe that's part of FTX Vector, I really don't like those bridges with the up-ramp followed with the down-ramp on the other side and they don't need to be that way. I usually bury those parts in the ground.

Here's another thing I came up with BTW that I sorta like and it's easy to do - burn the building footprints .shp to a .tif with gdal_rasterize and make them a layer in the Photoshop .psb. Add an "outer glow" effect, black, with a feather of 25-ish pixels and about 75% transparency. It adds a sort of faux ambient occlusion effect around all the autogen buildings:

agn-ao-comparison.gif
 
Messages
491
Country
us-missouri
Wow, that makes a huge difference. I don't mind the ramps up and down; I'd just like to have bridges where they belong and I'll start digging back into that this weekend. What of imagery are you using? That looks spectacular -- much better than my USGS!
 
Messages
1,510
Country
unitedstates
That's 2018 60cm NAIP off earthexplorer.usgs.gov. Unfortunately the "compressed" (.jp2) downloads weren't available for this area so I had to download about 6 Gb in .tifs for the immediate airport area. The outlying 1m imagery came off TNM, I think it's 2014 but I grabbed a few chunks of 2016 1m off earthexplorer here and there to fix some stuff (mainly ugly black shadows) in the 2014 imagery.

I bought a 1 Tb SSD here a little over a month ago and I have it 1/3 filled up already with this stupid project! You must have accumulated massive amounts of data since you started on all this! What are you using for storage?

EDIT:
If you want to see some amazing imagery take a look at the 7.62cm 2018 for Lewiston, ID on https://insideidaho.org/apps/imagery-explorer. I downloaded some of this a while back and made a PR for KLWS. Never finished it but it came out to LOD19 in TMFViewer. Here's a clipped screenshot off the airport, this is I believe Gustin Aviation, they do the crop dusting in the Lewiston area and also a lot of duster repairs in the winter for other dusters all around the area. When I was mid-20s I worked for a duster pilot in Bonners Ferry, we took our Air Tractor down there one spring for an annual.

t2304_1719.jpg
 
Last edited:
Messages
491
Country
us-missouri
Breathtaking.

Storage hasn't become an issue yet since it's slow going with one guy trying to learn as I go and constantly running into snags. I'm primarily focused on finishing up the terrain for now (which compared to imagery doesn't take up much space) so I can figure out the best place to host it. Oddly enough, uploading the files to my site takes more time than creating the scenery.

Started out with straight textures, then integrated shapefile autogen trees, fine-tuning water vectors and then burning watermasks, adding buildings and roads, then custom bits like churches, fire stations, utility lines, wind turbines, substations, and so on. Plus, I have to modify the airports I use to their proper orientation so they fit better with the terrain. All of this is constantly tweaked and being over-written as I learn more. So unfortunately, I only have patches of photoreal scenery around airports I enjoy flying to and from in California and Missouri. But considering I didn't have the first clue about scenery until I created an account here, I'm quite proud of the fact that everything I see is something I have designed. All of that is thanks to you, Gary, and Arno.
 
Messages
7,450
Country
us-illinois
Hi Chris:

I have tested the source data file suggested by Jim above.

I can confirm that, as I had indicated earlier in this thread, files in the USGS data set cited above are already in a 32-Bit Floating Point DEM format.

The files in that data set are ready to be re-projected to the WGS84 GIS format required for use in SDK Resample, to compile terrain mesh BGLs without terracing by utilizing the FractionBits and BaseValue parameter values (...only where necessary for Maximum elevation points that exceed the thresholds cited in the SDK Resample documentation for "Scaled Elevation Values").

There is no "contour terracing" seen in your gray-scale or color Hill Shader screenshots above, but rather there are vertical North-South 'stripes'.

While am not certain as to how those vertical North-South 'stripes' are formed on your computer via QGIS and/or other data processing utilities or applications, and I am not quite sure how one might duplicate the effect on my computer via Global Mapper, I suspect that it may be due to how your data was processed via OSGEO4W and/or QGIS to output GeoTIFFs using a "Strip" orientation (which is normally the default mode for GeoTIFF files rather than a 'Tiled' orientation).

The anomaly may involve an issue of assigned precision in OSGEO4W and/or QGIS configuration, since, IIUC, GDAL is currently capable of processing GeoTIFFS at greater than 32-Bit Floating Point precision.

IMHO, one should troubleshoot this anomaly before generating more terrain mesh BGLs for distribution. :alert:


However, the USGS data set in question cited above, has already been "smoothed", and could even be output as a 16-Bit Integer DEM.; that would have the potential to save data working set and output BGL footprint size, as well as processing time. :idea:


BTW: This is how the source file appears in Global Mapper in a color Hill Shader view:

usgs_13_n36w107_tif_4326_32-bit_fp_elevation_grid-jpg.63853


As I use Global Mapper to save a lot of work, I am not familiar with what might be required to eliminate this anomaly via your current methods utilizing OSGEO4W and/or QGIS.

Perhaps if no anomaly is seen in a GIS gray-scale or color Hill Shader view when the USGS data set cited above is processed via Jim's work-flow, you might utilize his methods via GDAL to resolve the vertical North-South 'stripes' issue discussed above in this thread. ;)

GaryGB
 

Attachments

  • USGS_13_n36w107_tif_4326_32-Bit_FP_Elevation_Grid.jpg
    USGS_13_n36w107_tif_4326_32-Bit_FP_Elevation_Grid.jpg
    83 KB · Views: 405
Last edited:
Messages
491
Country
us-missouri
I used the "for" command I posted on the previous page to reproject them all:
Code:
for %f in ("%dems%\*.tif") do gdalwarp -of GTiff -co "INTERLEAVE=PIXEL" -t_srs "+proj=latlong +datum=WGS84" -r cubic %f "%remote%\%~nf_WGS84.tif"
Jim, is there a way to use your excellent "for" commands above -- or another process perhaps -- to trim out portions of the generated file's name?

For example, I get a lovely re-projected "USGS_13_n36w107.tif" from your code, and I could save a lot of time if I could remove the "USGS_13_" bits, just leaving me with a clean "n36w107.tif" filename.

I imagine it's not possible, but given how much time it takes to do it by hand, it doesn't hurt anything to ask.
 
Messages
1,510
Country
unitedstates
I'd probably just use a quick & dirty rename after they were reprojected, first running something like dir /b USGS_13*.tif > tifs.txt which would result in a "tifs.txt" document listing all the files. I'd then open that in Textpad and use it's advanced coding functions like "block select mode" (just hold down the ALT key while selecting), "fill block" (right click a block of selected text), and/or maybe even a macro to turn it into a block of commands similar to this:

ren USGS_13_n32w107_WGS84.tif n32w107.tif
ren USGS_13_n32w108_WGS84.tif n32w108.tif
ren USGS_13_n32w109_WGS84.tif n32w109.tif
ren USGS_13_n33w104_WGS84.tif n33w104.tif
ren USGS_13_n33w105_WGS84.tif n33w105.tif
ren USGS_13_n33w106_WGS84.tif n33w106.tif
ren USGS_13_n33w107_WGS84.tif n33w107.tif
ren USGS_13_n33w108_WGS84.tif n33w108.tif

You can copy that entire block and paste it into a command window in one fell swoop, the command window will interpret the line breaks the same as pressing the Enter key so it'll walk through the list and rename them all in a blink. (you'll need to either copy a line break after the last line or press Enter in the command window to run the last command) Alternately you could save it as a .bat file and double-click it of course.

I'm sure it's possible to re-write the "for" command to do exactly what you want. It's complicated, you'll need to set up some sort of test scenario to work out the command so you don't screw up something in the process (like accidentally delete 25 Gb of downloaded DEMs, lol. Unlikely but...). To me it's usually just easier and quicker to do something like the above in Textpad. If you type "for /?" at a command prompt you'll get several screens of "help" on using "for" though. I think what you want to do can be done using "delims" but I'd have to screw with it a while and I don't have time right now, maybe I'll mess with it this evening.

Incidentally I get a lot of help with this stuff from here:


It's not nearly as active as it was several years ago and a lot of the helpful/knowledgeable old timers have either abandoned it or just lurk now, but I'm guessing you could search around and find a thread where someone's asked basically the same question but probably with some unrelated process that you could adapt.
 
Messages
1,510
Country
unitedstates
This is probably sloppy but it works. Problem is it works from a batch file but for some reason it's not working straight from the command line. I'll study it a bit and see if I can figure out what I'm doing wrong.

Code:
set dems=G:\Projects\New_Mexico_mesh_project\sources
set output=D:\Temp2\temp
setlocal enabledelayedexpansion
for %%f in ("%dems%\USGS_13_*.tif") do (
set filename=%%~nf
set shortname=!filename:~8,7!
gdalwarp -of GTiff -co "INTERLEAVE=PIXEL" -t_srs "+proj=latlong +datum=WGS84" -r cubic %%f "%output%\!shortname!.tif"
)

In set shortname=!filename:~8,7! the 8,7 is telling it to get 7 characters of the filename starting at the 8th so if you count to the 8th character (starting with zero) in USGS_13_n33w108.tif you get the lower case "n".

More examples because I suck at explaining things:

FSDeveloper:~0,2 = FS
FSDeveloper:~2,3 = Dev
FSDeveloper:~2,9 = Developer


The only way this works is if you get that part right, so as you move Eastward and for example your DEM filename might be USGS_13_n33w98.tif with only two characters in the longitude you'll need to modify it like so: set shortname=!filename:~8,6!
(actually I'm not sure it will matter because %~nf is "USGS_13_n33w98" without the .tif extension so there are only 6 characters to get anyway?)

To use it copy the code to Notepad or whatever and save it as reproject.bat. Make sure your %dems% and %output% paths are correct. Start the OSGeo4W shell and "call" the batch file with call "path\to\reproject.bat".

---------------------------------------------------------
Honestly this may be easier, just run the for command we started with but get rid of the _WGS84 in the output filename, so:

for %f in ("%dems%\*.tif") do gdalwarp -of GTiff -co "INTERLEAVE=PIXEL" -t_srs "+proj=latlong +datum=WGS84" -r cubic %f "%output%\%~nf.tif"

When it finishes doing it's thing you can just rename them all with this:

ren "%output%\USGS_13_*.tif" "////////*.tif"
 
Messages
1,510
Country
unitedstates
...for some reason it's not working straight from the command line. I'll study it a bit and see if I can figure out what I'm doing wrong.

I've found out Windows won't let you "setlocal enabledelayedexpansion" from a command line which is why I could only get this to work from a batch file. Delayed expansion is what allows the loop to walk through and reset the %filename% and %shortname% variables FOR each .tif in the %dems% folder. Without it it sets them once for the first file apparently and then tries to overwrite the first output file using the same output filename each time, that of course causes gdalwarp to throw up the "...some commandline options were provided indicating a new dataset should be created. Please delete existing dataset and run again." error. It is possible however to enable delayed expansion from a command line with cmd /v:on so the following set of commands do appear to work from the OSGeo4W shell if you don't want to mess with the .bat file:

Code:
cmd /v:on
set dems=G:\Projects\New_Mexico_mesh_project\sources
set output=D:\Temp2\temp
for %f in ("%dems%\USGS_13_*.tif") do (
set filename=%~nf
set shortname=!filename:~8,7!
gdalwarp -of GTiff -co "INTERLEAVE=PIXEL" -t_srs "+proj=latlong +datum=WGS84" -r cubic %f "%output%\!shortname!.tif"
)
 
Top