• Which the release of FS2020 we see an explosition of activity on the forun and of course we are very happy to see this. But having all questions about FS2020 in one forum becomes a bit messy. So therefore we would like to ask you all to use the following guidelines when posting your questions:

    • Tag FS2020 specific questions with the MSFS2020 tag.
    • Questions about making 3D assets can be posted in the 3D asset design forum. Either post them in the subforum of the modelling tool you use or in the general forum if they are general.
    • Questions about aircraft design can be posted in the Aircraft design forum
    • Questions about airport design can be posted in the FS2020 airport design forum. Once airport development tools have been updated for FS2020 you can post tool speciifc questions in the subforums of those tools as well of course.
    • Questions about terrain design can be posted in the FS2020 terrain design forum.
    • Questions about SimConnect can be posted in the SimConnect forum.

    Any other question that is not specific to an aspect of development or tool can be posted in the General chat forum.

    By following these guidelines we make sure that the forums remain easy to read for everybody and also that the right people can find your post to answer it.

Effects cause fps drop?

I think I got a sweet spot.
Only one emitter and bigger spot, increase X, Y, Z to 2 meters.
Make texture brighter to simulate the bright light in the middle.
Visibility range is good, the light is good and frame rate is acceptable.

Only one problem is the offset. I need another tool from Arno
to correct that.


VTBStaxilightFinal_zps74bc155f.jpg
 
got any from the air like the other page? looks good close up.

Here is the scene from the air. You can see that the visibility range is good.
If you can see the fps, it is up to 35.2 by this point of view. The terminal steal away fps more than the taxi lights and effects. The end of the taxiway is about 3000 meters away, measure in gmax model.


Nevertheless, I did separate the this light effect bgl file. So if someone have limited power of their PC, they can choose not to use this and fps is up considerably.
VTBStaxilightFinal2_zpsbf273c21.jpg
 
Last edited:
Looks good. Is the effect object model freely available? :) The taxi light and effect for it.

I don't think so. Since my model of taxi light has other texture with it.

But you can do it youself. It is just a cross plane with texture of taxi light on it.
The effect, I use from default white nav light effect (cannot remember the name of it) and change the color code, delete other emitter out. You can do that on notepad.

I'll show you the method later, it is easy.
 
Here comes the tutorial. I need to write it down since I might forget how to do it after some time.
 

Attachments

Hi,
I got an idea!
The visibility range is the problem for texture model only without effect.
Can we modify the mipmap texture to be just pure white so we can see the light from distance? I think we cannot see because of mipmap texture. The smaller it is, it will be like totally dark since most of the area are dark back ground.

Can we modify the mipmap texture individually?

It is generated outside of FS, and only called for use within FS, so there should be a way to do it. MIP is basically another form of LOD if I understand its function correctly.
 
Hi Guys,
I found a SWEETER spot!
I found that after I add the light from Scasm, the fps drop more and I don't like it.
Effect still have some detrimental effect to the fps, even only one emitter.

I changed my plan to edit mipmap using good old friend, ImageTool.

My original texture is 128x128 pixel and when I use ImageTool to do dds texture, it came out 6 mipmaps.

I think the solution for the visibility range is to manually edit mipmap. My plan is editing the last mipmap to be brighter than it's normal mipmap. The texture always has black background, when it comes to last mip, it turn to be all dark.

I opened up the texture with Photoshop then saveed as another file (xxx_mip01.psd) and reduce its size by half. Then do it all over again and save as (xxx_mip02.psd) then you will have texture that reduce size to half successively. I edited the last mipmap which is xxx_mip05.psd to be brighter almost pure white for the area that supposed to be the light of taxi light.

Then I used ImageTool to open my main texture. Do DXT5 and Mipmap and save it as dds. Then use Image->Add MipMaps and choose the PSD file that you have just edited (xxx._mip05.psd) and it will be your last mipmap, replace the default one.


OMB( OMG=Oh my God but I'm buddhist so I'll use OMB= Oh my lord Budda :D)
The visibility is excellent, the fps is excellent. I have to throw away my effect out now.

FinalTaxilight_zpsef39f089.jpg


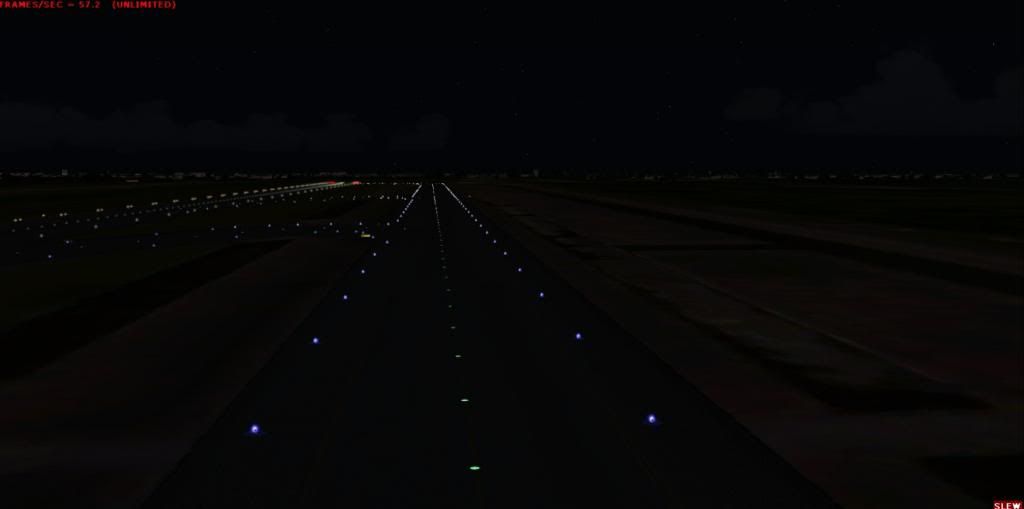
These are the taxi lights without effect (only texture or light) BEFORE editing mipmap.
FinalTaxilight02before_zpse11bcd4d.jpg


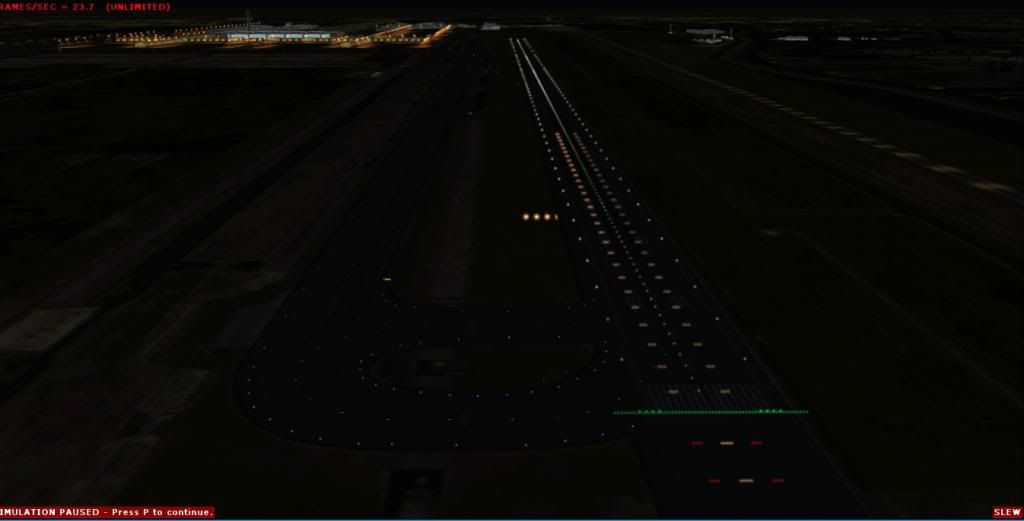
These are the taxi lights AFTER editing the mipmap. The last mipmap stay bright. So you can see it far...far....away.
FinalTaxilight02_zps53ed48e3.jpg


This is how mipmap was edited.

MipMap05_zps58b16fad.jpg
 
Last edited:
I found that you have to edit all the mipmap level together. Since if you edit only the last one the intensity of light is not smooth. It become dimmer and dimmer and suddenly bright to white on the last mipmap.

I did a correction and edit all the mipmap level and use ImageTool to incorporate those mipmap level to the texture right in the texture folder of FSX. You can see the change and gradually alter the brightness of the very last mipmap to suit to your preference.
 
Hi jtanabodee,

many thanks for your execution. But I have a question.

A lot of time I tested with the lights for Rwy- and Taxisigns. And I have a problem with the distance and visibility. After ca. 200-300 meters my lights decrease to zerro. I solved it to make the core of the light whiter, so I can see it from farther away. But the porblem is, that it is viewed from nearness, it looks not very good.

I think this decrease comes from the Box I have bound the effect. So the effect behaves as an Objekt and decrease with the distance. I think FSX cannot see, that we meen the effect is a light and so he decrease it.

I would like to make the lights as a stock airport. Arno wrote in Post 4 the stock lights are probably hardcopied. But why can ADE make the lights as stock and also e.g. Approaching Innsbruck, or Aerosoft Airports (Payware) can make the Rwy lights as a stock. And they (not ADE) put the effects exactly to the objects.

In their it works. In their airports the effect (lights) becomes stronger in the distance as an stock lights.
What they are doing differently than we do? I think we have to tell FSX, this is a light and not an object, but how?

Greetings Oli
 
Last edited:
If you want to use stock lights, you can add them as strings of lights in ADE.
 
I don't know either. I never use the models in download page.
Sorry for my English, I really don't understand the question.
Is that the problem of the effect? It is not relevant to this thread since I finally don't use effect.

If the taxi sign that you use from your gmax models, and you use your own texture, you can edit your mipmap to increase visibility.
But I don't think we need to see those signs miles away, do you?

Thanks tgibson for answer.

What are stock lights anyway?
 
Last edited:
Stock lights are the blue taxiway lights you see at all the default airports.
 
Hi,

and stock lights are also the runway lights, or the running lights before the runway at default airports, but also see it at payware airports, partially in the correct position of the objekts.

They becomes brigther (in realtion to the runway) if you go away, so you can see it from further away.

You can place it with ADE, but then they are not at the correct position as your place objects.

Now I found an article (from MOUSY) in this forum to place it, with occupancy of a BGL code. But I don´t know how to use this code (place it where... write it where... attach at object but how... and so on) this time.

Greetings
Oli
 
Stock lights are the blue taxiway lights you see at all the default airports.

Oh, I see. If you use the word "default" lights I would have understood that. "Stock" sounds like something in the library or something else.

Do you mean that the blue taxiway lights that is default and go with the taxiway that we draw in ADE?
I don't know that we can use this taxiway light since, by default, it should be under gmax ground poly.
Would you mind show me the thread that inform us how to use that?
 
Last edited:
I never saw you said this was a custom ground poly, sorry.

You can place the lights one by one in ADE, but it is a painful, trial and error process. Takes forever...
 
Back
Top