-
Which the release of FS2020 we see an explosition of activity on the forun and of course we are very happy to see this. But having all questions about FS2020 in one forum becomes a bit messy. So therefore we would like to ask you all to use the following guidelines when posting your questions:
- Tag FS2020 specific questions with the MSFS2020 tag.
- Questions about making 3D assets can be posted in the 3D asset design forum. Either post them in the subforum of the modelling tool you use or in the general forum if they are general.
- Questions about aircraft design can be posted in the Aircraft design forum
- Questions about airport design can be posted in the FS2020 airport design forum. Once airport development tools have been updated for FS2020 you can post tool speciifc questions in the subforums of those tools as well of course.
- Questions about terrain design can be posted in the FS2020 terrain design forum.
- Questions about SimConnect can be posted in the SimConnect forum.
Any other question that is not specific to an aspect of development or tool can be posted in the General chat forum.
By following these guidelines we make sure that the forums remain easy to read for everybody and also that the right people can find your post to answer it.
You are using an out of date browser. It may not display this or other websites correctly.
You should upgrade or use an alternative browser.
You should upgrade or use an alternative browser.
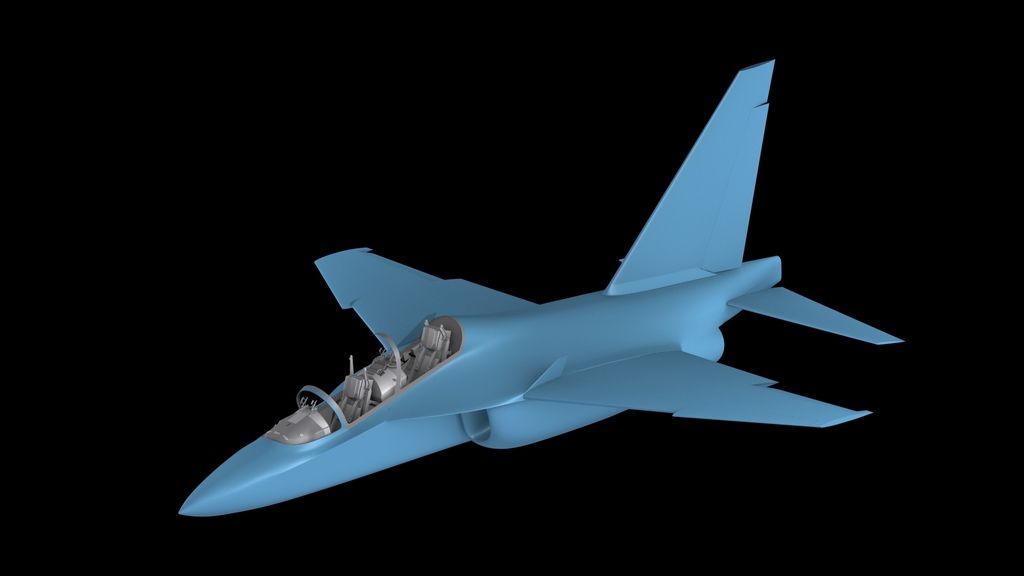
P3D v2 T-346A
- Thread starter SixGhost
- Start date


SixGhost
Resource contributor
- Messages
- 103
- Country

Yes it sure was, Tom. It's rather challenging to have a painter friendly layout AND the least amount of distortion with such a curvy mesh. It forces you to manually adjust every single UV vertex and it all takes time, probably more time now since the base mesh is richer than before. I'm open to suggestions on where you would place the seams and if you'd go with 2x4096 or Nx2048.
Paul Domingue
Resource contributor
- Messages
- 1,532
- Country

Tom's right it is an unenviable chore. I'm spending hours mapping and painting my Defiant. It takes time and a lot of correcting to get it correct and painter friendly.Yes it sure was, Tom. It's rather challenging to have a painter friendly layout AND the least amount of distortion with such a curvy mesh. It forces you to manually adjust every single UV vertex and it all takes time, probably more time now since the base mesh is richer than before. I'm open to suggestions on where you would place the seams and if you'd go with 2x4096 or Nx2048.
I would suggest cutting the fuselage and wings up. For the fuselage use planer maps at a minimum of six every 60 degrees.
If you want I can send you mapping images of a very similar aircraft I built as a reference example.
SixGhost
Resource contributor
- Messages
- 103
- Country
Tom's right it is an unenviable chore. I'm spending hours mapping and painting my Defiant. It takes time and a lot of correcting to get it correct and painter friendly.
I would suggest cutting the fuselage and wings up. For the fuselage use planer maps at a minimum of six every 60 degrees.
If you want I can send you mapping images of a very similar aircraft I built as a reference example.
Greetings Paul, yes please, I'd like to have a look at them if you don't mind, that way I can evaluate different approaches or outside the box thinking.
Wings and empennages are a walk in the park and will of course be detached from the main body. It's the fuselage that will give me headaches. Here's the old mapping just for reference.
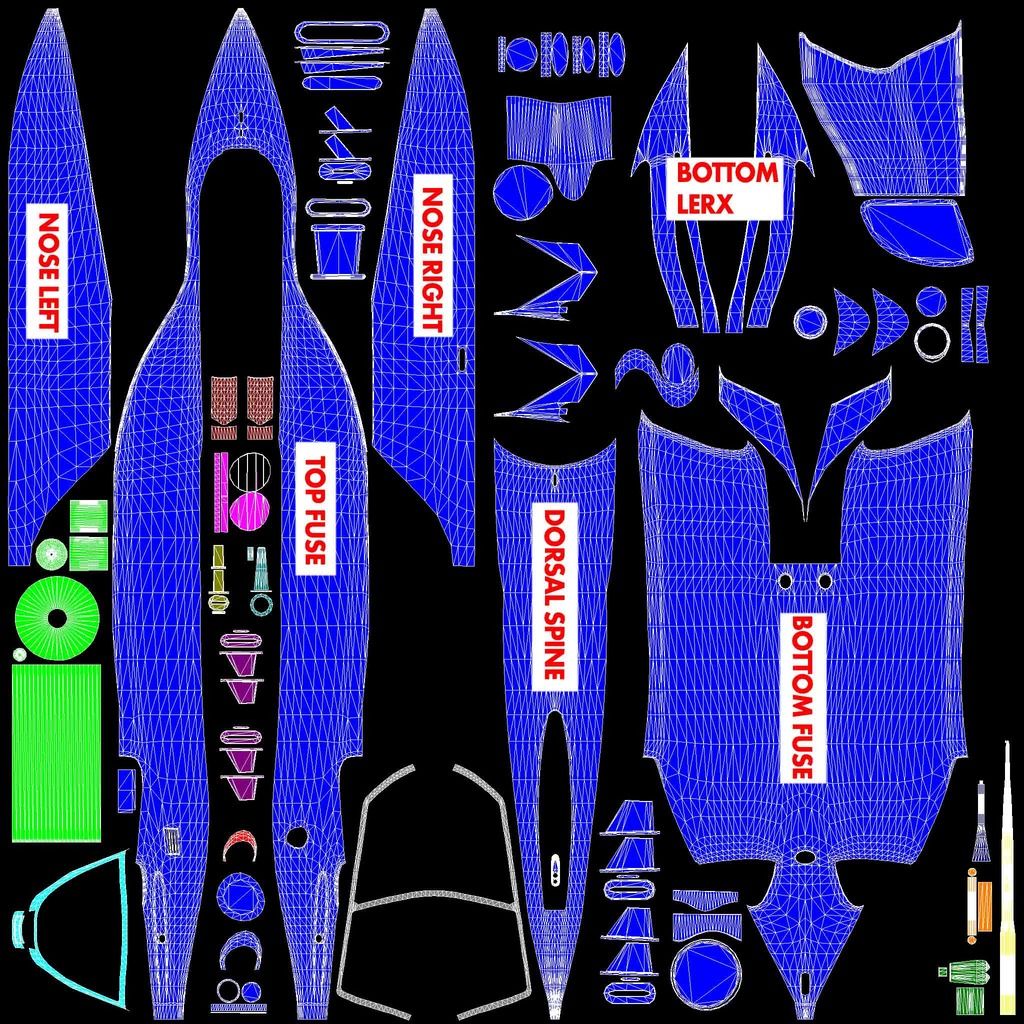
It was the most organized layout I came up with. All of the fuselage's UV islands are aligned horizontally so panel lines would have been easier to draw. The downside is that the lenght of the island covering the top fuselage pretty much dictates your layout and limits your max pixel density so the wings have to be mapped smaller giving you more unused texture space.
I'm considering using a similar layout but I may cut the top fuse island in two and rearrange the rest. The idea so far is to have 1 texture sheet for each wing, 1 for tailerons and vertical stab and as few as possible that cover the fuselage. (or 2 big 4k maps)
What would you do?
Paul Domingue
Resource contributor
- Messages
- 1,532
- Country
It looks like you have a good grasp on your mapping so far. With some experimenting and a lot of patients with out fear of redoing your work when necessary you will do fine.
For the main exterior of the model I have been expanding from 2048 on my earlier models to 4096 on my latest developments.
I'm no longer concerned with filling up an entire texture sheet by packing everything I can on one sheet. This is primarily to conform to FSX's limitations on vertex draw calls and still allow for high detail. Add specular and bump to a packed sheet and you run into problems. This is not the case for P3D v2.x and above but I want my stuff to work for FSX even though I only fly P3D.
Another thing I do on mapping the exterior is have two maps, one for the fuselage, v-stab, rudder, canopy, prop still, etc. The other is for wings, empennage, gear and bays. I will of course have other small maps for miscellaneous items.
I take the longest object on my model and set the planer map to slightly larger than this object. All the rest of the objects on both sheets will have the same dimension as this longest object (exterior model only). This maintains pixel integrity throughout for painting rivets and seems. Repainters will thank you and your work will be somewhat easier to attend to.
Send me a PM and I'll post some stuff on my Google drive for you.


Ronald
Resource contributor
- Messages
- 974
This is great stuff and an inspiring piece of modeling work (for me) Luca!
Thanks for posting the UV-map of your T346 exterior fuselage, this gives me a couple of nice hints, how to win finally the battle with my own babies "sleek and curved lines" (an YF-16 fuselage in Blender).
Thanks for posting the UV-map of your T346 exterior fuselage, this gives me a couple of nice hints, how to win finally the battle with my own babies "sleek and curved lines" (an YF-16 fuselage in Blender).
SixGhost
Resource contributor
- Messages
- 103
- Country
Thanks guys, way to keep me motivated!")
Ronald, don't take those uv's so seriously, they're nothing special, that's why I'll be redoing them. Keep in mind that a good uv map saves hours and hours of painting, sometimes it's best to study the real plane panelling and start from there. Panel lines are much more difficult to align than camos. Good luck!
Ronald, don't take those uv's so seriously, they're nothing special, that's why I'll be redoing them. Keep in mind that a good uv map saves hours and hours of painting, sometimes it's best to study the real plane panelling and start from there. Panel lines are much more difficult to align than camos. Good luck!
Ronald
Resource contributor
- Messages
- 974
Thanks for the tips Luca! (going back to that UV-unwrap / repaint hanger....)Keep in mind that a good uv map saves hours and hours of painting, sometimes it's best to study the real plane panelling and start from there. Panel lines are much more difficult to align than camos. Good luck!

SixGhost
Resource contributor
- Messages
- 103
- Country
Yeah but where's the challenge? Alx (Alessandro Biagi) would be very happy to hear that, he once tried to convince me into building one. Might I suggest a M.B.3 after that? Gorgeous plane.
I'm eagerly waiting for your showroom thread! #freethewhirlwind
I'm eagerly waiting for your showroom thread! #freethewhirlwind